Pro Custodibus On-Premises With Rootless Podman
This article will show you how to run the Pro Custodibus Community Edition in rootless containers with Podman and Podman Compose, secured with a Firewalld firewall and HTTPS certificates from Let’s Encrypt. This tutorial is similar to the Quick Start for Pro Custodibus On-Premises article, but will demonstrate using Pro Custodibus in a production configuration with a publicly-accessible HTTPS URL, instead of with a test configuration meant for local access only. Other notable differences from the Quick Start tutorial include:
-
Running Pro Custodibus in rootless Podman containers instead of with the rootful Docker daemon.
-
Using Let’s Encrypt to obtain TLS certificates for the Pro Custodibus API and app UI.
-
Using Firewalld to enable remote access to Pro Custodibus through the host firewall.
These are the steps we’ll walk through to get started with Pro Custodibus:
Provision Server
The very first thing we need is a publicly-accessible server with Podman, Podman Compose, and Firewalld installed on it.
|
Note
|
While the steps in this article will generally work with most any recent Linux distro, the commands and output show were run on Fedora 39. |
To install the Podman, Podman Compose, and Firewalld on a Fedora server (or a server running any of the many Fedora derivatives), run the following command:
$ sudo dnf install firewalld podman podman-compose
...
Install  71 Packages

Total download size: 61 M
Installed size: 291 M
Is this ok [y/N]: y
Downloading Packages:
...
Complete!
Set Up DNS
The next thing we need to do is decide on the DNS name we want to use for our on-premises version of Pro Custodibus. We’ll use this DNS name to access the Pro Custodibus app UI; and the WireGuard hosts monitored with Pro Custodibus will use this DNS name to access the Pro Custodibus API.
For this article, we’ll use the DNS name example123.arcemtene.com, which means that we’ll access the Pro Custodibus app UI of our on-premises version of Pro Custodibus at the following URL:
https://example123.arcemtene.com/For your own on-premises version of Pro Custodibus, you’ll probably want to choose a DNS name like procustodibus.example.com, where example.com is some domain name for which you have the ability to create DNS records.
Once we decide on a DNS name, we need to create a DNS record pointing that name to the publicly-accesible IP address of the server we’ve just provisioned for Pro Custodibus. How we do this exactly depends on our DNS provider; but for example, the example123.arcemtene.com record would look something like this in a DNS zone file:
$ORIGIN arcemtene.com.
$TTL 1h
; ...
example123            IN A    198.51.100.123
Set Up Firewall
Next, we’ll make sure Firewalld is up and allows access to TCP port 80 (which we’ll need to create our Let’s Encrypt certificates), as well as TCP port 443 (at which we’ll expose Pro Custodibus).
Run the following command to check if Firewalld is running:
$ sudo systemctl status firewalld
● firewalld.service - firewalld - dynamic firewall daemon
     Loaded: loaded (/usr/lib/systemd/system/firewalld.service; enabled; preset: enabled)
    Drop-In: /usr/lib/systemd/system/service.d
             └─10-timeout-abort.conf
     Active: active (running) since Fri 2023-10-20 18:44:42 UTC; 40s ago
       Docs: man:firewalld(1)
   Main PID: 27637 (firewalld)
      Tasks: 2 (limit: 2074)
     Memory: 25.3M
        CPU: 515ms
     CGroup: /system.slice/firewalld.service
             └─27637 /usr/bin/python3 -sP /usr/sbin/firewalld --nofork --nopid

Oct 20 18:44:42 example123 systemd[1]: Starting firewalld.service - firewalld - dynamic firewall daemon...
Oct 20 18:44:42 example123 systemd[1]: Started firewalld.service - firewalld - dynamic firewall daemon.
In this case it is, but if not, start it with the following command:
$ sudo systemctl start firewalld
Next, we need to allow public access to TCP ports 80 and 443. However, because we will be using rootless Podman to run Pro Custodibus, the containers running Pro Custodibus won’t be able to bind to any ports on the host lower than 1024 (at least not without relaxing some useful security restrictions).
Therefore, we’ll actually have the containers running Pro Custodibus bind to TCP ports 8080 and 8443 on the host, and use Firewalld to forward the host’s TCP ports 80 and 443 to ports 8080 and 8443. Run the following commands to accomplish this:
$ sudo firewall-cmd --zone=public --add-forward-port='port=80:proto=tcp:toport=8080'
success
$ sudo firewall-cmd --zone=public --add-forward-port='port=443:proto=tcp:toport=8443'
success
After we run the port-forwarding commands, the configuration for Firewalld’s public zone should look something like the following:
$ sudo firewall-cmd --info-zone=public
public (active)
  target: default
  ingress-priority: 0
  egress-priority: 0
  icmp-block-inversion: no
  interfaces: eth0
  sources:
  services: dhcpv6-client mdns ssh
  ports:
  protocols:
  forward: yes
  masquerade: no
  forward-ports:
        port=80:proto=tcp:toport=8080:toaddr=
        port=443:proto=tcp:toport=8443:toaddr=
  source-ports:
  icmp-blocks:
  rich rules:
Test it out by running a dummy Python server on TCP port 8080:
$ mkdir /tmp/dummyserver && cd /tmp/dummyserver
$ python3 -m http.server 8080
Serving HTTP on 0.0.0.0 port 8080 (http://0.0.0.0:8080/) ...
From a different machine, attempt to access that server, using TCP port 80 and the DNS name we chose in the Set Up DNS section above:
$ curl http://example123.arcemtene.com/
<!DOCTYPE HTML>
<html lang="en">
<head>
<meta charset="utf-8">
<title>Directory listing for /</title>
</head>
<body>
<h1>Directory listing for /</h1>
<hr>
<ul>
</ul>
<hr>
</body>
</html>
If it works, we’re ready to deploy Pro Custodibus to the server. Make sure to kill the dummy Python server first, though, to free up port 8080 (press control-C to kill it):
203.0.113.99 - - [20/Oct/2023 20:37:07] "GET / HTTP/1.1" 200 -
^C
Keyboard interrupt received, exiting.
And also run the following command to persist the current Firewalld configuration across reboots:
$ sudo firewall-cmd --runtime-to-permanent
success
Generate Docker-Compose File
Now we’re ready to deploy Pro Custodibus. First, create a directory on the server somewhere convenient to store the docker-compose.yml and other configuration files for Pro Custodibus:
$ sudo mkdir -p /srv/containers/procustodibus
$ sudo chown $USER:$(id -g) /srv/containers/procustodibus
$ cd /srv/containers/procustodibus
Then download the generate-docker-compose.sh script from the API source-code repository, and run it:
$ curl -L -c /tmp/srht.cookies -b /tmp/srht.cookies https://git.sr.ht/~arx10/procustodibus-api/blob/main/ops/install/generate-docker-compose.sh | bash -s
|
Tip
|
To install the Enterprise Edition instead of the Community Edition, run the script with |
This script will prompt for a few important configuration settings. For the first prompt, we’ll enter the DNS name we set up in the Set Up DNS section earlier (example123.arcemtene.com):
The "canonical" URL is the URL end-users enter into their browser to access
Pro Custodibus. For example, "https://pro.custodib.us" is the canonical URL of
the SaaS edition. With this URL, the host is "pro.custodib.us", the scheme is
"https", and the port is "443" (the default for the scheme).

For on-premises editions, we recommend setting the canonical URL to one like
the following, where your organization controls the domain name "example.com":

https://procustodibus.example.com

Enter the canonical URL host (eg procustodibus.example.com): example123.arcemtene.com
Since we want to use https://example123.arcemtene.com for the canonical URL, accept the defaults (https and 443) for the next two prompts:
Enter the canonical URL scheme (default https):
Enter the canonical URL port (default 443):
The next two prompts after that concern sending mail; if we have an SMTP relay server running locally on TCP port 25 of the server, the defaults will send mail through that SMTP server as procustodibus@example123.arcemtene.com:
Enter the SMTP server address (default host.docker.internal):
NOTE: If this SMTP server requires SSL or authentication, you must configure it
via the environment variables in the api.env file.
Enter the 'From' address emails will use (default procustodibus@example123.arcemtene.com):
  % Total    % Received % Xferd  Average Speed   Time    Time     Time  Current
                                 Dload  Upload   Total   Spent    Left  Speed
100  6714  100  6714    0     0   9426      0 --:--:-- --:--:-- --:--:--  9416
If you don’t have an SMTP server available through which to send email from Pro Custodibus, that’s okay — just accept the defaults (to attempt to send mail through a local relay), and Pro Custodibus will simply fail gracefully without issues any time it attempts to send mail (you can configure it later if you decide you do want to get mail working).
The last two prompts ask about Let’s Encrypt certificates. Enter yes (or accept the default yes value) for the first prompt to use Let’s Encrypt; and for the second, enter the email address at which you want to receive notices from Let’s Encrypt about certificate expiry:
Use letsencrypt certbot to automatically manage SSL certificates? (default yes): yes
  % Total    % Received % Xferd  Average Speed   Time    Time     Time  Current
                                 Dload  Upload   Total   Spent    Left  Speed
100   932  100   932    0     0   2107      0 --:--:-- --:--:-- --:--:--  2113
  % Total    % Received % Xferd  Average Speed   Time    Time     Time  Current
                                 Dload  Upload   Total   Spent    Left  Speed
100   815  100   815    0     0   1834      0 --:--:-- --:--:-- --:--:--  1831
  % Total    % Received % Xferd  Average Speed   Time    Time     Time  Current
                                 Dload  Upload   Total   Spent    Left  Speed
100   177  100   177    0     0    168      0  0:00:01  0:00:01 --:--:--   170
Enter the email address to use for the letsencrypt account (eg me@example.com): justin@arcemtene.com
  % Total    % Received % Xferd  Average Speed   Time    Time     Time  Current
                                 Dload  Upload   Total   Spent    Left  Speed
100   440  100   440    0     0    582      0 --:--:-- --:--:-- --:--:--   582
  % Total    % Received % Xferd  Average Speed   Time    Time     Time  Current
                                 Dload  Upload   Total   Spent    Left  Speed
100  1344  100  1344    0     0   3442      0 --:--:-- --:--:-- --:--:--  3446
Once the script completes, it will have created the following directory structure in the current working directory:
$ tree
.
├── acme-challenge
├── api.env
├── app.env
├── config
│   └── license
├── docker-compose.yml
├── initdb
│   └── init.sql
├── letsencrypt
│   └── cli.ini
├── nginx
│   └── procustodibus.conf
└── work

8 directories, 6 files
The api.env and app.env files contain the configuration for the Pro Custodibus API server and app UI components, respectively. The letsencrypt/cli.ini file contains the configuration for the Let’s Encrypt Certbot; and the nginx/procustodibus.conf file contains the NGINX configuration to terminate TLS connections, serve the static app UI files, and reverse proxy the API.
Run Podman-Compose
Before running Podman Compose for the first time, we need to make one adjustment to the generated docker-compose.yml file. The generated file will try to bind the app container to the host’s TCP ports 80 and 443:
  app:
    env_file:
    - app.env
    image: docker.io/procustodibus/app-ce
    ports:
    - 80:80
    - 443:443
This will fail with a “bind: permission denied” error if we try to run it with rootless Podman. Therefore, change the docker-compose.yml file to instead bind the app container to the host’s TCP ports 8080 and 8443:
  app:
    env_file:
    - app.env
    image: docker.io/procustodibus/app-ce
    ports:
    - 8080:80
    - 8443:443
The port forwarding we set up in the Set Up Firewall section earlier will forward the host’s TCP ports 80 and 443 to ports 8080 and 8443 (which Podman will then forward to the app container’s own ports 80 and 443).
With the ports in the docker-compose.yml file adjusted, we can now run Podman Compose:
$ podman-compose up                                           21:24:03 [185/185]
podman-compose version: 1.0.6
['podman', '--version', '']
using podman version: 4.7.0
** excluding:  set()
['podman', 'ps', '--filter', 'label=io.podman.compose.project=procustodibus', '-a', '--format', '{{ index .Labels "io.podman.compose.config-hash"}}']
['podman', 'network', 'exists', 'procustodibus_default']
['podman', 'network', 'create', '--label', 'io.podman.compose.project=procustodibus', '--label', 'com.docker.compose.project=procustodibus', 'procustodibus_default']
['podman', 'network', 'exists', 'procustodibus_default']
podman create --name=procustodibus_api_1 --label io.podman.compose.config-hash=24d1a8c04cbb21b023ee00312a7c11f75eef0489b1daa5d7d21ad9ade3c2da95 --label io.podman.compose.project=procustodibus --label io.podman.compose.version=1.0.6 --label PODMAN_SYSTEMD_UNIT=podman-compose@procustodibus.service --label com.docker.compose.project=procustodibus --label com.docker.compose.project.working_dir=/srv/containers/procustodibus --label com.docker.compose.project.config_files=docker-compose.yml --label com.docker.compose.container-number=1 --label com.docker.compose.service=api --env-file /srv/containers/procustodibus/api.env -v /srv/containers/procustodibus/config:/etc/procustodibus:Z -v /srv/containers/procustodibus/work:/work:z --net procustodibus_default --network-alias api --restart unless-stopped docker.io/procustodibus/api-ce
Trying to pull docker.io/procustodibus/api-ce:latest...
Getting image source signatures
Copying blob 25c0c638a779 done   |
Copying blob fc521c5b9835 done   |
Copying blob 4ded46c9afa4 done   |
Copying blob 43dbec1edaf1 done   |
Copying blob 4f4fb700ef54 done   |
Copying config 09fa500416 done   |
Writing manifest to image destination
3bd63db4beaa77c61c425f57a8387f67244f33b9c657f4f75f8a2c7717a01ece
exit code: 0
['podman', 'network', 'exists', 'procustodibus_default']
podman create --name=procustodibus_app_1 --label io.podman.compose.config-hash=24d1a8c04cbb21b023ee00312a7c11f75eef0489b1daa5d7d21ad9ade3c2da95 --label io.podman.compose.project=procustodibus --label io.podman.compose.version=1.0.6 --label PODMAN_SYSTEMD_UNIT=podman-compose@procustodibus.service --label com.docker.compose.project=procustodibus --label com.docker.compose.project.working_dir=/srv/containers/procustodibus --label com.docker.compose.project.config_files=docker-compose.yml --label com.docker.compose.container-number=1 --label com.docker.compose.service=app --env-file /srv/containers/procustodibus/app.env -v /srv/containers/procustodibus/acme-challenge:/var/www/certbot:Z -v /srv/containers/procustodibus/letsencrypt:/etc/letsencrypt:Z -v /srv/containers/procustodibus/nginx:/etc/nginx/conf.d:Z -v /srv/containers/procustodibus/work:/work:z --net procustodibus_default --network-alias app -p 8080:80 -p 8443:443 --restart unless-stopped docker.io/procustodibus/app-ce
Trying to pull docker.io/procustodibus/app-ce:latest...
Getting image source signatures
Copying blob 8c74c6df0f24 done   |
Copying blob 579b34f0a95b done   |
Copying blob fea24dc82305 done   |
Copying blob 33bc802d8197 done   |
Copying blob 6330dee112a3 done   |
Copying blob c1130fde9e6a done   |
Copying blob 720f04823631 done   |
Copying blob 997041a86136 done   |
Copying blob 4f4930dba346 done   |
Copying blob 9bd0f37206bd done   |
Copying blob 8c90628c7196 done   |
Copying blob 4f4fb700ef54 skipped: already exists
Copying config e371173132 done   |
Writing manifest to image destination
d32817924740ce02281b62aefa1a77a15914187112f90c364711b7e610ccf7ac
exit code: 0
podman volume inspect procustodibus_db || podman volume create procustodibus_db
['podman', 'volume', 'inspect', 'procustodibus_db']
Error: no such volume procustodibus_db
['podman', 'volume', 'create', '--label', 'io.podman.compose.project=procustodibus', '--label', 'com.docker.compose.project=procustodibus', 'procustodibus_db']
['podman', 'volume', 'inspect', 'procustodibus_db']
['podman', 'network', 'exists', 'procustodibus_default']
podman create --name=procustodibus_db_1 --label io.podman.compose.config-hash=24d1a8c04cbb21b023ee00312a7c11f75eef0489b1daa5d7d21ad9ade3c2da95 --label io.podman.compose.project=procustodibus --label io.podman.compose.version=1.0.6 --label PODMAN_SYSTEMD_UNIT=podman-compose@procustodibus.service --label com.docker.compose.project=procustodibus --label com.docker.compose.project.working_dir=/srv/containers/procustodibus --label com.docker.compose.project.config_files=docker-compose.yml --label com.docker.compose.container-number=1 --label com.docker.compose.service=db -e POSTGRES_PASSWORD=nMBgMJ6hvQgB56xS -v procustodibus_db:/var/lib/postgresql/data -v /srv/containers/procustodibus/initdb:/docker-entrypoint-initdb.d:Z -v /srv/containers/procustodibus/work:/work:z --net procustodibus_default --network-alias db --restart unless-stopped docker.io/postgres:alpine
Trying to pull docker.io/library/postgres:alpine...
Getting image source signatures
Copying blob 23188c26e131 done   |
Copying blob 579b34f0a95b skipped: already exists
Copying blob a1755e5b6687 done   |
Copying blob 57128d869f41 done   |
Copying blob 0ce6c9594066 done   |
Copying blob 18090f101ca2 done   |
Copying blob e7d671ebc4aa done   |
Copying blob 69c2c86cea90 done   |
Copying config 422e6c2b0c done   |
Writing manifest to image destination
969a3efba8149073410cf5f2d6a489ba9e1c45bde0caf2b60df15d9893a88f43
exit code: 0
podman start -a procustodibus_api_1
podman start -a procustodibus_app_1
[app] | Fri Oct 20 21:24:11 UTC 2023 generate dummy cert
2023/10/20 21:24:11 [notice] 19#19: using the "epoll" event method
2023/10/20 21:24:11 [notice] 19#19: nginx/1.25.2
2023/10/20 21:24:11 [notice] 19#19: built by gcc 12.2.1 20220924 (Alpine 12.2.1_git20220924-r10)
2023/10/20 21:24:11 [notice] 19#19: OS: Linux 6.5.6-300.fc39.aarch64
2023/10/20 21:24:11 [notice] 19#19: getrlimit(RLIMIT_NOFILE): 524288:524288
2023/10/20 21:24:11 [notice] 19#19: start worker processes
2023/10/20 21:24:11 [notice] 19#19: start worker process 21
2023/10/20 21:24:11 [notice] 19#19: start worker process 22
[api] | 21:24:11.699 [error] Postgrex.Protocol (#PID<0.167.0>) failed to connect: ** (DBConnection.ConnectionError) tcp connect (db:5432): non-existing domain - :nxdomain
[api] | 21:24:11.699 [error] Postgrex.Protocol (#PID<0.166.0>) failed to connect: ** (DBConnection.ConnectionError) tcp connect (db:5432): non-existing domain - :nxdomain
podman start -a procustodibus_db_1
[db]  | The files belonging to this database system will be owned by user "postgres".
[db]  | This user must also own the server process.
[db]  |
[db]  | The database cluster will be initialized with locale "en_US.utf8".
[db]  | The default database encoding has accordingly been set to "UTF8".
[db]  | The default text search configuration will be set to "english".
[db]  |
[db]  | Data page checksums are disabled.
[db]  |
[db]  | fixing permissions on existing directory /var/lib/postgresql/data ... ok
[db]  | creating subdirectories ... ok
[db]  | selecting dynamic shared memory implementation ... posix
[db]  | selecting default max_connections ... 100
[db]  | selecting default shared_buffers ... 128MB
[db]  | selecting default time zone ... UTC
[db]  | creating configuration files ... ok
[db]  | running bootstrap script ... ok
sh: locale: not found
2023-10-20 21:24:13.315 UTC [25] WARNING:  no usable system locales were found
[db]  | performing post-bootstrap initialization ... ok
** (DBConnection.ConnectionError) connection not available and request was dropped from queue after 2966ms. This means requests are coming in and your connection pool cannot serve them fast enough. You can address this by:

  1. Ensuring your database is available and that you can connect to it
  2. Tracking down slow queries and making sure they are running fast enough
  3. Increasing the pool_size (although this increases resource consumption)
  4. Allowing requests to wait longer by increasing :queue_target and :queue_interval

See DBConnection.start_link/2 for more information

    (ecto_sql 3.10.2) lib/ecto/adapters/sql.ex:1047: Ecto.Adapters.SQL.raise_sql_call_error/1
    (ecto_sql 3.10.2) lib/ecto/adapters/sql.ex:667: Ecto.Adapters.SQL.table_exists?/3
    (api 1.1.1) lib/api/repo.ex:32: anonymous fn/1 in Api.Repo.Migrator.bootstrap/0
    (ecto_sql 3.10.2) lib/ecto/migrator.ex:170: Ecto.Migrator.with_repo/3
    (api 1.1.1) lib/api/ops/migrator.ex:16: Api.Ops.Migrator.migrate/0
    nofile:1: (file)
    (stdlib 5.0.2) erl_eval.erl:750: :erl_eval.do_apply/7
[db]  | syncing data to disk ... ok
[db]  |
[db]  |
[db]  | Success. You can now start the database server using:
[db]  |
[db]  |     pg_ctl -D /var/lib/postgresql/data -l logfile start
[db]  |
initdb: warning: enabling "trust" authentication for local connections
initdb: hint: You can change this by editing pg_hba.conf or using the option -A, or --auth-local and --auth-host, the next time you run initdb.
[db]  | waiting for server to start....2023-10-20 21:24:16.415 UTC [31] LOG:  starting PostgreSQL 16.0 on aarch64-unknown-linux-musl, compiled by gcc (Alpine 12.2.1_git20220924-r10) 12.2.1 20220924, 64-bit
[db]  | 2023-10-20 21:24:16.419 UTC [31] LOG:  listening on Unix socket "/var/run/postgresql/.s.PGSQL.5432"
[db]  | 2023-10-20 21:24:16.427 UTC [34] LOG:  database system was shut down at 2023-10-20 21:24:13 UTC
[db]  | 2023-10-20 21:24:16.434 UTC [31] LOG:  database system is ready to accept connections
[db]  |  done
[db]  | server started
[db]  |
[db]  | /usr/local/bin/docker-entrypoint.sh: running /docker-entrypoint-initdb.d/init.sql
[db]  | CREATE ROLE
[db]  | CREATE DATABASE
[db]  |                                                        21:24:26 [44/185]
[db]  |
[db]  | waiting for server to shut down...2023-10-20 21:24:16.609 UTC [31] LOG:  received fast shutdown request
[db]  | .2023-10-20 21:24:16.611 UTC [31] LOG:  aborting any active transactions
[db]  | 2023-10-20 21:24:16.614 UTC [31] LOG:  background worker "logical replication launcher" (PID 37) exited with exit code 1
[db]  | 2023-10-20 21:24:16.615 UTC [32] LOG:  shutting down
[db]  | 2023-10-20 21:24:16.618 UTC [32] LOG:  checkpoint starting: shutdown immediate
[app] | Fri Oct 20 21:24:16 UTC 2023 run certbot
Saving debug log to /var/log/letsencrypt/letsencrypt.log
[db]  | .2023-10-20 21:24:17.691 UTC [32] LOG:  checkpoint complete: wrote 932 buffers (5.7%); 0 WAL file(s) added, 0 removed, 0 recycled; write=0.054 s, sync=0.976 s, total=1.076 s; sync files=308, longest=0.029 s, average=0.004 s; distance=4260 kB, estimate=4260 kB; lsn=0/19135D0, redo lsn=0/19135D0
[db]  | 2023-10-20 21:24:17.719 UTC [31] LOG:  database system is shut down
[db]  |  done
[db]  | server stopped
[db]  |
[db]  | PostgreSQL init process complete; ready for start up.
[db]  |
2023-10-20 21:24:17.878 UTC [1] LOG:  starting PostgreSQL 16.0 on aarch64-unknown-linux-musl, compiled by gcc (Alpine 12.2.1_git20220924-r10) 12.2.1 20220924, 64-bit
2023-10-20 21:24:17.878 UTC [1] LOG:  listening on IPv4 address "0.0.0.0", port 5432
2023-10-20 21:24:17.879 UTC [1] LOG:  listening on IPv6 address "::", port 5432
2023-10-20 21:24:17.883 UTC [1] LOG:  listening on Unix socket "/var/run/postgresql/.s.PGSQL.5432"
2023-10-20 21:24:17.890 UTC [47] LOG:  database system was shut down at 2023-10-20 21:24:17 UTC
2023-10-20 21:24:17.897 UTC [1] LOG:  database system is ready to accept connections
[api] | 21:24:18.760 [info] initializing database
[api] | 21:24:20.759 [info] database initialized successfully
[api] | 21:24:21.024 [info] == Running 20200101000000 Api.Repo.Migrations.CreateSuperArcemOrganization.up/0 forward
[api] | 21:24:21.041 [info] == Migrated 20200101000000 in 0.0s
[api] | 21:24:21.073 [info] == Running 20230915091812 Api.Repo.Migrations.CreateSystemAuthnChallengesTable.change/0 forward
[api] | 21:24:21.073 [info] create table system_authn_challenges
[api] | 21:24:21.099 [info] create index system_authn_challenges_pub_id_index
[api] | 21:24:21.111 [info] == Migrated 20230915091812 in 0.0s
[api] | 21:24:28.969 [info] Running ApiWeb.Endpoint with cowboy 2.10.0 at :::4000 (http)
[api] | 21:24:28.980 [info] Access ApiWeb.Endpoint at https://example123.arcemtene.com
[app] | Account registered.
[app] | Requesting a certificate for example123.arcemtene.com
[app] | 10.89.0.3 - - [20/Oct/2023:21:24:38 +0000] "GET /.well-known/acme-challenge/8qLtWuP-LJRLQdZhPztl2sYa1Xl3mTnUN2pKMstcFbg HTTP/1.1" 200 87 "-" "Mozilla/5.0 (compatible; Let's Encrypt validation server; +https://www.letsencrypt.org)" "-"
[app] | 10.89.0.3 - - [20/Oct/2023:21:24:38 +0000] "GET /.well-known/acme-challenge/8qLtWuP-LJRLQdZhPztl2sYa1Xl3mTnUN2pKMstcFbg HTTP/1.1" 200 87 "-" "Mozilla/5.0 (compatible; Let's Encrypt validation server; +https://www.letsencrypt.org)" "-"
[app] | 10.89.0.3 - - [20/Oct/2023:21:24:38 +0000] "GET /.well-known/acme-challenge/8qLtWuP-LJRLQdZhPztl2sYa1Xl3mTnUN2pKMstcFbg HTTP/1.1" 200 87 "-" "Mozilla/5.0 (compatible; Let's Encrypt validation server; +https://www.letsencrypt.org)" "-"
[app] |
[app] | Successfully received certificate.
[app] | Certificate is saved at: /etc/letsencrypt/live/example123.arcemtene.com/fullchain.pem
[app] | Key is saved at:         /etc/letsencrypt/live/example123.arcemtene.com/privkey.pem
[app] | This certificate expires on 2024-01-18.
[app] | These files will be updated when the certificate renews.
[app] | NEXT STEPS:
[app] | - The certificate will need to be renewed before it expires. Certbot can automatically renew the certificate in the background, but you may need to take steps to enable that functionality. See https://certbot.org/renewal-setup for instructions.
[app] |
[app] | - - - - - - - - - - - - - - - - - - - - - - - - - - - - - - - - - - - - - - - -
[app] | If you like Certbot, please consider supporting our work by:
[app] |  * Donating to ISRG / Let's Encrypt:   https://letsencrypt.org/donate
[app] |  * Donating to EFF:                    https://eff.org/donate-le
[app] | - - - - - - - - - - - - - - - - - - - - - - - - - - - - - - - - - - - - - - - -
2023/10/20 21:24:40 [notice] 9#9: signal process started
2023/10/20 21:24:40 [notice] 19#19: signal 1 (SIGHUP) received from 9, reconfiguring
2023/10/20 21:24:40 [notice] 19#19: reconfiguring
2023/10/20 21:24:40 [notice] 19#19: using the "epoll" event method
2023/10/20 21:24:40 [notice] 19#19: start worker processes
2023/10/20 21:24:40 [notice] 19#19: start worker process 27
2023/10/20 21:24:40 [notice] 19#19: start worker process 28
2023/10/20 21:24:41 [notice] 21#21: gracefully shutting down
2023/10/20 21:24:41 [notice] 22#22: gracefully shutting down
2023/10/20 21:24:41 [notice] 22#22: exiting
2023/10/20 21:24:41 [notice] 21#21: exiting
2023/10/20 21:24:41 [notice] 21#21: exit
2023/10/20 21:24:41 [notice] 22#22: exit
2023/10/20 21:24:41 [notice] 19#19: signal 17 (SIGCHLD) received from 21
2023/10/20 21:24:41 [notice] 19#19: worker process 21 exited with code 0
2023/10/20 21:24:41 [notice] 19#19: worker process 22 exited with code 0
2023/10/20 21:24:41 [notice] 19#19: signal 29 (SIGIO) received
Once the Certbot receives a certificate from Let’s Encrypt, and NGINX reloads its configuration with the new cert, we can test connecting to the API server with cURL:
$ curl -w'\n' https://example123.arcemtene.com/api/health
[
  {
    "error": null,
    "healthy": true,
    "name": "DB",
    "time": 2248
  }
]
We should see a healthy response from cURL; and the following output at the end of the Podman Compose logging:
[api] | 21:25:43.288 request_id=F4_uNrXYIs2P_REAAAIi remote_ip=::ffff:10.89.0.6 [info] GET /health
[app] | 10.89.0.6 - - [20/Oct/2023:21:25:43 +0000] "GET /api/health HTTP/1.1" 200 86 "-" "curl/8.2.1" "-"
[api] | 21:25:43.293 request_id=F4_uNrXYIs2P_REAAAIi remote_ip=::ffff:10.89.0.6 [info] Sent 200 in 5ms
|
Note
|
If you messed up the firewall settings, and the Let’s Encrypt servers can’t access the
If you do that, the Certbot will re-request a TLS certificate from Let’s Encrypt (using the configuration from |
Create Initial User
With the Pro Custodibus containers now up and running, switch to a web browser, and navigate to the Pro Custodibus app UI using the DNS name you choose in the Set Up DNS step. Append /signup to the canonical URL you chose, navigating to the initial Sign Up page:
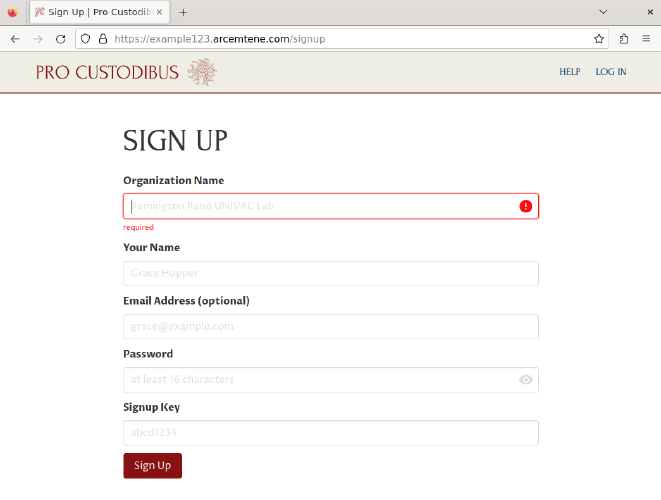
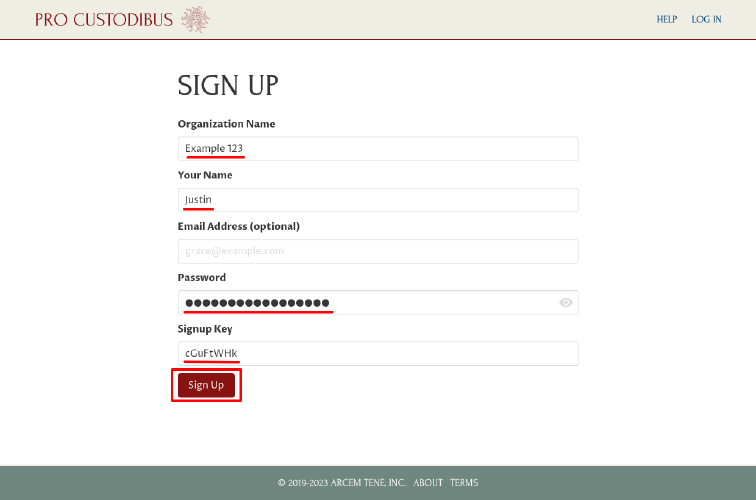
This page will allow us to create an initial user account with which to use the app UI. Fill out the following fields of the Sign Up form:
- Organization Name
-
Enter a display name for the organization whose WireGuard hosts you will be monitoring (eg “Example Network”).
- Your Name
-
Enter a display name for your initial user (eg “Justin”).
- Email Address
-
Enter the email address where you want to receive alerts and password-reset notifications for this user (eg “justin@arcemtene.com”) — or just leave this blank if you aren’t going to set up an SMTP relay server through which Pro Custodibus can send mail.
- Password
-
Enter a password (of 16 characters or more) with which to log in as this user in the future.
- Signup Key
-
Copy the value of the
SIGNUP_KEYenvironment variable from theapi.envfile (sibling of thedocker-compose.ymlfile), and paste it into this field.TipUse
grepto quickly find theSIGNUP_KEYvalue:$ grep SIGNUP_KEY api.env SIGNUP_KEY=cGuFtWHk
Then click the Sign Up button at the bottom of the form:
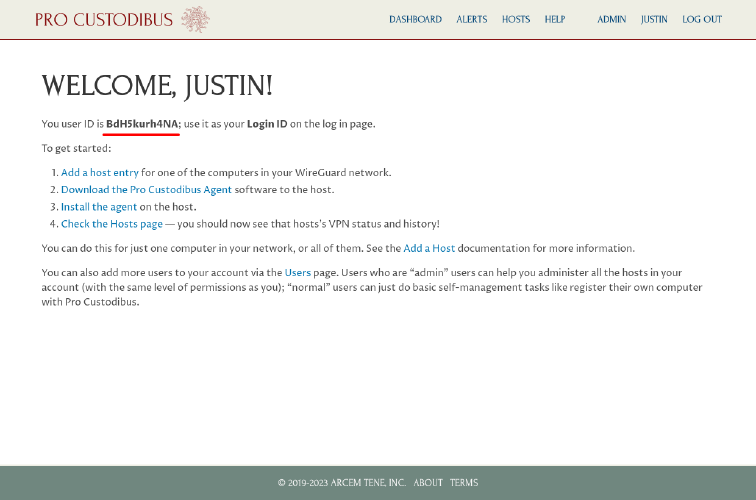
We now have access through the app UI to our on-premises Pro Custodibus instance. Copy the Login ID shown on the Welcome page to your password manager — use it and the password you entered on the Sign Up page to log into Pro Custodibus in the future:
Add First WireGuard Host
On the Welcome page, click the Add a host entry link:
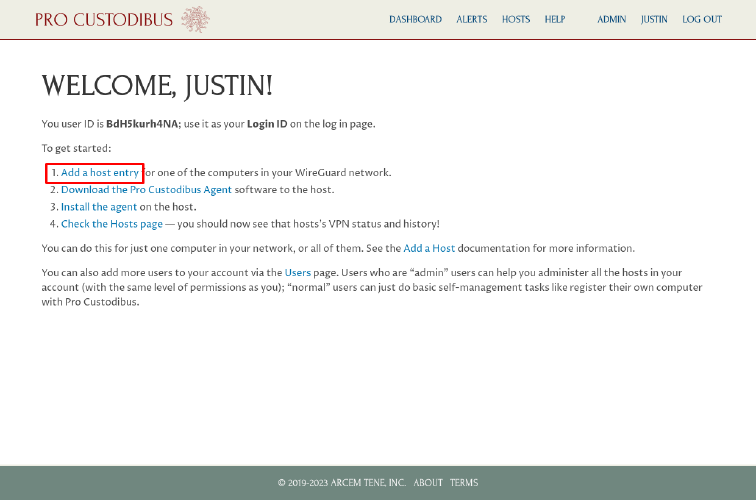
This will take us to a page where we can add our first WireGuard host to manage and monitor.
|
Tip
|
You can access this same Add Host page later by clicking the Hosts link in the top navigation bar, and then clicking the Add icon (plus sign) in the top right of the Hosts panel. |
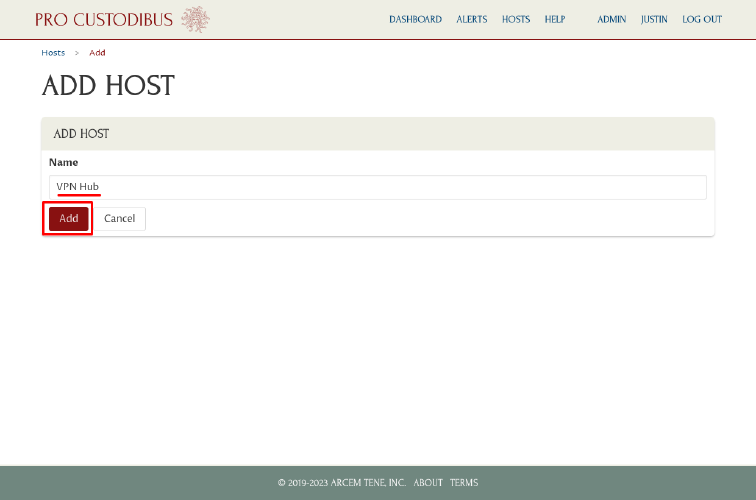
On the Add Host page, enter a display name for the WireGuard host in the Name field (eg “VPN Hub”), and then click the Add button:
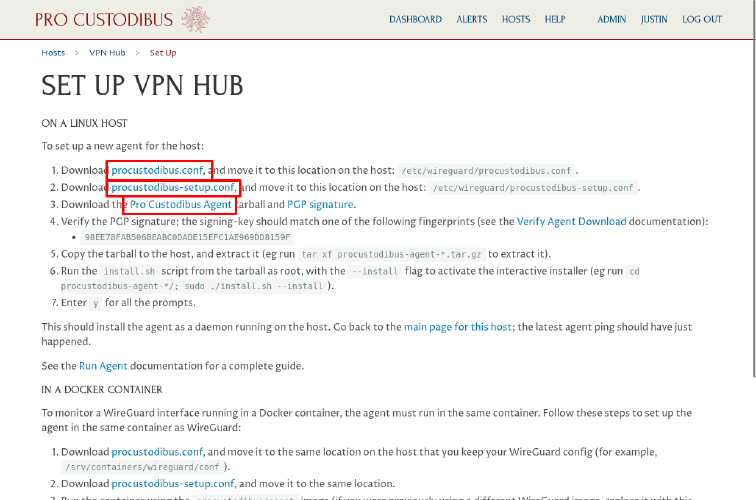
On the resulting Set Up page, download the procustodibus.conf and procustodibus-setup.conf files, as well as the Pro Custodibus Agent tarball:
Run Pro Custodibus Agent
Now copy the procustodibus.conf and procustodibus-setup.conf files, along with the procustodibus-agent-latest.tar.gz tarball, to the WireGuard host you want to manage.
On that WireGuard host, move the procustodibus.conf and procustodibus-setup.conf files to the /etc/wireguard/ directory:
$ sudo mv procustodibus.conf /etc/wireguard/.
$ sudo mv procustodibus-setup.conf /etc/wireguard/.
|
Note
|
On platforms where WireGuard config files are stored in a different config directory, such as |
Then extract the procustodibus-agent-latest.tar.gz tarball, change to the procustodibus-agent-*/ directory it creates, and run the install.sh script:
$ tar xf procustodibus-agent-latest.tar.gz
$ cd procustodibus-agent-*/
$ sudo ./install.sh --install --force
running as root
force install 1.4.1
agent configuration found at /etc/wireguard/procustodibus.conf
agent setup found at /etc/wireguard/procustodibus-setup.conf
...
WARNING daemon dead
OK will start daemon
Created symlink /etc/systemd/system/default.target.wants/procustodibus-agent.service → /etc/systemd/system/procustodibus-agent.service.
started daemon
install SUCCESS
Once the install script completes, check the status of the agent:
$ systemctl status procustodibus-agent.service
● procustodibus-agent.service - Pro Custodibus Agent
     Loaded: loaded (/etc/systemd/system/procustodibus-agent.service; enabled; preset: enabled)
     Active: active (running) since Fri 2023-10-20 21:53:20 UTC; 40s ago
   Main PID: 1934 (procustodibus-a)
      Tasks: 1 (limit: 38248)
     Memory: 21.0M
        CPU: 2.600s
     CGroup: /system.slice/procustodibus-agent.service
             └─1934 /opt/venvs/procustodibus-agent/bin/python3 /opt/venvs/procustodibus-agent/bin/procustodibus-agent --loop=120 --verbosity=INFO

Oct 20 21:53:20 colossus systemd[1]: Started procustodibus-agent.service - Pro Custodibus Agent.
Oct 20 21:53:21 colossus procustodibus-agent[1934]: 2023-10-22 21:53:21,110 procustodibus_agent.agent INFO: Starting agent 1.4.1
Oct 20 21:53:21 colossus procustodibus-agent[1934]: ... 1 wireguard interfaces found ...
Oct 20 21:53:21 colossus procustodibus-agent[1934]: ... 198.51.100.123 is pro custodibus ip address ...
Oct 20 21:53:21 colossus procustodibus-agent[1934]: ... healthy pro custodibus api ...
Oct 20 21:53:21 colossus procustodibus-agent[1934]: ... can access host record on api for VPN Hub ...
Oct 20 21:53:21 colossus procustodibus-agent[1934]: All systems go :)
If “all systems go”, return to the web browser; if not, consult the agent’s Troubleshooting documentation.
|
Tip
|
If the agent can’t find the Pro Custodibus API, remember that the agent is trying to access the API running on the on-premises server we set up in the Provision Server step, using the DNS name we set up in the Set Up DNS step. |
View Pro Custodibus Dashboard
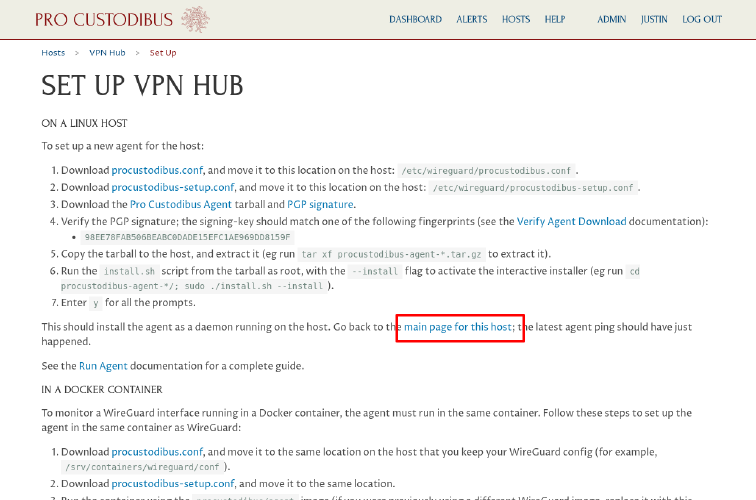
Back in the web browser, click the main for this host link on the Set Up page:
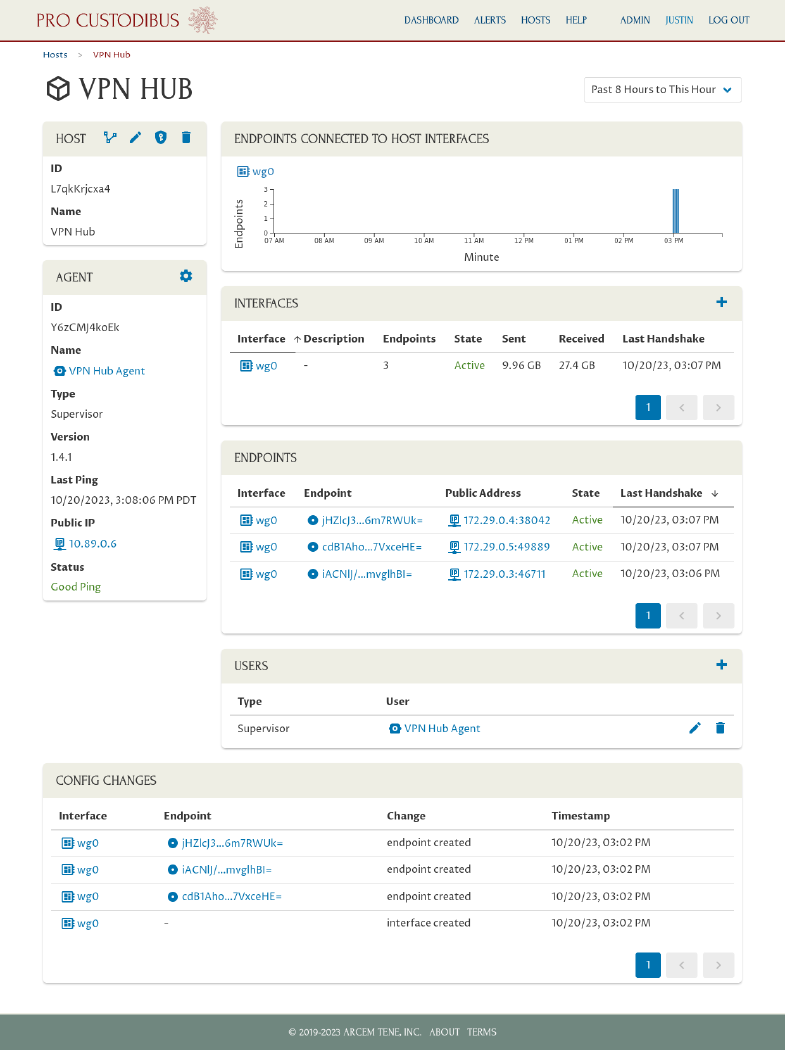
We’ll see the current status of the WireGuard host we just set up:
Click the Dashboard link on this page (or on any page) to navigate to an overall view of the monitored WireGuard network:
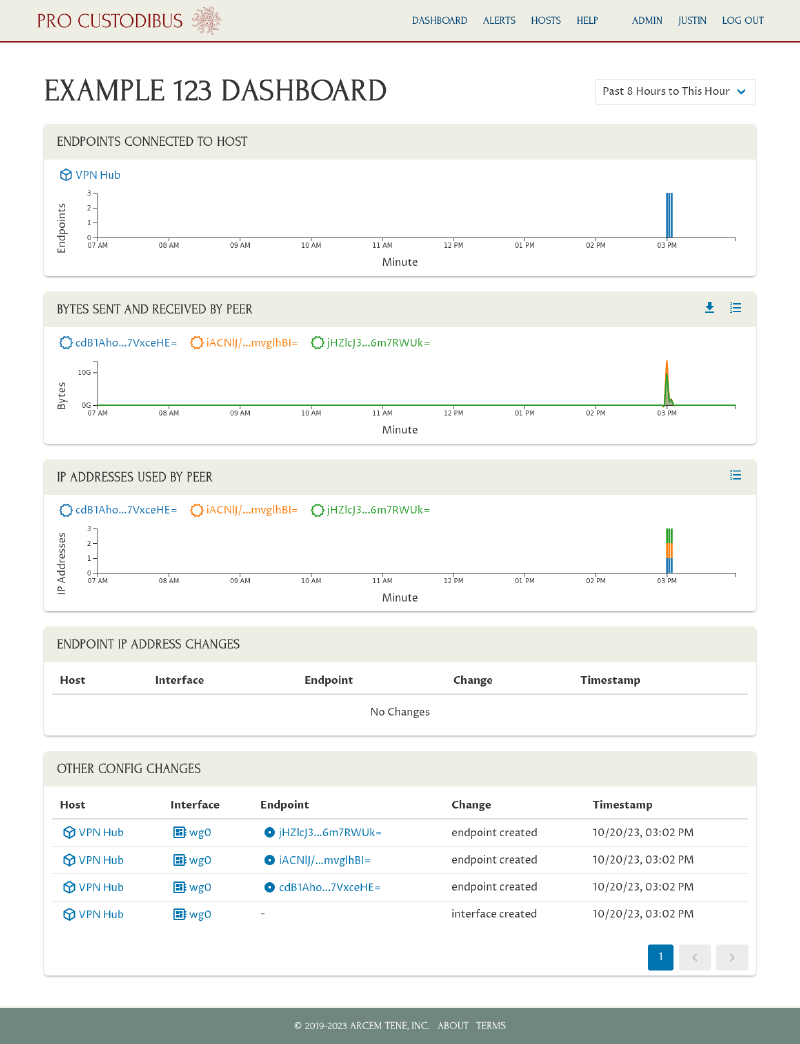
From this page, click on any host name or peer name to see more information about the host or peer, and further drill into the configuration for its WireGuard interface and connected endpoints.
Visit the Pro Custodibus How To Guides to learn more about what you can do with your on-premises Pro Custodibus server (or see the On-Premises Documentation for more details about the server configuration and maintenance).