High Availability WireGuard on Azure
This article will demonstrate how to set up WireGuard in a high availability configuration on Microsoft Azure. It will build upon the Point to Cloud with Azure Hub VNet article, where we set up a single WireGuard server in a hub VNet (Virtual Network), allowing access to internal applications in spoke VNets that had been peered with the hub. In this article, we’ll add a second WireGuard server, and place it and the first server behind an Azure Load Balancer (LB).
This will allow you to access internal applications in your spoke VNets through a highly-available cluster of WireGuard servers, and connect to the cluster as if it were simply an individual WireGuard server. The following diagram illustrates the scenario:

The diagram shows your local workstation, with an IP address of 198.51.100.1 on the public Internet, accessing an internal web application, which has an IP address of 10.20.0.4, within an isolated VNet. Your workstation connects through an Azure load balancer with a public IP address of 20.42.144.211, which routes the connection to one of your WireGuard servers (in this case in Availability Zone 1, with a private IP address of 10.10.0.4), which in turn forwards requests from your local workstation to the internal app.
If that WireGuard server becomes unavailable, the load balancer will automatically re-route your WireGuard connection to another WireGuard server (in this case, the one in Availability Zone 2, with a private IP address of 10.10.0.5).
Beyond the initial setup from the Point to Cloud with Azure Hub VNet article, these are the steps we’ll take to implement this scenario:
Launch Additional WireGuard Servers
The first thing you’ll need for high-availability WireGuard is multiple WireGuard servers. At minimum, you’ll need one WireGuard server each in at least two availability zones (AZs). That way, if a whole AZ containing one of your WireGuard servers goes down, you’ll still have a usable WireGuard server active in a different AZ.
If you already have one WireGuard server running, but not configured for a specific availability zone, shut it down, and launch a new one. Follow the steps from the Launch WireGuard Server VM section of the original Point to Cloud with Azure Hub VNet article, but this time, select Availability zone for Availability options; and select Availability zone number 1 for the first server:
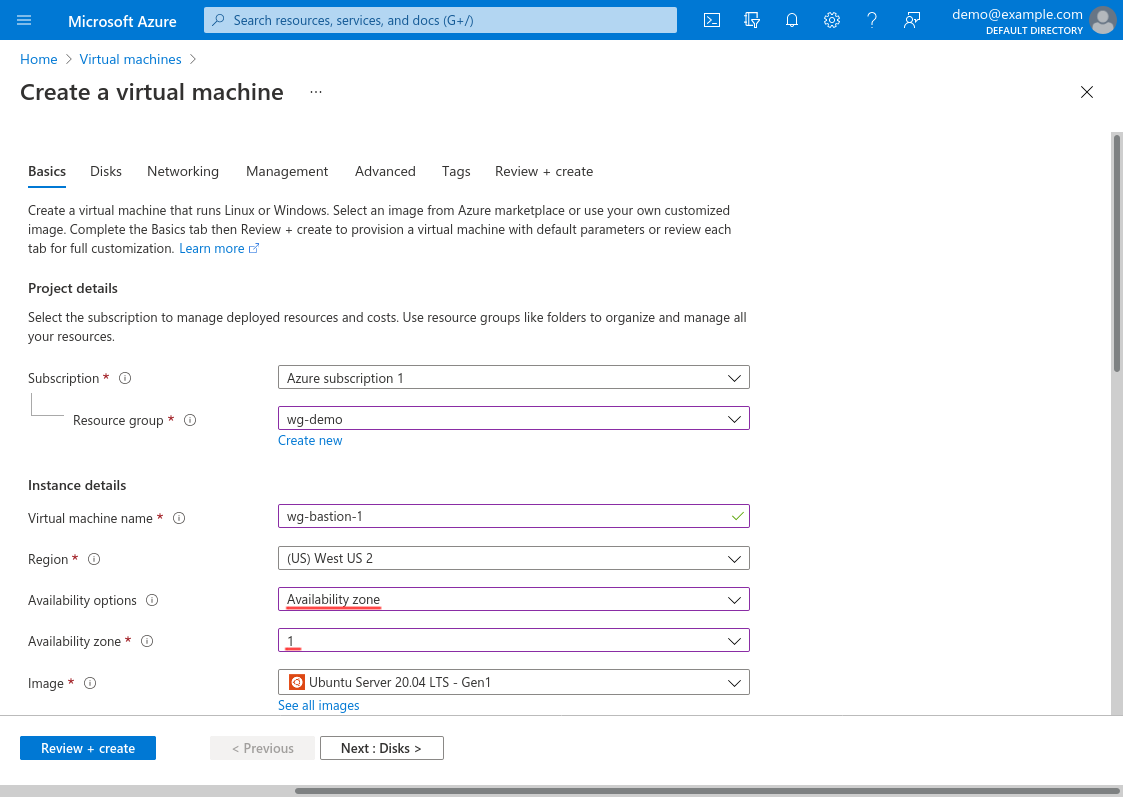
Then launch a second WireGuard server the same way, but select Availability zone number 2 for it.
Configure both WireGuard servers with the exact same WireGuard configuration, as directed in the Configure WireGuard Server section of the original Point to Cloud with Azure Hub VNet article, including the same exact PrivateKey and Address settings.
Using the exact same settings for each WireGuard server will allow your WireGuard clients to connect to either server without having to make changes on the client side. Once you’ve configured the clients with the load-balancer’s public IP address, the LB will be able to route traffic from any client to any server, interchangeably.
Because you’ll use the load-balancer’s own public IP address to connect your WireGuard clients, you won’t need separate public IP addresses for each of the WireGuard servers. If you followed the original Point to Cloud with Azure Hub VNet article exactly and added a public IP address to each WireGuard Server VM, you can dissociate each of those public IP addresses now. Alternately, you can simply skip assigning a public IP to each VM when you launch it (as long as you can still SSH into it via its private IP address by some other means, like a different VPN connection, when you set each up).
Set Up WireGuard Server Health Check
Once you’ve set up the two WireGuard servers, you’ll need to add a health-check service to each. This service will validate the health of each server in response to health probes from the load balancer.
The simplest way to implement a health-check service for WireGuard is via a simple HTTP server that responds with a 200-399 HTTP status code (and some content) when the WireGuard interface is up, and a 400-599 code when the WireGuard interface is down.
If your WireGuard servers are running Ubuntu 20.04, or other similar modern Linux distribution, install the Python 3 health-check script as a service on each WireGuard server (older Linux distros that only have Python 2 installed can use the Python 2 version of the script linked from the same article).
Copy the health-check script to each WireGuard server, and place it in the /usr/local/bin directory:
justin@jws:~$ scp wg-health-check.py azureuser@13.66.244.73:.
justin@jws:~$ ssh azureuser@13.66.244.73
$ chmod +x wg-health-check.py
$ sudo mv wg-health-check.py /usr/local/bin/.
On each server, create the following systemd service unit at /etc/systemd/system/wg-health-check.service:
# /etc/systemd/system/wg-health-check.service
[Unit]
Description=WireGuard health-check HTTP server
After=network-online.target

[Service]
Type=simple
User=nobody
ExecStart=/usr/local/bin/wg-health-check.py --device=wg0 --port=8080
Restart=always

[Install]
WantedBy=default.target
And enable the service to start on system boot, as well as start it now, with the following commands:
$ sudo systemctl enable wg-health-check.service
$ sudo systemctl start wg-health-check.service
You can check the output of the service with curl:
$ curl -I localhost:8080
HTTP/1.0 200 OK
Server: SimpleHTTP/0.6 Python/3.8.5
Date: Wed, 18 Jun 2021 22:17:02 GMT
Content-Type: text/plain
Update WireGuard Server NSG
Now we need to update the NSG (Network Security Group) for the WireGuard servers that we created in the Create WireGuard Server NSG section of the original Point to Cloud with Azure Hub VNet article. We need to allow access to the health-check service we added above from the load-balancer health probes we’ll create later on.
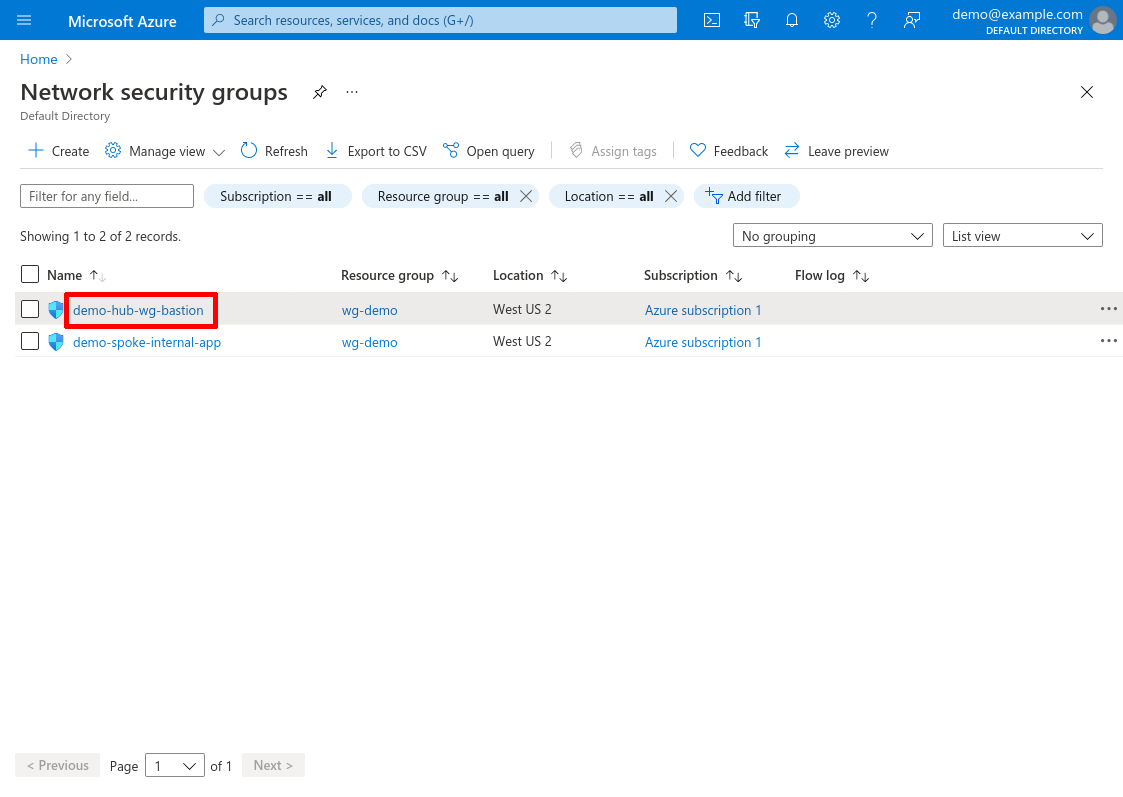
So log into the Azure Portal, and navigate to the Network security groups service (type network security groups into the Azure search bar and click the “Network security groups” result under “Services”). Click the NSG for your WireGuard servers (I called mine demo-hub-wg-bastion):
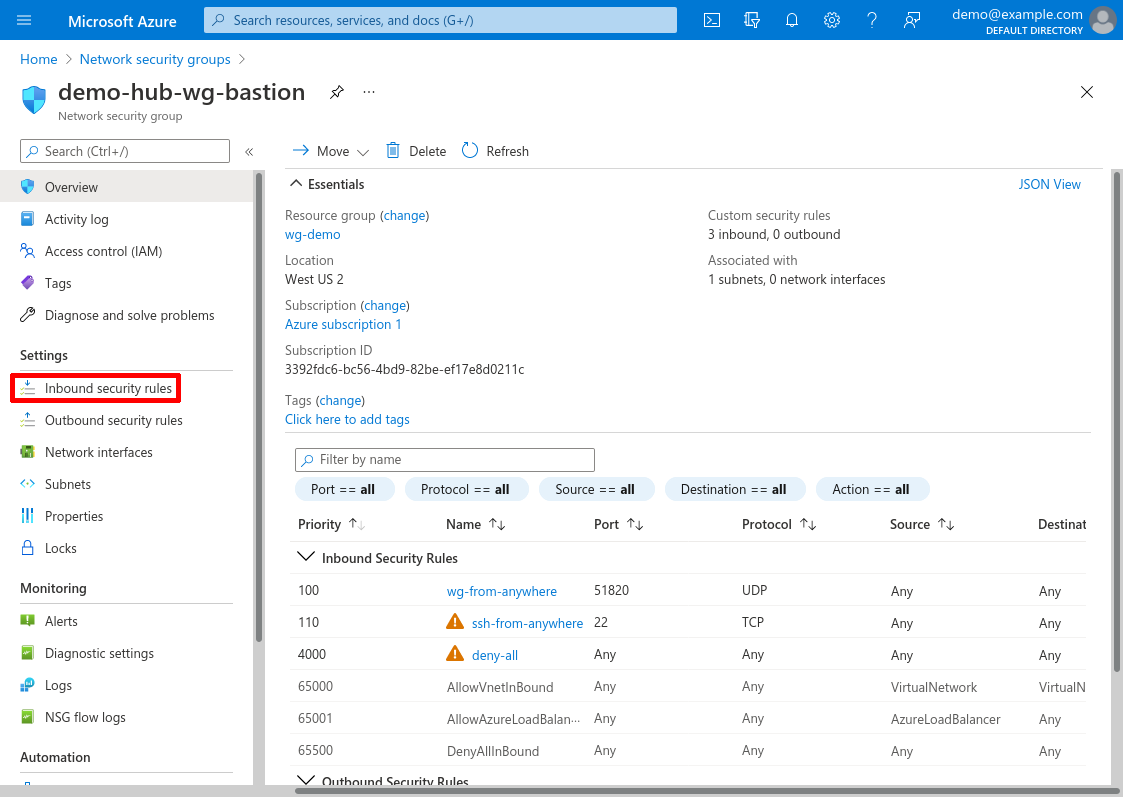
Then click the Inbound security rules link in the leftnav:
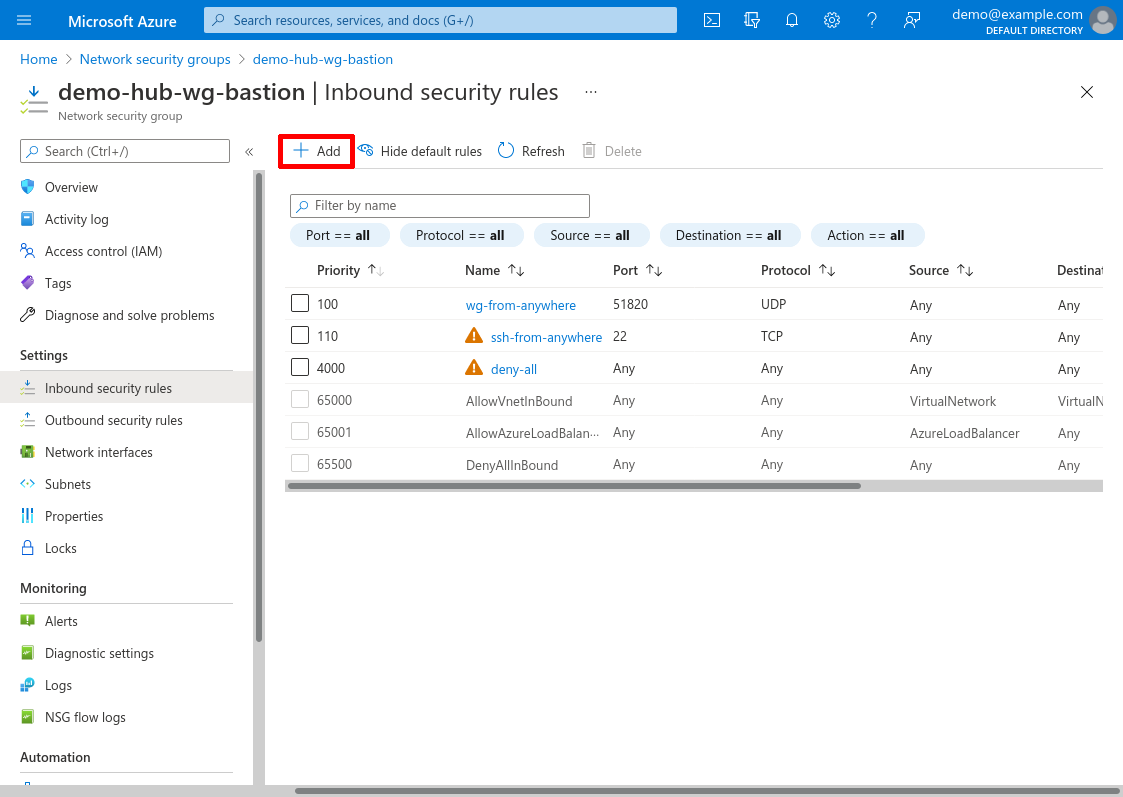
Then click the Add button:
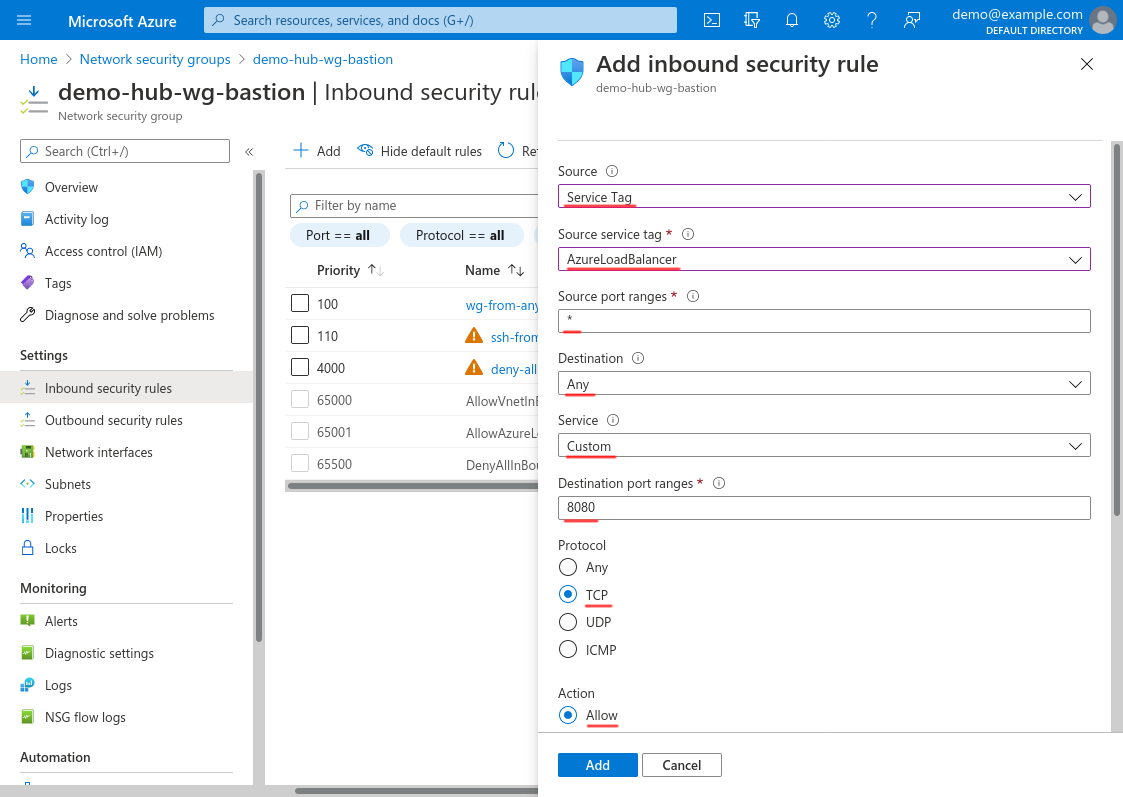
For Source, select Service Tag; for Source service tag, select AzureLoadBalancer; and for Source port ranges, select *.
For Destination, select Any; for Service, select Custom; for Destination port ranges, enter 8080 (or the custom port on which you set your health-check services to listen, if not 8080); and for Protocol, select TCP. For Action, select Allow:
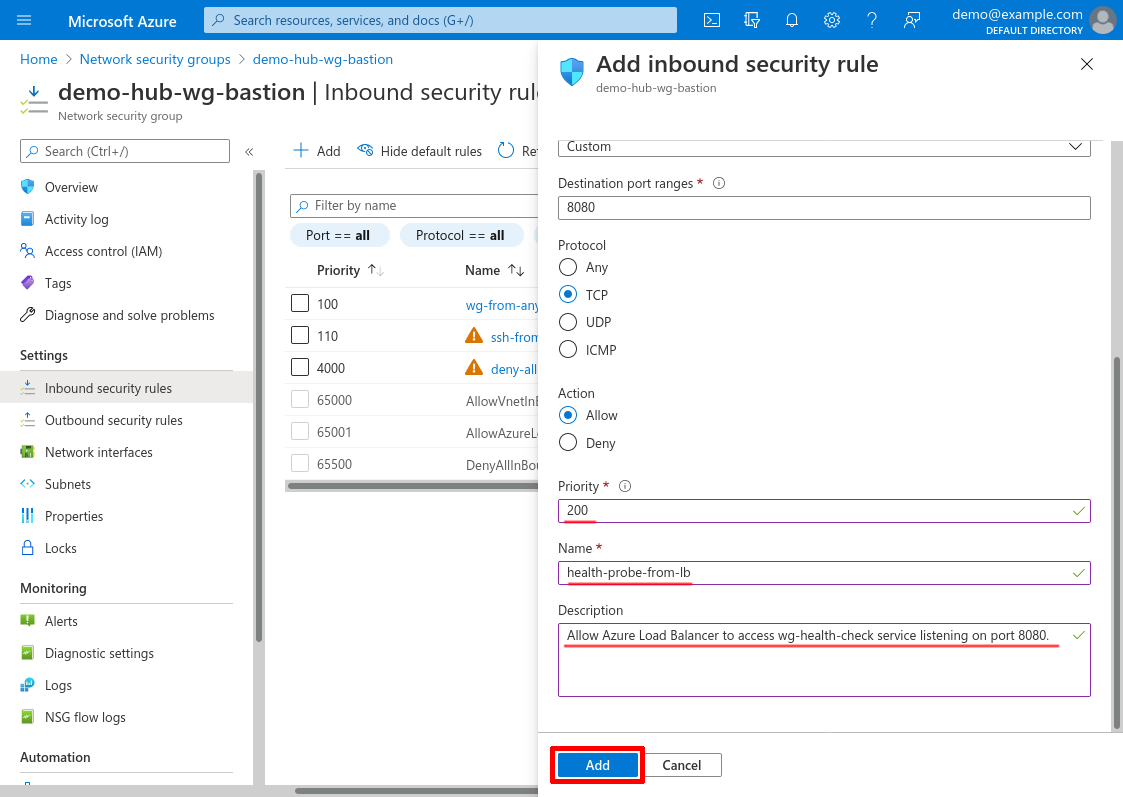
Scroll down and set the Priority to 200 (or some other number lower than any deny-access rules you’ve set up); set the Name to something descriptive, like health-probe-from-lb; and use the Description for additional details. Then click the Add button:
Create LB Public IP
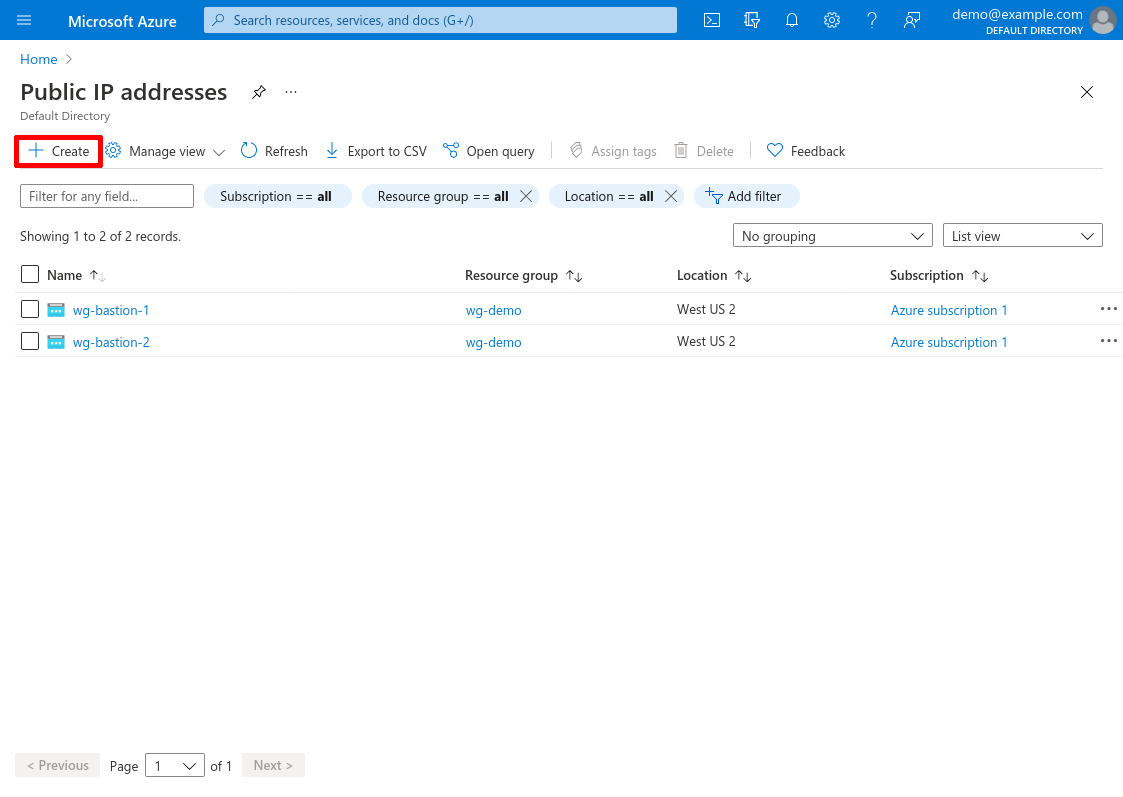
Now create a public IP address for the load balancer that we’ll launch in the next step. When we launch the LB, we’ll assign it this IP address.
Navigate to the Public IP addresses service (type public ip addresses into the Azure search bar and click the “Public IP addresses” result under “Services”). Then click the Create button:
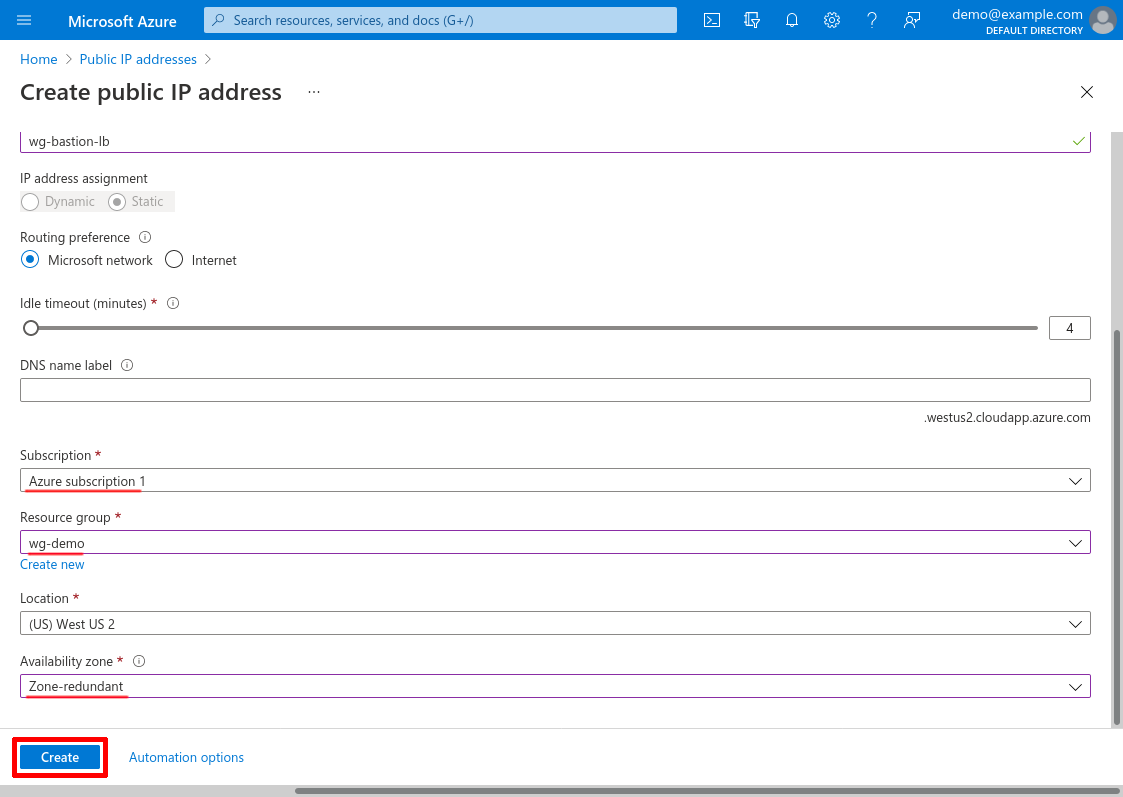
For IP Version, select IPv4; for SKU, select Standard; and for Tier, select Regional. Enter a descriptive Name for the IP address, like wg-bastion-lb:
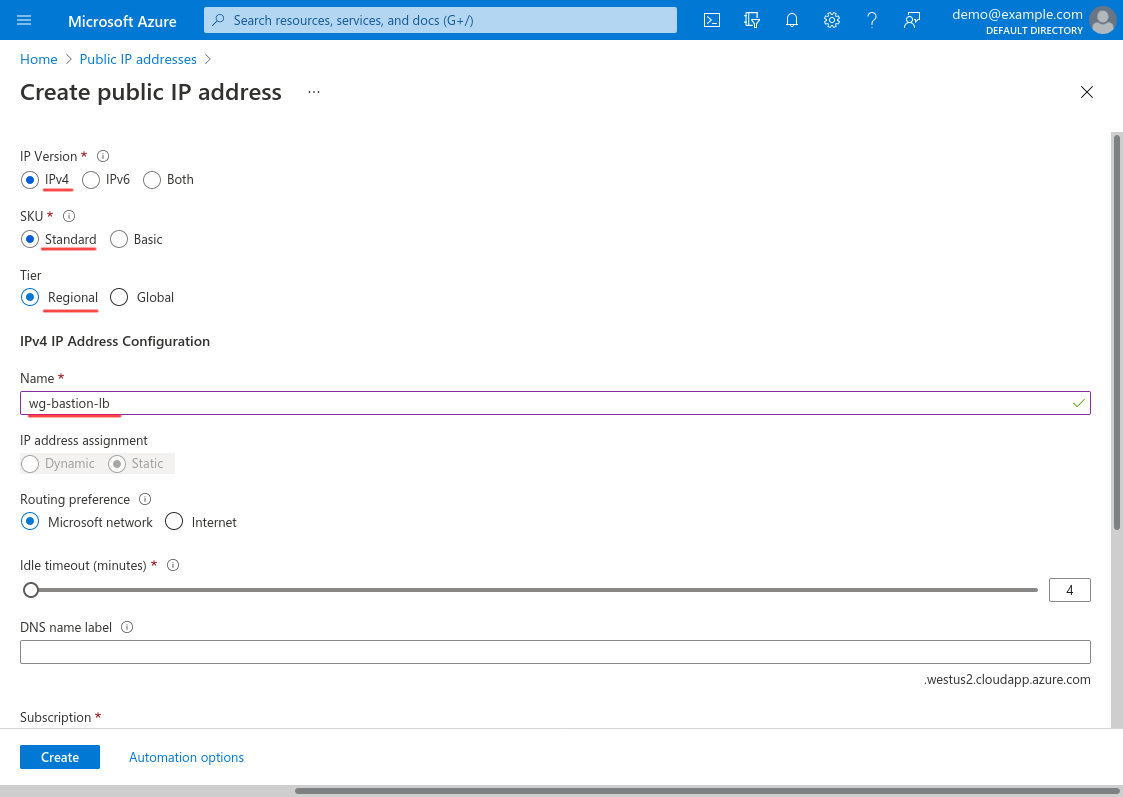
Then scroll down and select the Subscription and Resource group of the hub VNet; and select Zone-redundant for the Availability zone option. Then click the Create button:
Launch Load Balancer
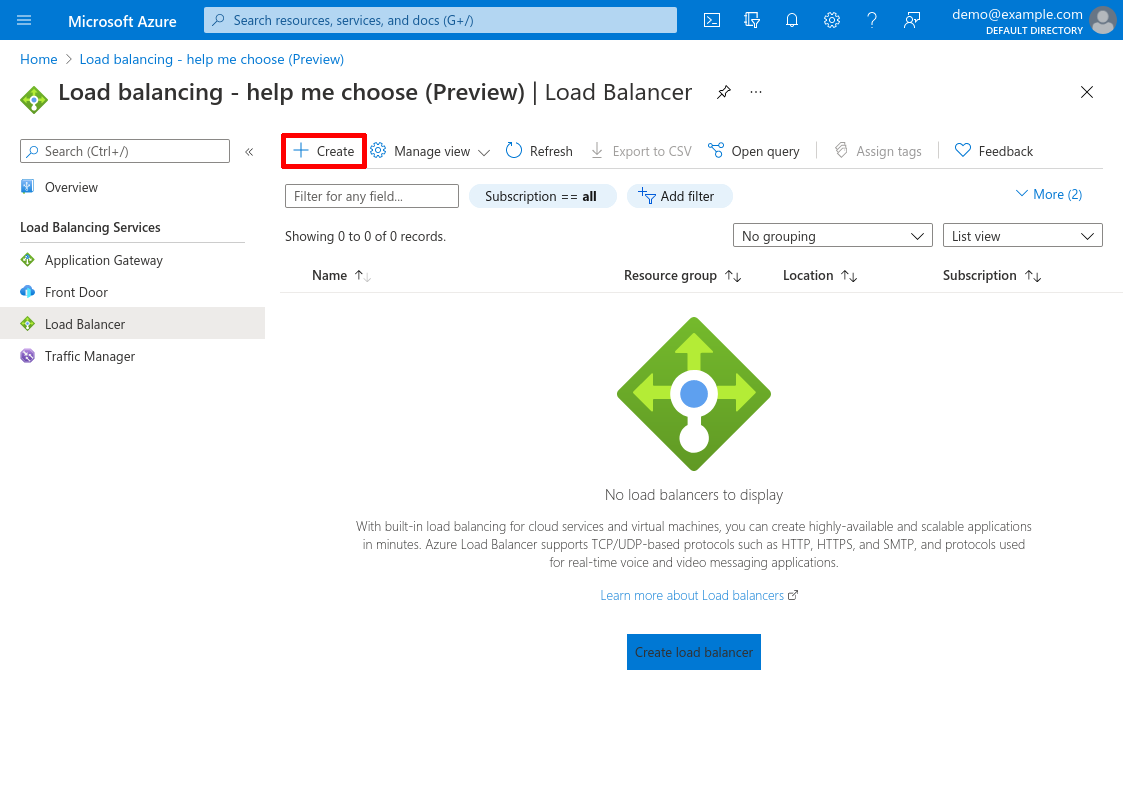
Now we can start setting up the load balancer itself. Navigate to the Load balancers service (type load balancers into the Azure search bar and click the “Load balancers” result under “Services”). Then click the Create button:
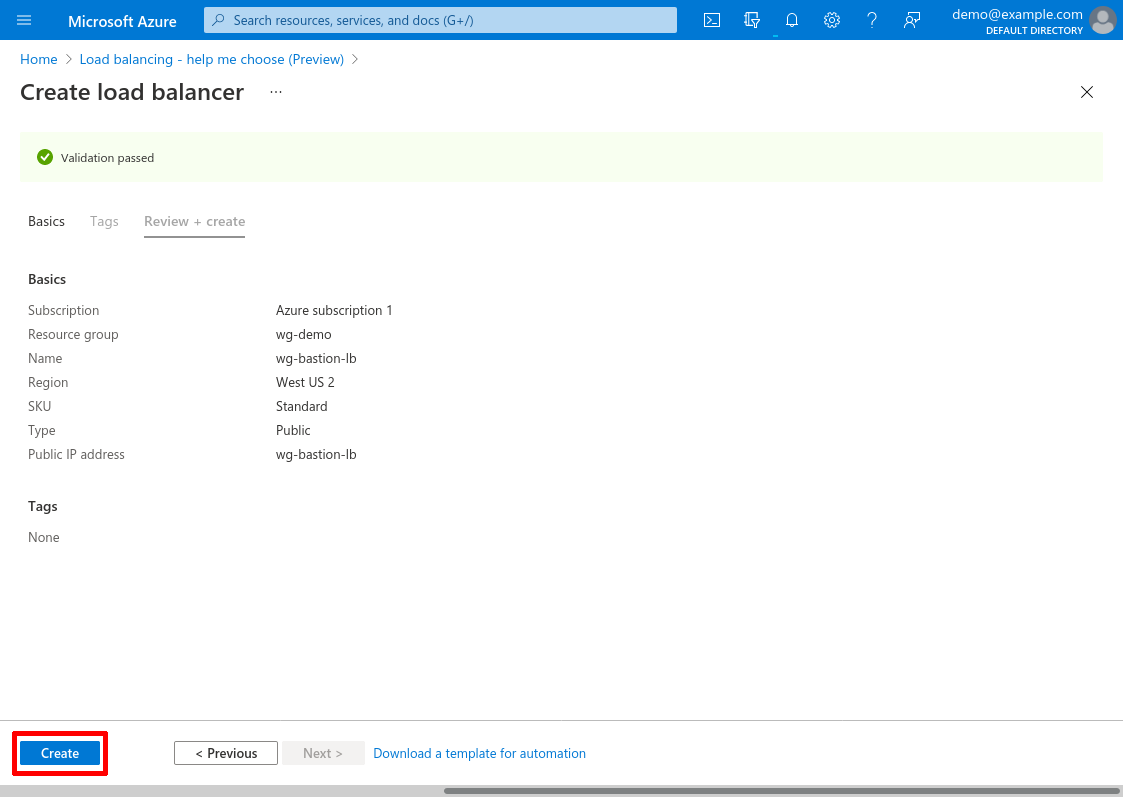
Select the Subscription and Resource group of the hub VNet. Give the load-balanceer instance a meaningful Name, like wg-bastion-lb. Set its Type to Public; its SKU to Standard; and its Tier to Regional.
For Public IP address, select Use existing; and for Choose public IP address, select the IP address you just created in the Create LB Public IP section above.
Then click the Review + create button:

And click the Create button:
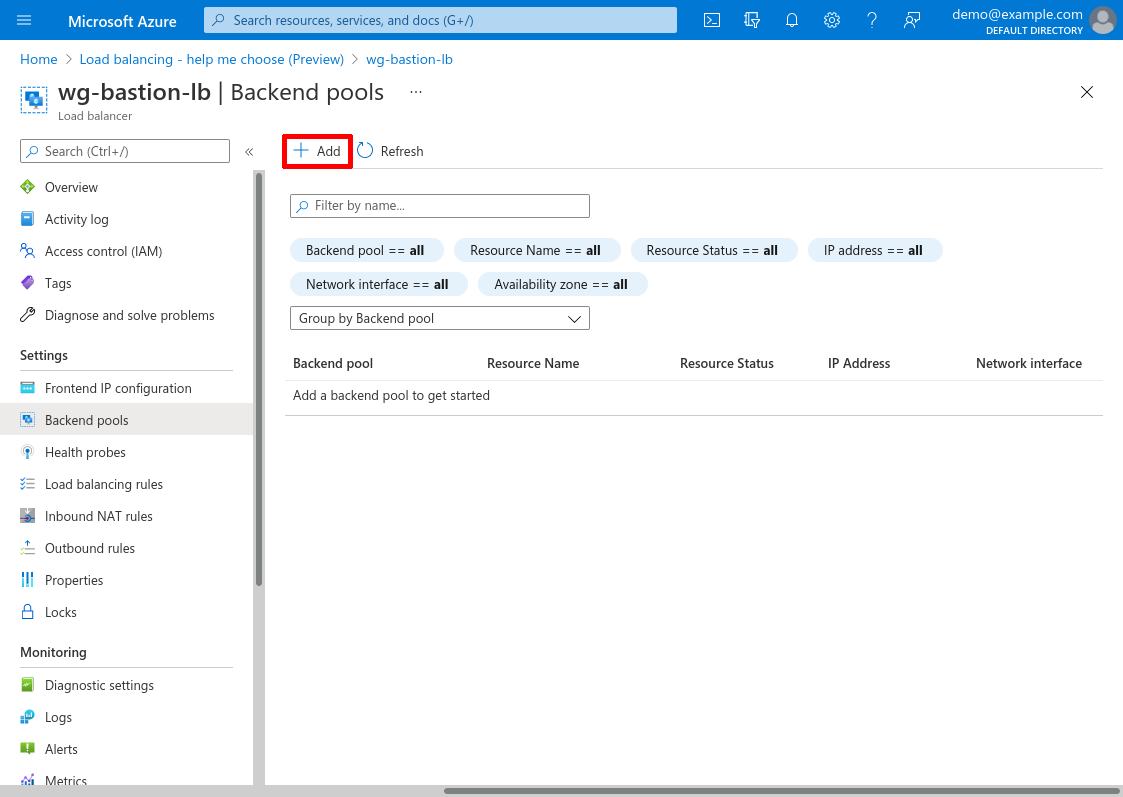
Add LB Backend Pool
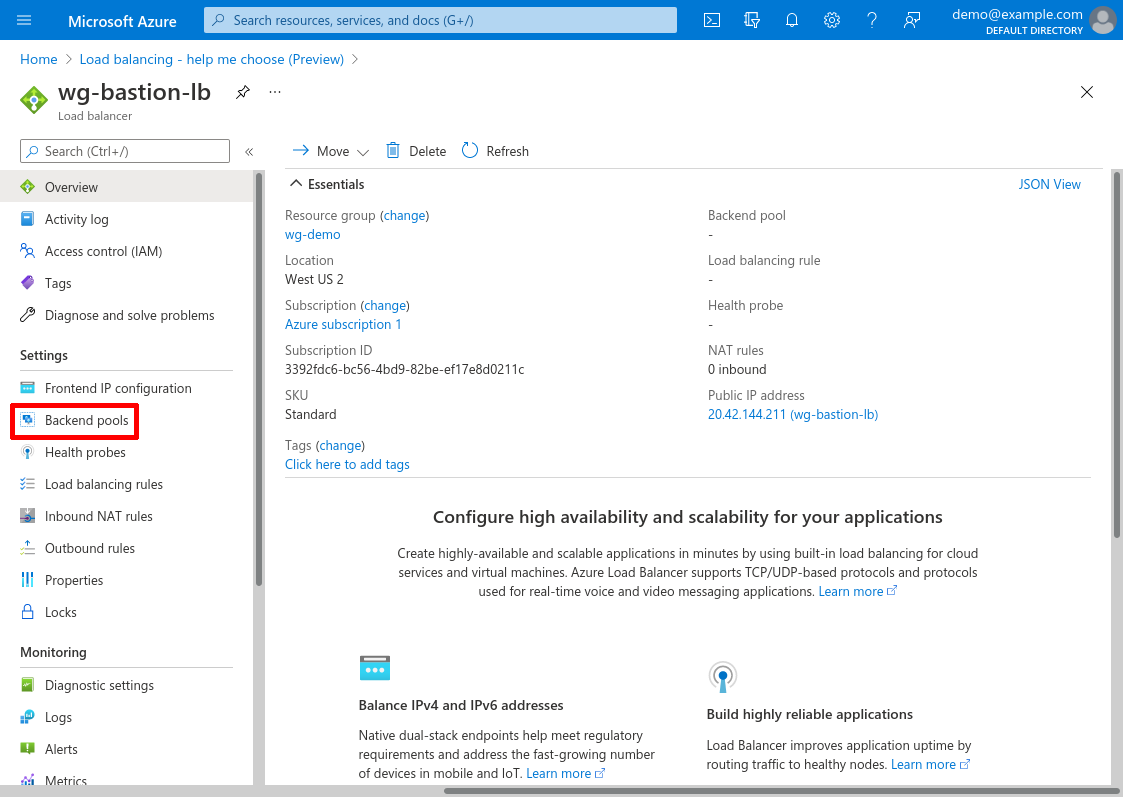
Now we’ll connect our new load balancer to our WireGuard servers. Navigate to the main page for the load balancer (click the Go to resource button if you just created it), and click the Backend pools link in the leftnav:
Then click the Add button:
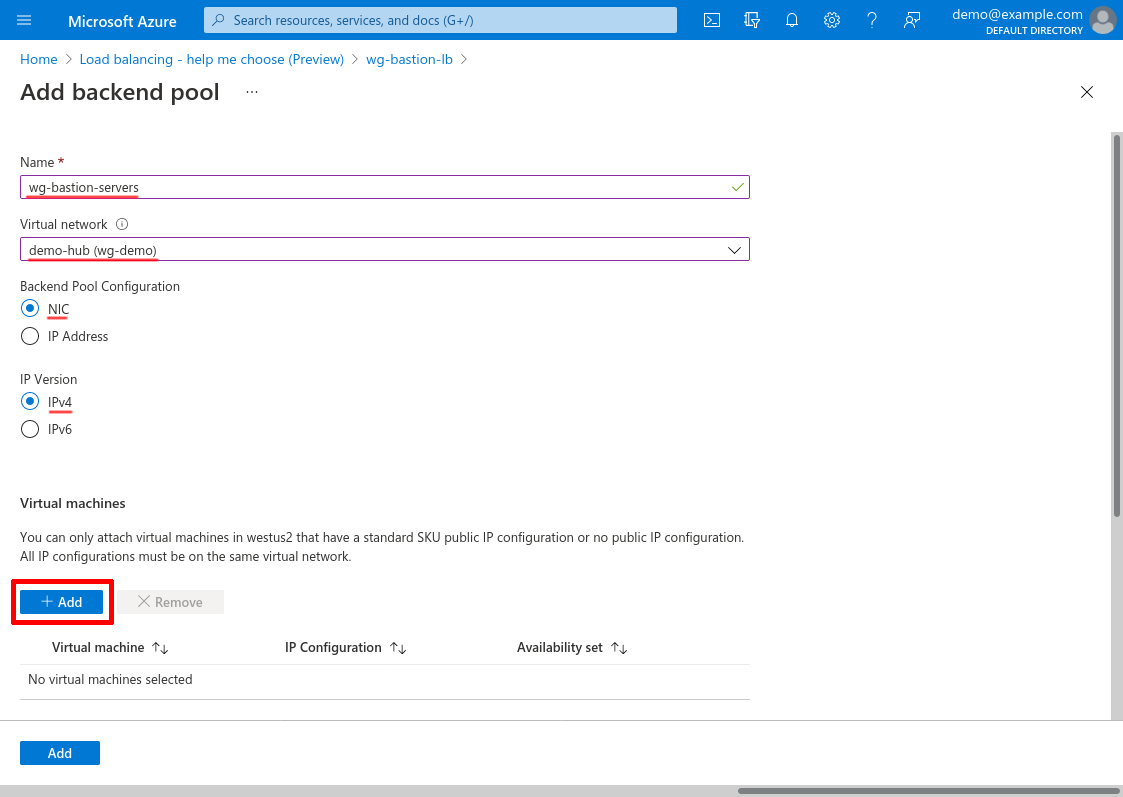
Enter a Name for the pool, like wg-bastion-servers; and for Virtual network, select demo-hub. For Backend Pool Configuration, select NIC; and for IP Version, select IPv4.
Then click the Add button in the “Virtual machines” section of the form to add your WireGuard servers to the pool:
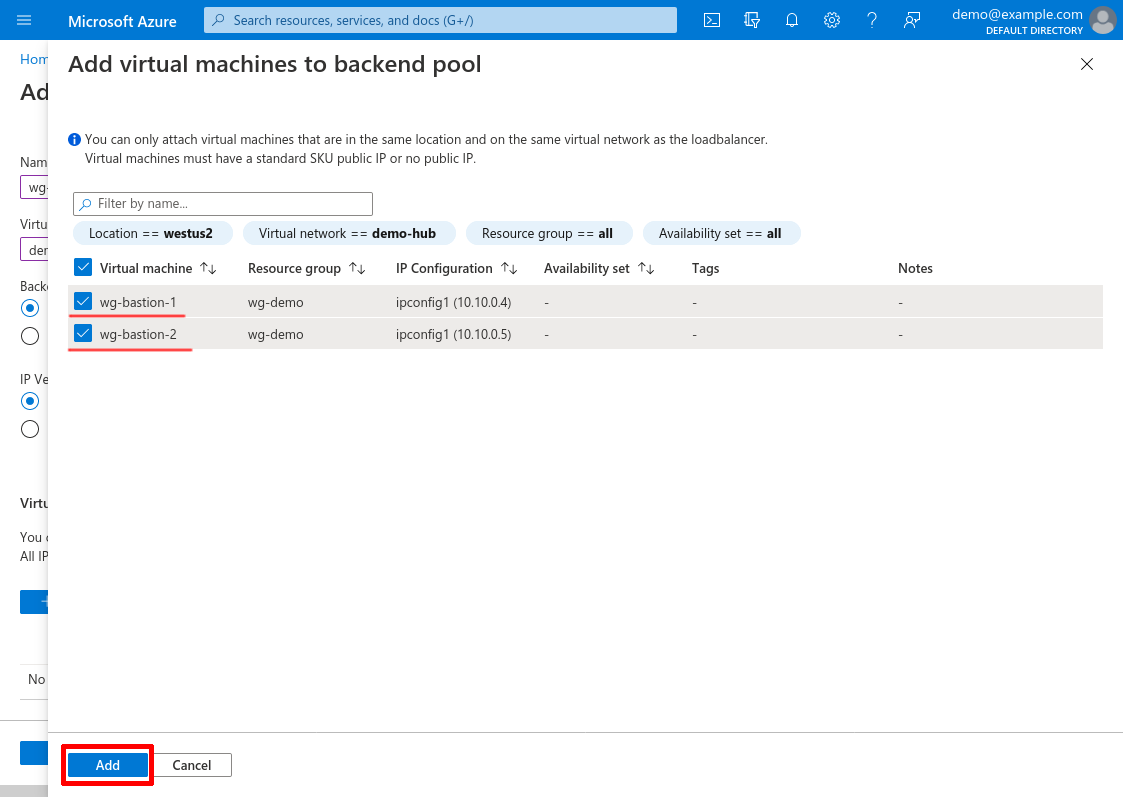
Select your WireGuard servers, and click the Add button:
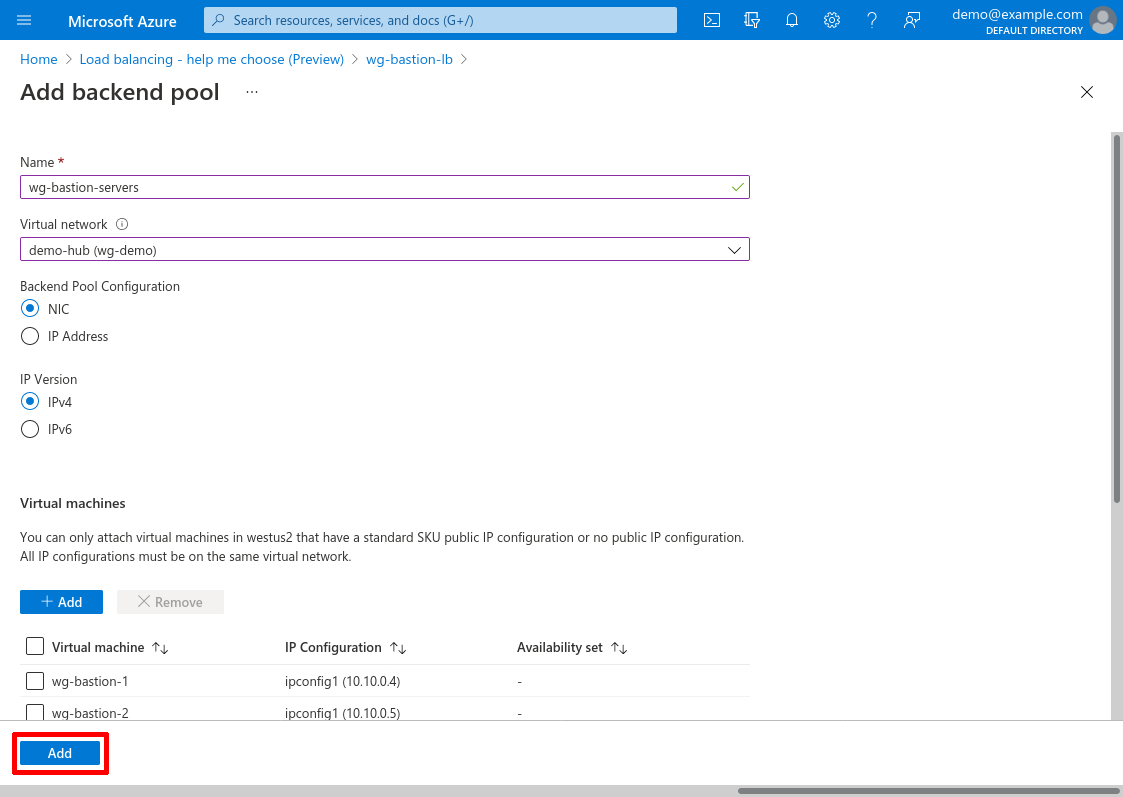
Then click the form’s main Add button to add the backend pool:
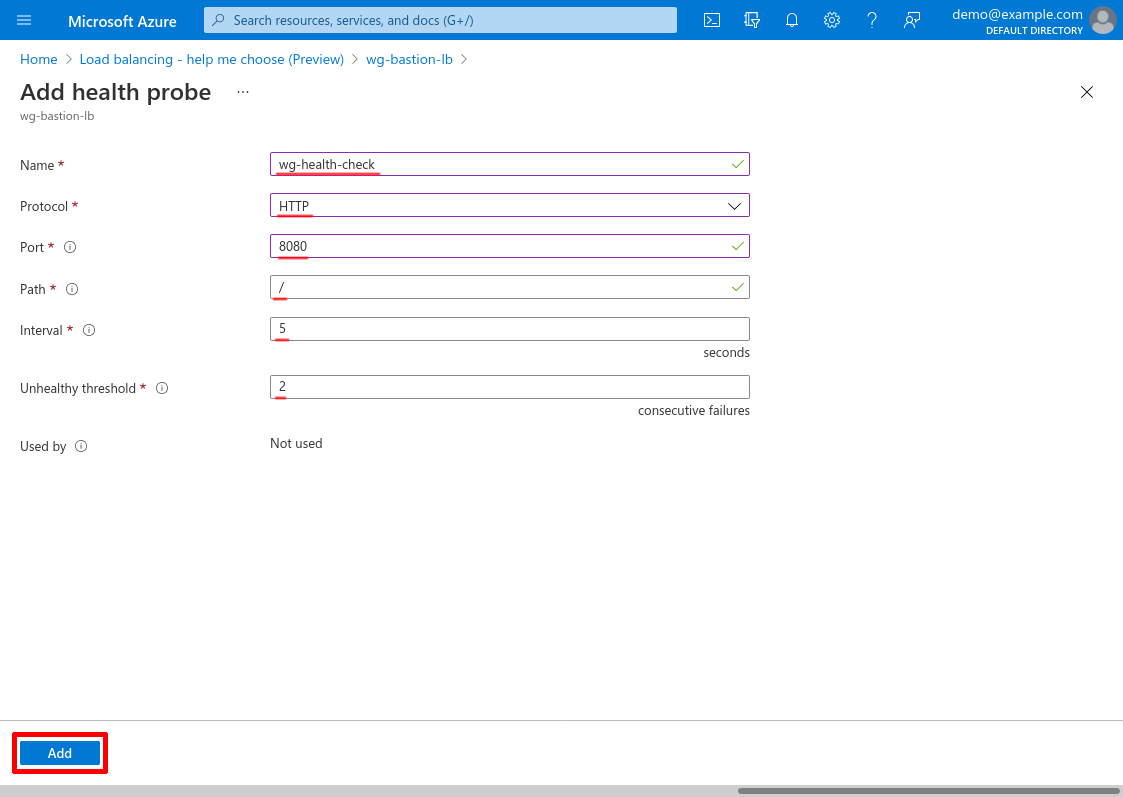
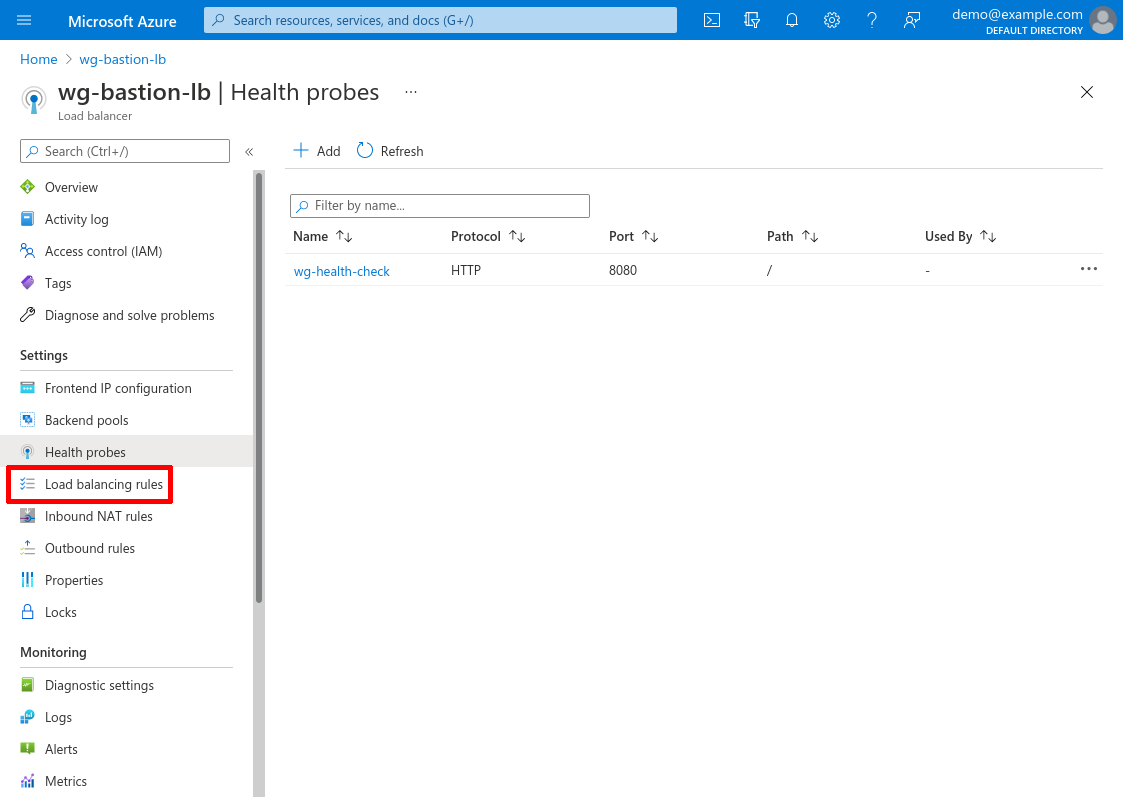
Add LB Health Probe
Now we’ll set up a health probe for the load balancer. This will enable the load balancer to detect if one of the WireGuard servers has gone down, and remove it from service. Click the Health probes link in the leftnav for the load balancer:
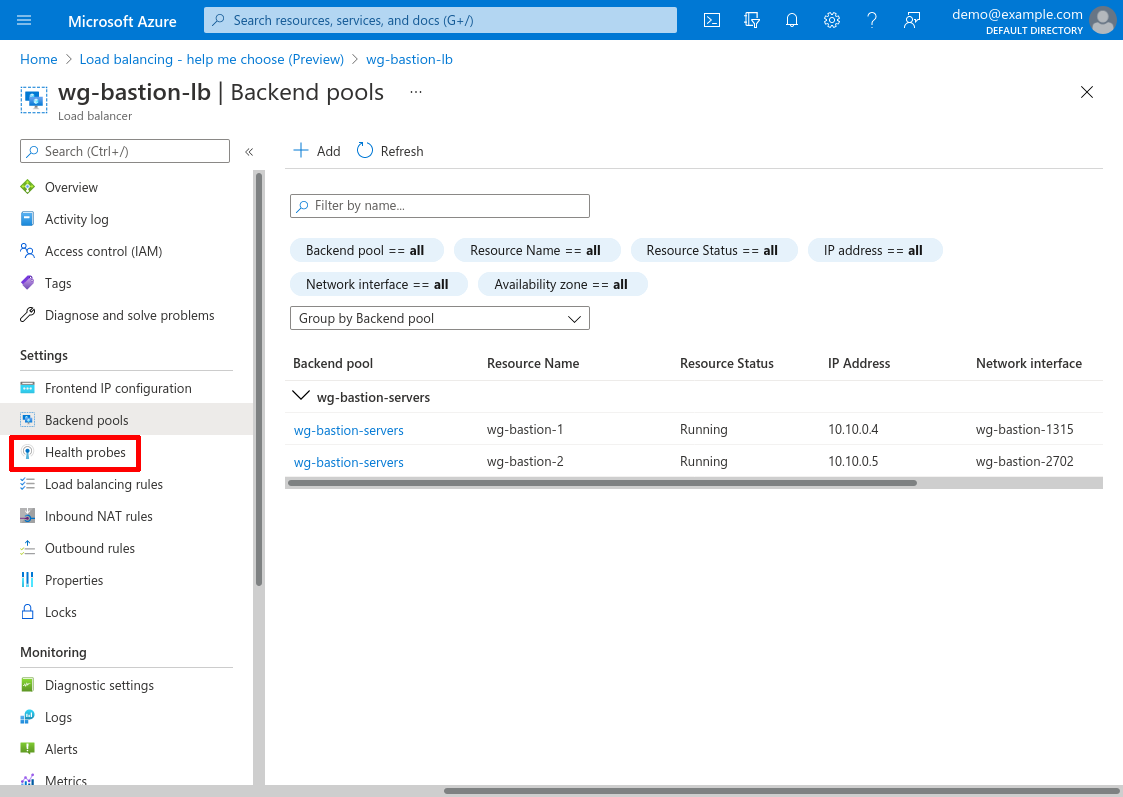
Then click the Add button:

Enter a Name for the probe, like wg-health-check. For Protocol, select HTTP; for Port, enter 8080 (or whatever port you configured the health-check service to listen on in the Set Up WireGuard Server Health Check step); and for Path, enter /. For Interval, enter 5 (seconds); and for Unhealthy threshold, enter 2 (consecutive failures).
Then click the Add button:
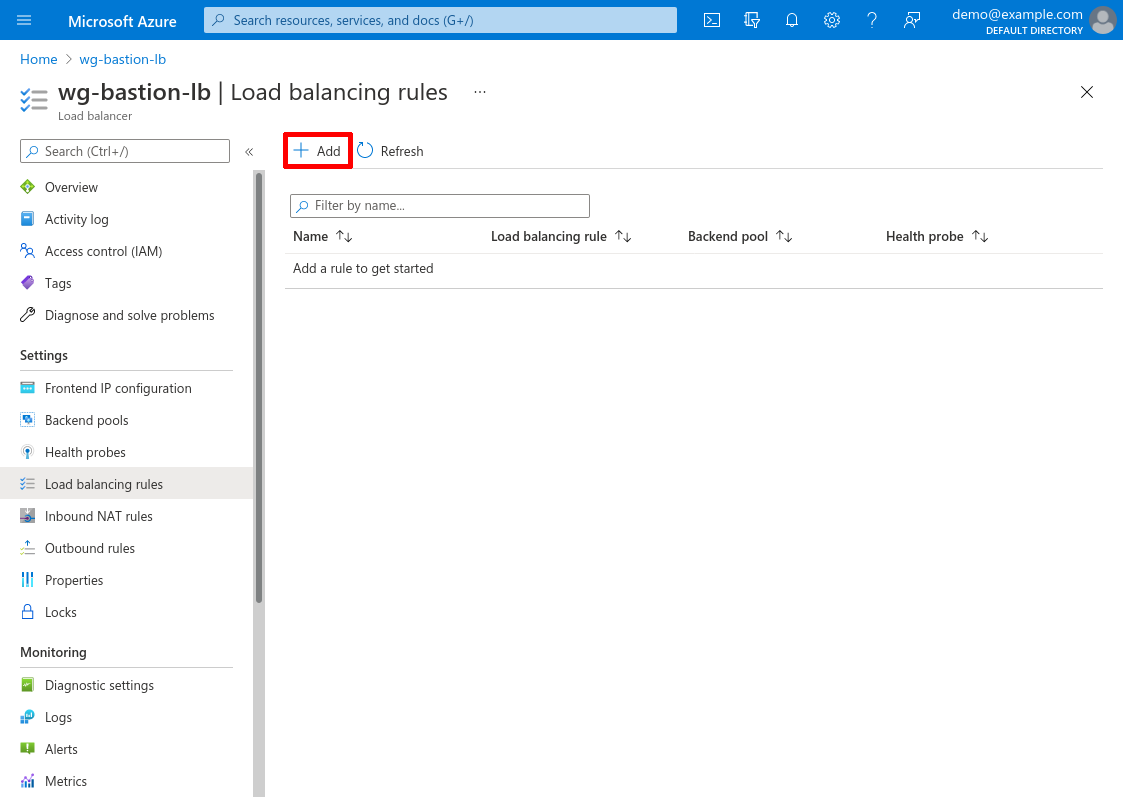
Add Load Balancing Rule
Now we’ll set up the load-balancing rule that will send traffic from the load balancer to our WireGuard servers. Click the Load balancing rules link in the leftnav:
Then click the Add button:
Enter a Name for the rule, like wg-to-wg-bastion-servers. For IP Version, select IPv4; and for Frontend IP address, select the default frontend created when we launched the LB (in this example, 20.42.144.211).
For Protocol, select UDP; and for both Port and Backend port, enter 51820.
For Backend pool, select the pool we created in the Add LB Backend Pool step (in this example, wg-bastion-servers). For Health probe, select the probe we created in the Add LB Health Probe step (in this example, wg-health-check).
For Session persistence, select Client IP and protocol (WireGuard is stateful, so we’ll want the same client to use the same server, if the same server is available). For Floating IP, select Disabled; and for Outbound SNAT, select Use outbound rules.
Then click the Add button:

Update WireGuard Client Config
On your local workstation, update the WireGuard configuration for your connection to the WireGuard server that we set up in the Configure WireGuard Client section of the original Point to Cloud with Azure Hub VNet article (this file was named /etc/wireguard/wg-bastion-1.conf). Replace the Endpoint setting in that config file with the public IP address for the load balancer you created with the Create LB Public IP step. In this example, it was 20.42.144.211:
# /etc/wireguard/wg-bastion-1.conf

# local settings for Justin's Workstation
[Interface]
PrivateKey = AAAAAAAAAAAAAAAAAAAAAAAAAAAAAAAAAAAAAAAAAEE=
Address = 10.0.0.1/32

# remote settings for WireGuard Server
[Peer]
PublicKey = fE/wdxzl0klVp/IR8UcaoGUMjqaWi3jAd7KzHKFS6Ds=
Endpoint = 20.42.144.211:51820
AllowedIPs = 10.20.0.0/16
Then restart that WireGuard interface on your local workstation with the following command:
justin@jws:~$ sudo systemctl restart wg-quick@wg-bastion-1.serviceNow, just like in the original article, you should be able to connect to the internal applications you have running in your spoke VNets through this WireGuard connection on your local workstation, simply by using the private IPv4 addresses of those applications. In the Launch Internal Application VM section of the original article, we set up a test web app running on port 80 of a VM using a private IPv4 address of 10.20.0.4. With our updated WireGuard connection (and that app still running), we can access it through the load balancer from our local workstation, the same way as before:
justin@jws:~$ curl 10.20.0.4
<!DOCTYPE HTML PUBLIC "-//W3C//DTD HTML 4.01//EN" "http://www.w3.org/TR/html4/strict.dtd">
<html>
...
Failover
Unlike the limitations with AWS load balancers, Azure’s load-balacing failover works smoothly with WireGuard. When health probes are configured like the Add LB Health Probe section above, Azure will detect and remove an unhealthy WireGuard server from its backend pool within 10-15 seconds. When that happens, the WireGuard clients that are actively using the removed WireGuard server will immediately have their traffic routed to a new WireGuard server.
The new WireGuard server will drop all the packets encrypted for the old server, and respond by initiating a new handshake with each client of the old server. This may take a second or two, but once complete, all new packets sent by each client will be decrypted by the new WireGuard server and forwarded on to your internal applications successfully. For clients using an internal web application, this will usually appear as a pause of 15-30 seconds while the application appears unresponsive, and then resumes its normal behavior (once the client’s TCP stack has resent all the packets for which it never received an acknowledgement).
Pricing
The cost of this setup, at least in the “West US 2” region, should usually be less than $40/month. Here’s a complete breakdown:
| Item | Price per 30 days usage | Price per GB transferred | |
|---|---|---|---|
2 WireGuard servers (2 B1LS Linux VMs) |
- |
||
2 30GB Standard HDD Managed Disks (for WG servers) |
- |
||
1 Load Balancer (with 1 rule) |
|||
1 Public IP |
- |
||
Hub-Spoke VNet peering |
- |