High Availability WireGuard on AWS
This article will demonstrate how to set up WireGuard in a high availability configuration on AWS (Amazon Web Services). It will build upon the Point to Cloud with AWS Private Subnets article, where we set up a single WireGuard server in a public subnet of a AWS VPC (Virtual Private Cloud) to allow access to internal applications in the VPC’s private subnets. In this article, we’ll add more WireGuard servers to that scenario, and then put them behind an AWS Network Load Balancer (NLB) with an AWS Global Accelerator.
This will allow you to access internal applications in your VPC through a highly-available cluster of WireGuard servers, connecting to the cluster as if it were nothing more than an individual WireGuard server. The following diagram illustrates this configuration:

The diagram shows your local workstation, with an IP address of 198.51.100.1 on the public Internet, accessing an internal web application, which has an IP address of 10.10.21.130 within an AWS private subnet. Your workstation connects through the Global Accelerator endpoint with a public IP address of 75.2.2.228, which routes the connection through the NLB to one of your WireGuard servers in Availability Zone (AZ) A, which forwards requests from your local workstation on to the internal web app.
If that WireGuard server becomes unavailable, the load balancer will automatically re-route your WireGuard connection to another WireGuard server. And if the entire availability zone becomes unavailable, the NLB will automatically re-route your WireGuard connection to a different AZ.
These are the steps we’ll walk through:
- Launch Additional WireGuard Servers
- Set Up WireGuard Server Health Check
- Update WireGuard Server Security Group
- Create Load Balancer Target Group
- Create Load Balancer
- Create Global Accelerator
- Update WireGuard Client Config
Do You Need High Availability?
But first, before you set up “high availability” anything, you should spend some time considering the level of availability your really need, and what you’re willing to pay for it.
While some servers in a cloud environment may chug along happily for years without interruption, it’s probably safe to expect that over the course of the year, you’ll have to replace each server in your fleet a couple of times; and that each data center (or availability zone in AWS parlance) where you have servers hosted will have a “bad day” a couple times a year (eg have network connectivity or other core services become impaired or go down entirely for several hours at a time). So if you rely on a single WireGuard server in a single data center to provide access to a core suite of internal applications, you’ll probably lose access to that server, or have to replace it, several times a year.
If you have someone on call (or have some automation) that can replace your WireGuard bastion within an hour or two during the business day, and you can live without access to those internal applications for a few hours, then you probably don’t need WireGuard high availability at all. If you do need some form of high availability, however, you should probably run at least two different WireGuard bastion servers in two different data centers (aka AZs in AWS).
The next thing to consider is whether you really need automatic failover among your WireGuard servers. For some set of users, you may be able to get away with simply giving them instructions to reconfigure the WireGuard client on their workstations to use an alternate endpoint address if the connection to their primary endpoint drops out. If that’s not feasible for your user base, however, you’ll probably need a high availability architecture with automatic failover, like one described by this article.
For a VPC running in the Ohio (us-east-2) region, the architecture described by this article would cost you about $50 a month, plus around $0.25 per GB of traffic, broken down as follows:
| Item | Price per 30 days usage |
|---|---|
| 4 WireGuard servers (4 t4g.nano EC2 instances, 8 GB EBS each) | $14.50 |
| 1 Network Load Balancer | $16.20 |
| 1 Global Accelerator | $18.00 |
Launch Additional WireGuard Servers
To get started with high-availability WireGuard, the first thing you’ll need is multiple WireGuard servers. At minimum, you’ll need one WireGuard server each in two availability zones. Ideally, however, you should have at least two servers in each AZ — this will allow for better failover behavior, given some current limitations of NLB.
So, if you already have one WireGuard server running, launch another server in the same VPC and AZ as it, and then two more servers in a second AZ within the same VPC. Follow the Launch WireGuard Server Instance and Configure WireGuard Server sections of the original Point to Cloud with AWS Private Subnets article to do this. Configure the new servers with the exact same WireGuard configuration as your existing server, including the exact same PrivateKey and Address settings.
Using the exact same settings for each of the four WireGuard servers will allow our WireGuard clients to connect to any server without having to make changes on the client side. Once we’ve configured the clients with the load-balancer’s endpoint address, the NLB will be able to route traffic from clients to any server, interchangeably.
Set Up WireGuard Server Health Check
Once you’ve set up those four WireGuard servers, we’ll need to add a health-check service to each. This service will validate the health of each server in response to periodic queries from the NLB service.
The simplest way to implement a health-check service for WireGuard is via a simple HTTP server that responds with a 200-399 HTTP status code (and some content) when the WireGuard interface is up, and a 400-599 code when the WireGuard interface is down.
This short wg-health-check.py Python script will do the trick:
#!/usr/bin/env python2

from BaseHTTPServer import HTTPServer, BaseHTTPRequestHandler
from optparse import OptionParser
from os import popen

class HealthCheck(BaseHTTPRequestHandler):

    def do_GET(self):
        if check(self.server.device):
            self.send_response(200)
            self.send_header("Content-Type", "text/plain")
            self.end_headers()
            self.wfile.write("healthy\n")
        else:
            self.send_response(404)

    def do_HEAD(self):
        self.do_GET()

def check(device):
    return popen("ip link show %s up " % device).read() != ""

def test(device):
    if check(device):
        print("%s up" % device)
    else:
        print("%s down" % device)

def main(port, device):
    server = HTTPServer(('', port), HealthCheck)
    server.device = device
    server.serve_forever()

def opts():
    parser = OptionParser(
            description="HTTP server that sends 200 response when device is up.")
    parser.add_option("-d", "--device", dest="device", default="wg0",
            help="device name to check (default wg0)")
    parser.add_option("-p", "--port", dest="port", default=8080, type="int",
            help="port on which to listen (default 8080)")
    parser.add_option("-t", "--test", action="store_true", dest="test", default=False,
            help="show status and exit")
    return parser.parse_args()[0]

if __name__ == "__main__":
    options = opts()
    if options.test:
        test(options.device)
    else:
        main(options.port, options.device)
Note that this script is meant for older Linux distributions, like Amazon Linux 2, which come with Python 2 as their default Python version. For newer Linux distros, use the Python 3 health-check script.
Copy the script to each WireGuard server, and place it in the /usr/local/bin directory:
justin@jws:~$ scp wg-health-check.py ec2-user@18.217.226.255:.
justin@jws:~$ ssh ec2-user@18.217.226.255:.
$ chmod +x wg-health-check.py
$ sudo mv wg-health-check.py /usr/local/bin/.
If you run the script with the --test flag, you should see it output wg0 up:
$ wg-health-check.py --test
wg0 up
We can have systemd run this script as a service on startup; create the following systemd service unit at /etc/systemd/system/wg-health-check.service on each WireGuard server:
# /etc/systemd/system/wg-health-check.service
[Unit]
Description=WireGuard health-check HTTP server
After=network-online.target

[Service]
Type=simple
User=nobody
ExecStart=/usr/local/bin/wg-health-check.py --device=wg0 --port=8080
Restart=always

[Install]
WantedBy=default.target
And enable the service with the following commands:
$ sudo systemctl enable wg-health-check.service
$ sudo systemctl start wg-health-check.service
You can check the output of the service with curl:
$ curl -I localhost:8080
HTTP/1.0 200 OK
Server: BaseHTTP/0.3 Python/2.7.18
Date: Fri, 05 Feb 2021 23:58:04 GMT
Content-Type: text/plain
And check the service’s logs with journalctl:
$ journalctl -u wg-health-check.service
-- Logs begin at Fri 2021-02-05 19:09:32 UTC. --
Feb 05 23:57:19 ip-10-10-10-135.us-east-2.compute.internal systemd[1]: Started WireGuard health-check server.
Feb 05 23:57:19 ip-10-10-10-135.us-east-2.compute.internal systemd[1]: Starting WireGuard health-check server...
Feb 05 23:58:04 ip-10-10-10-135.us-east-2.compute.internal wg-health-check.py[3024]: 127.0.0.1 - - [05/Feb/2021 23:58:04] "HEAD / HTTP/1.1" 200 -
Update WireGuard Server Security Group
Now we need to update the security group (SG) that controls network access to our WireGuard servers to allow access to our health-check service from the NLB service. This means that we need to grant access to the health-check port (TCP 8080 with the above configuration) to our entire VPC (the NLB health checks will access our health-check service via an internal gateway in our VPC, managed transparently by AWS).
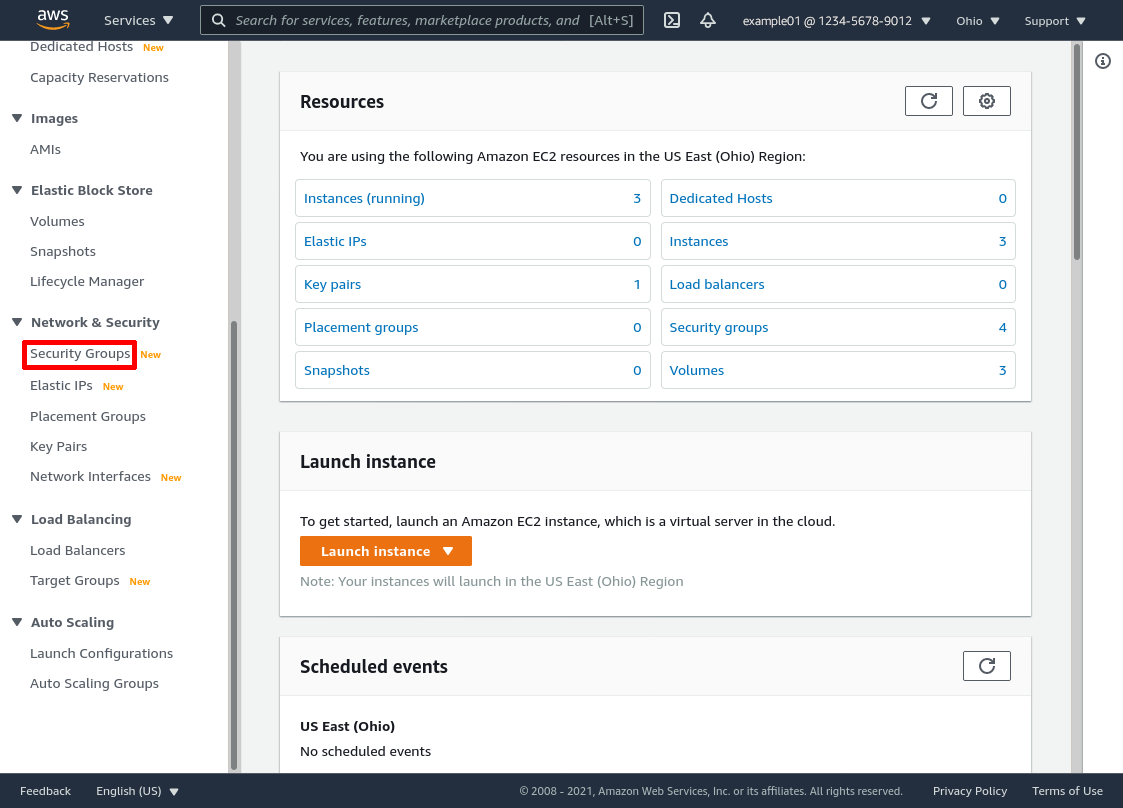
So log into the AWS console, and navigate to the EC2 service (type EC2 into the AWS search bar and click the “EC2” result under “Services”). Use the region dropdown menu in the top right of the page to select the region in your VPC is hosted. Our example VPC is hosted in the “Ohio” region (aka us-east-2).
In the leftnav of the AWS console, click the Security Groups link:
Select the WireGuard servers’ security group (wg-bastion in this example). Then select the Inbound rules tab for the group, and click the Edit inbound rules button:
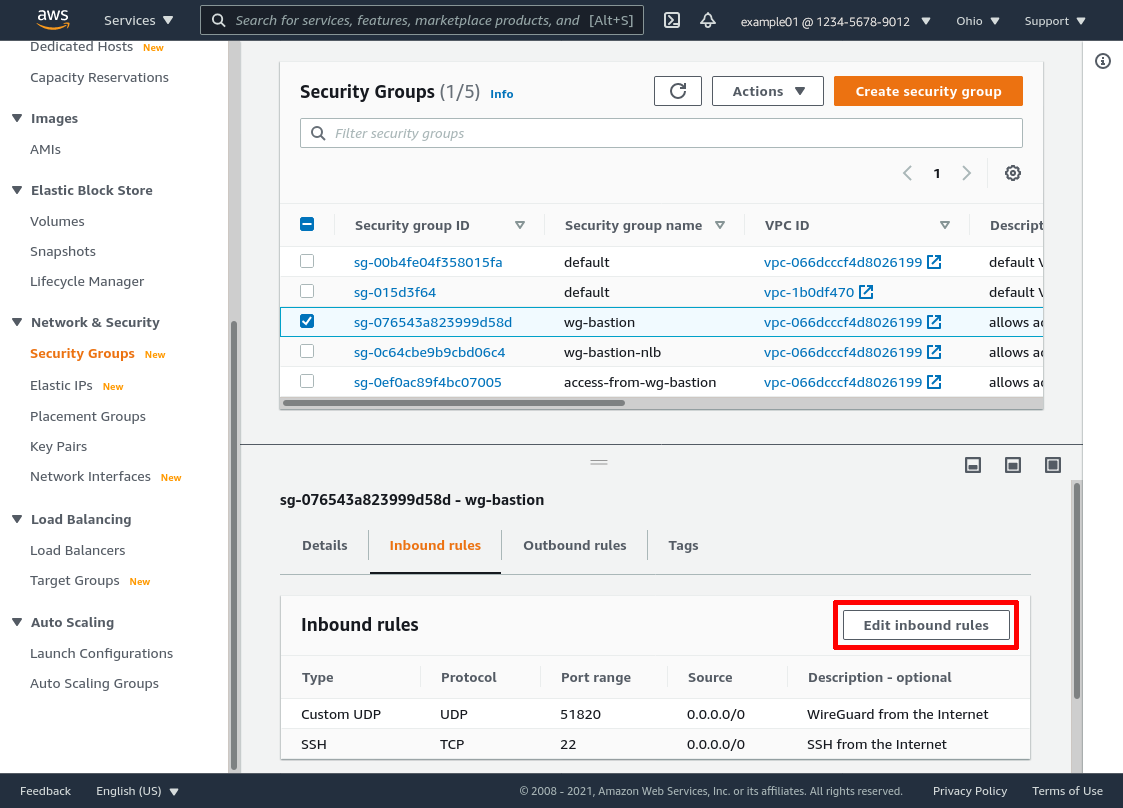
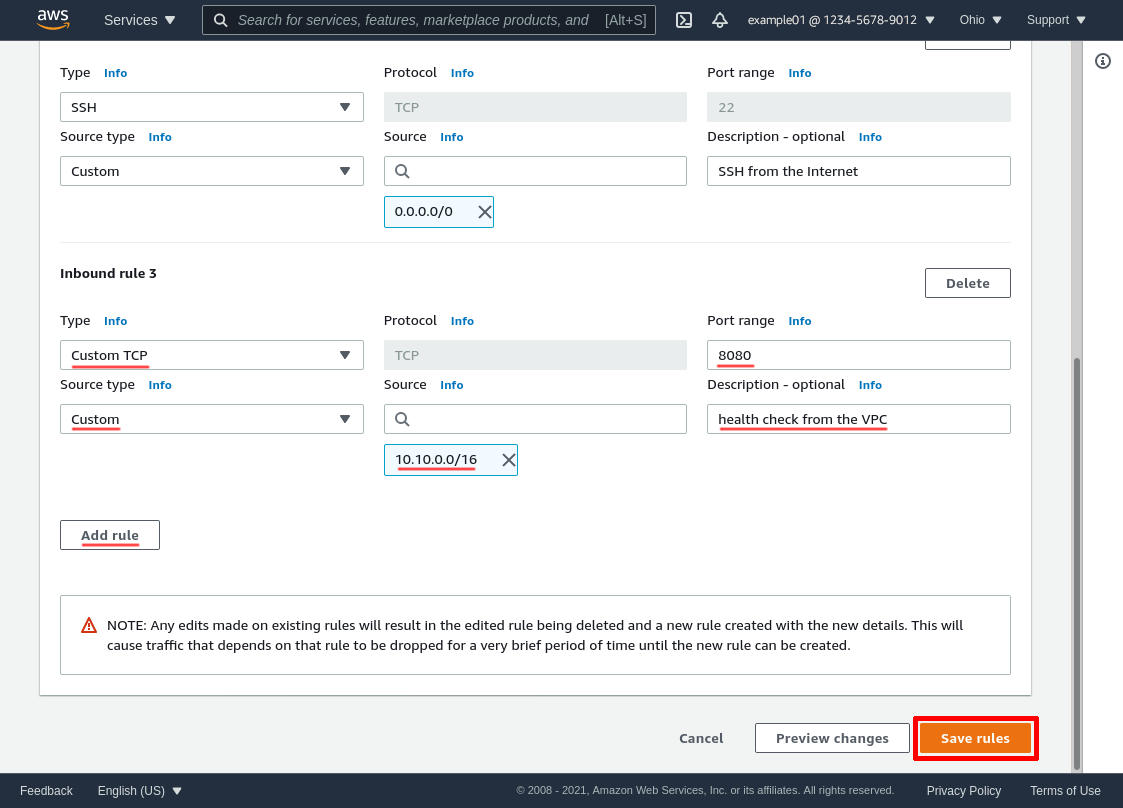
Leaving the existing rules alone, click the Add rule button to add a new rule. Set the Type to Custom TCP, the Port range to the port used by our health check (8080 in this example), and the Source to the IPv4 CIDR block used by our VPC (10.10.0.0/16 in this example). Then click the Save rules button:
Updated 2021-08-21
Note that if the SG for your WireGuard servers doesn’t already include an inbound rule to allow access to the servers’ WireGuard port from anywhere on the Internet — or at least from anywhere in your VPC — you’ll also need to add another inbound rule to allow access to their WireGuard port from anywhere in your VPC. The NLB will need this (in addition to the existing rules allowing access from your WireGuard clients to your WireGuard servers) in order to be able to forward WireGuard connections to your servers.
See the AWS documentation for NLB Target Security Groups for more detail (as well as a method for identifying the exact IP address an existing NLB uses as its internal gateway to your VPC — this would allow you to narrow your SG rules for the NLB to include just that individual IP address instead of the full IPv4 CIDR block used by your VPC).
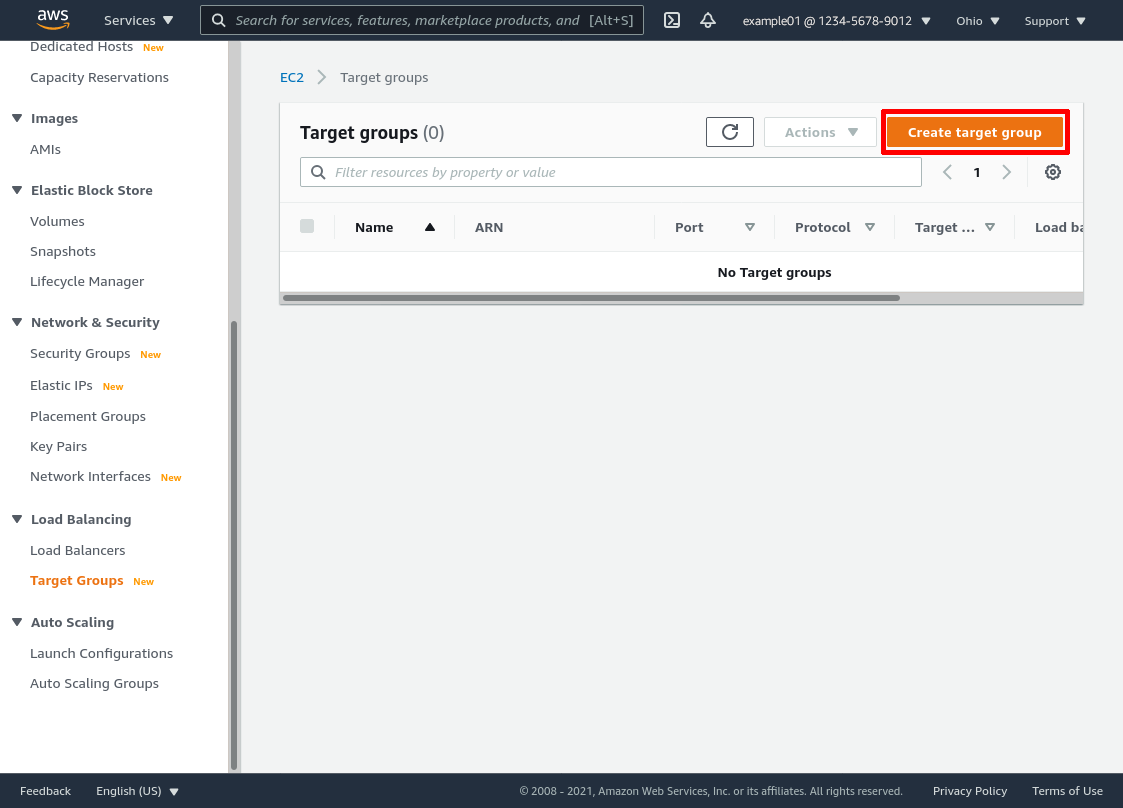
Create Load Balancer Target Group
Now we can start setting up the NLB. The first step is to create a target group, which is used to configure what the load balancer sends traffic to.
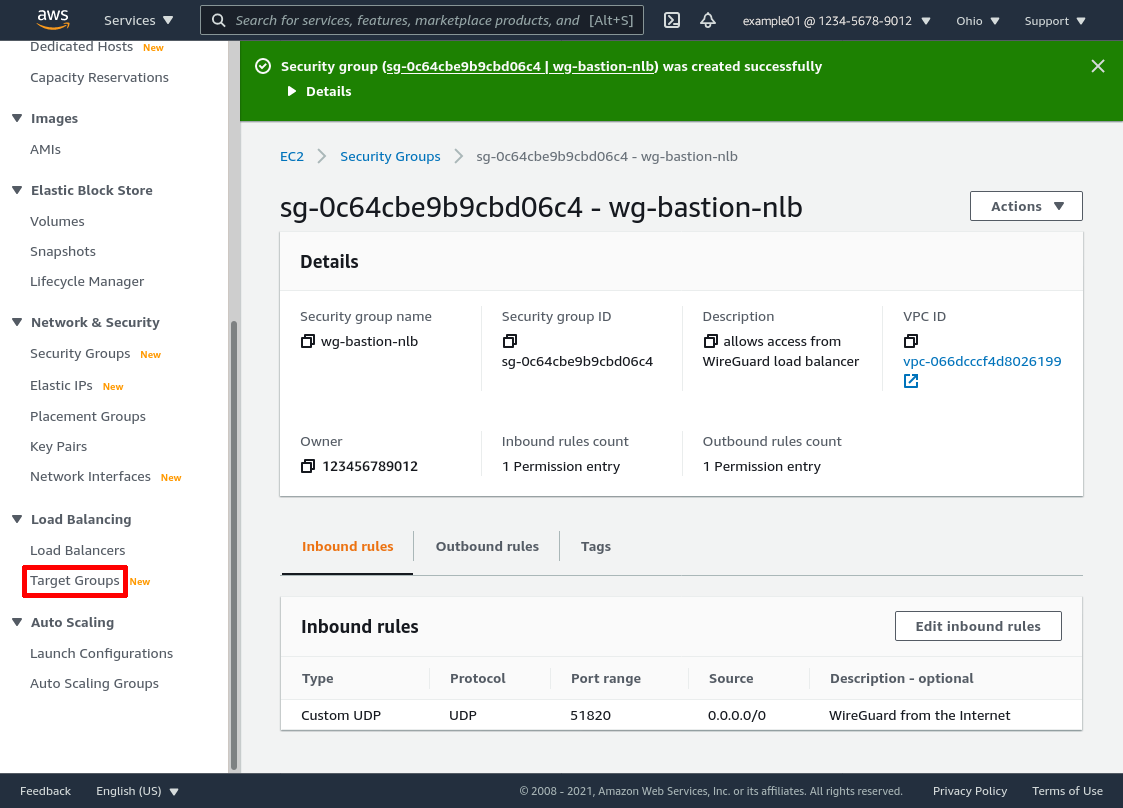
In the leftnav of the AWS console, click the Target Groups link:
Then click the Create target group button:
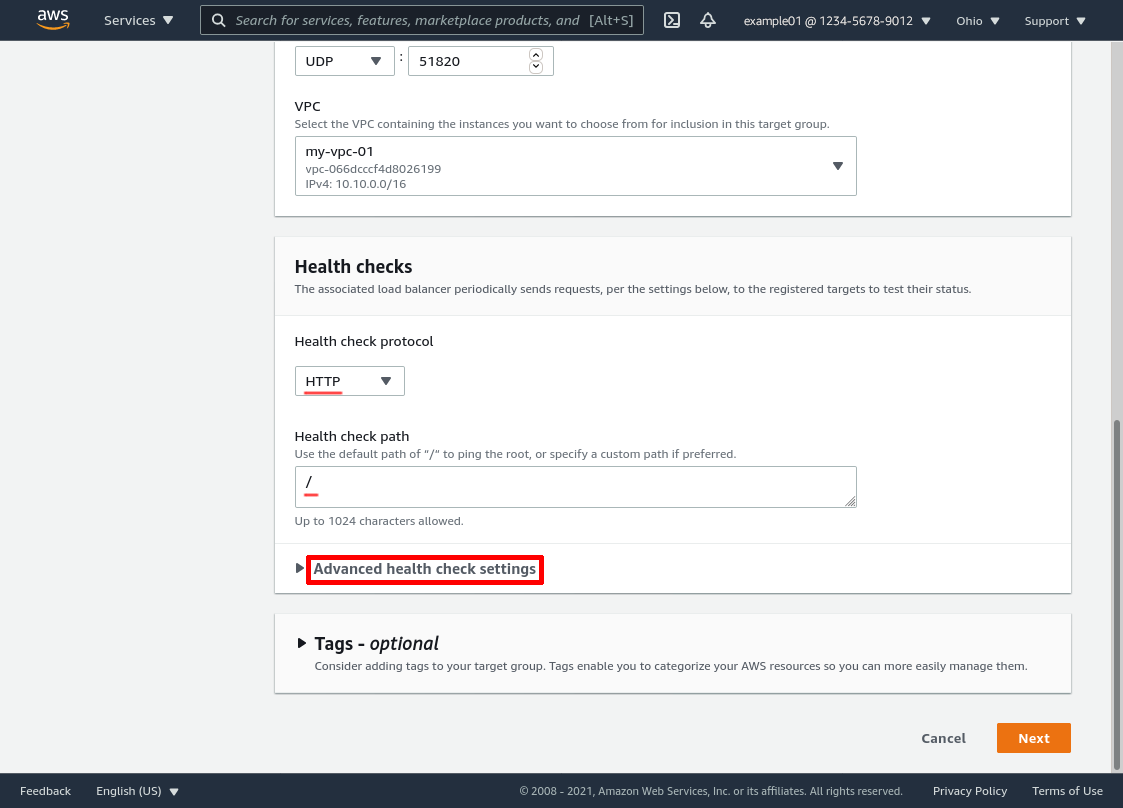
In the “Basic configuration” section, select Instances as the target type. Enter a Target group name (like wg-bastion-servers in this example) that will help you distinguish this target group from the target groups of any other load balancers you set up. For Protocol, select UDP; for Port, select 51820; and for VPC, select the VPC in which the servers live (my-vpc-01 in this example):

In the “Health checks” section, for Health check protocol, select HTTP. Set the Health check path to /. Then click the Advanced health check settings toggle button:
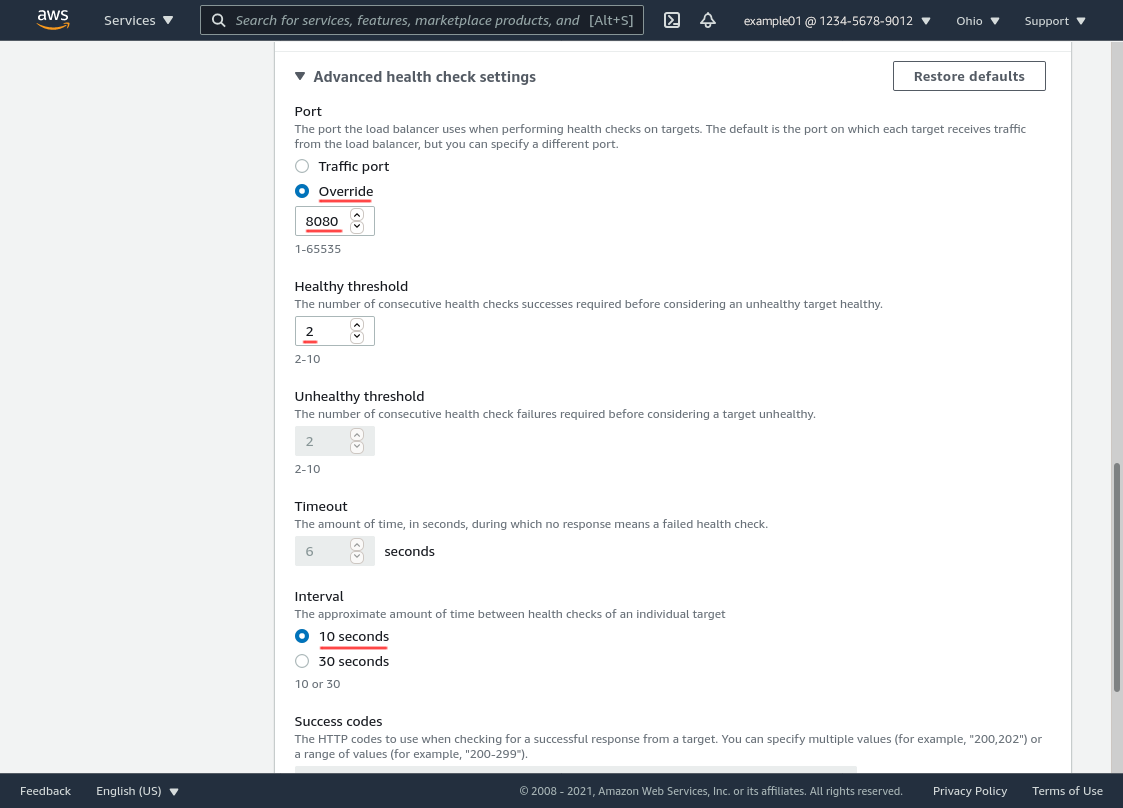
In the “Advanced health checking settings” section, select the Override radio button for the Port option, and enter the port number on which the wg-health-check service is listening on your WireGuard servers (which we set up in the Set Up WireGuard Server Health Check section above) — 8080 is what we’re using in this example. Set the Healthy threshold to 2 and the Interval to 10 seconds (the minimum for each, since our health check is lightweight and a reliable indicator of server health):
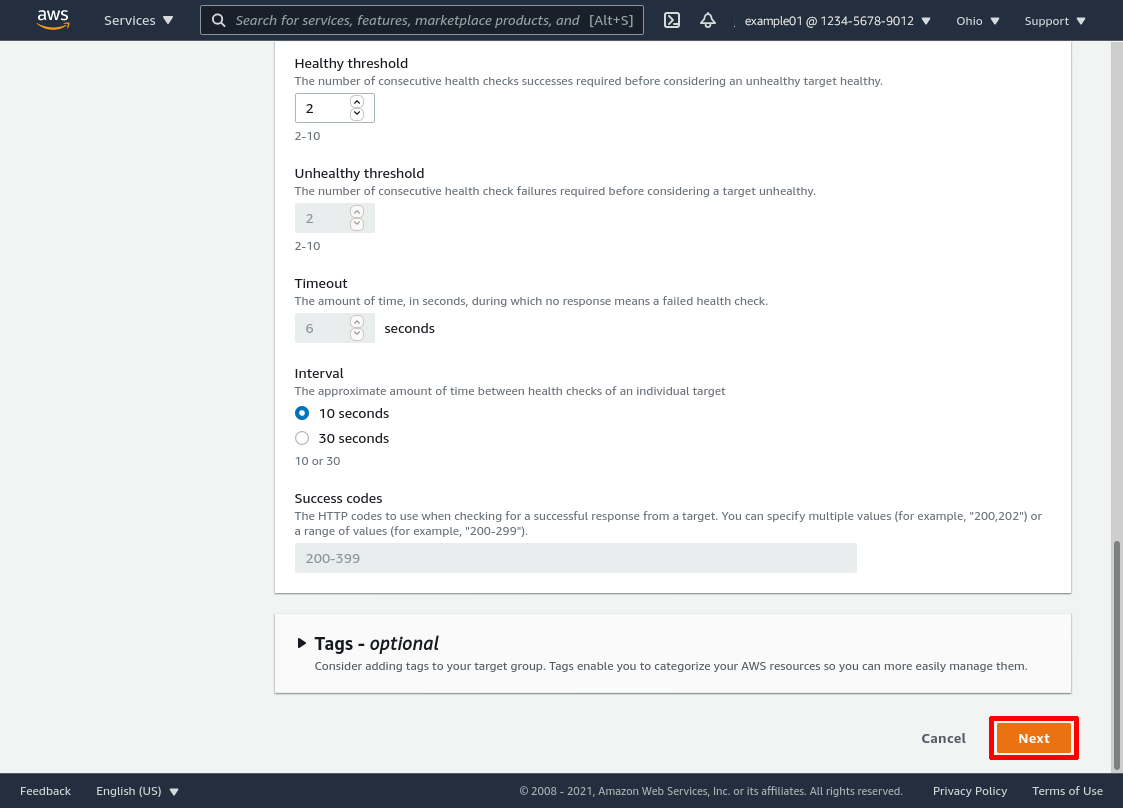
Then click the Next button:
In the “Available instances” section, select all your WireGuard servers, and click the Include as pending below button:
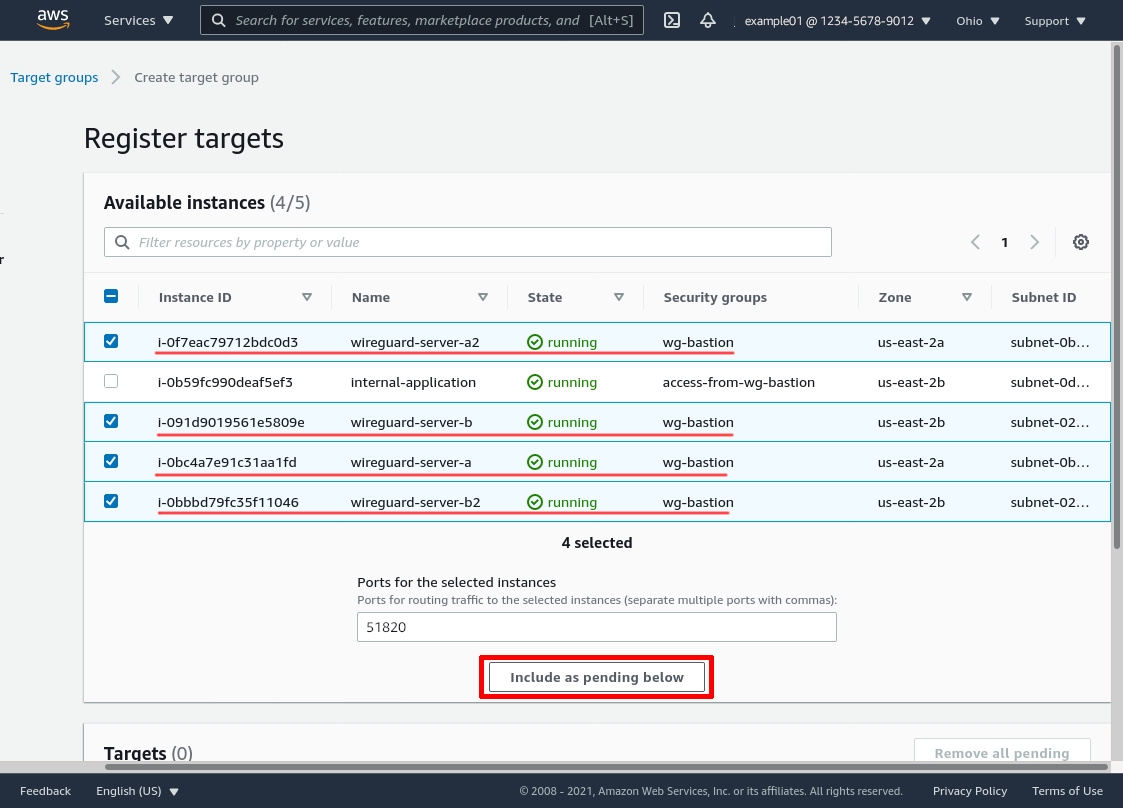
Over time, as you stand up new WireGuard servers and tear down old ones, you’ll update this list of available instances (usually through the same automation you have for standing up and tearing down the servers).
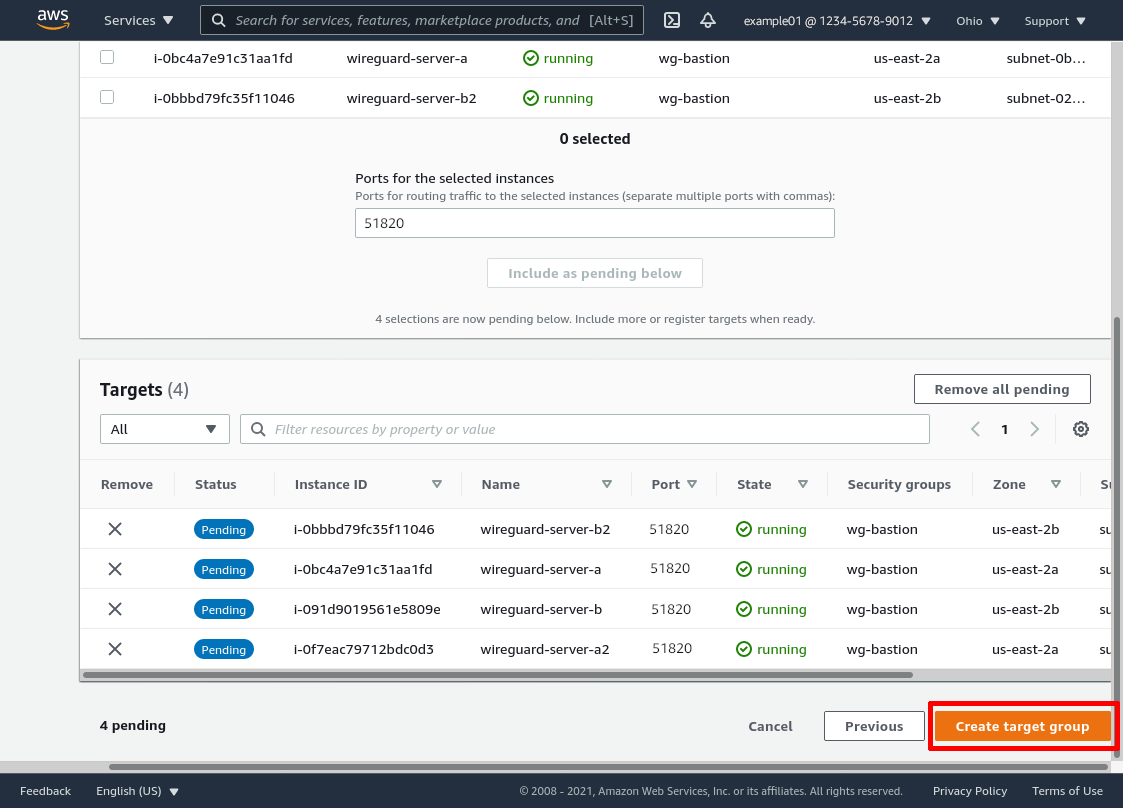
Those WireGuard servers will now appear in the “Targets” section. Click the Create target group button to finish:
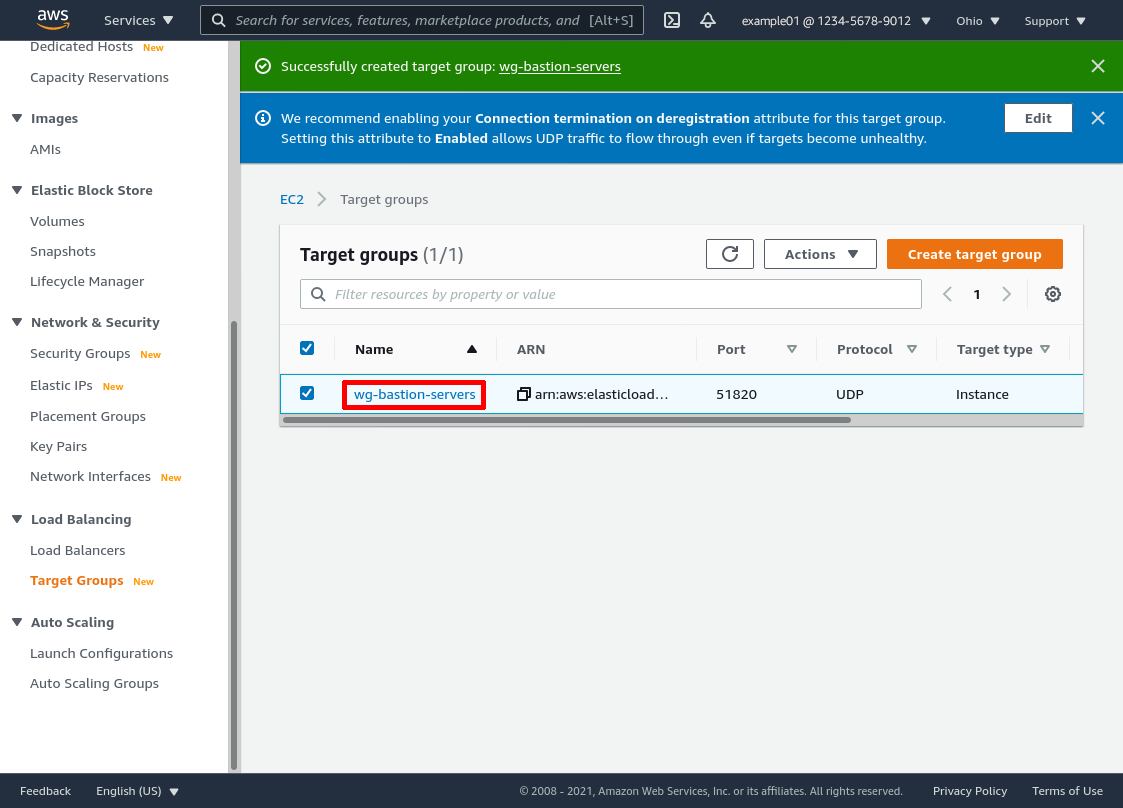
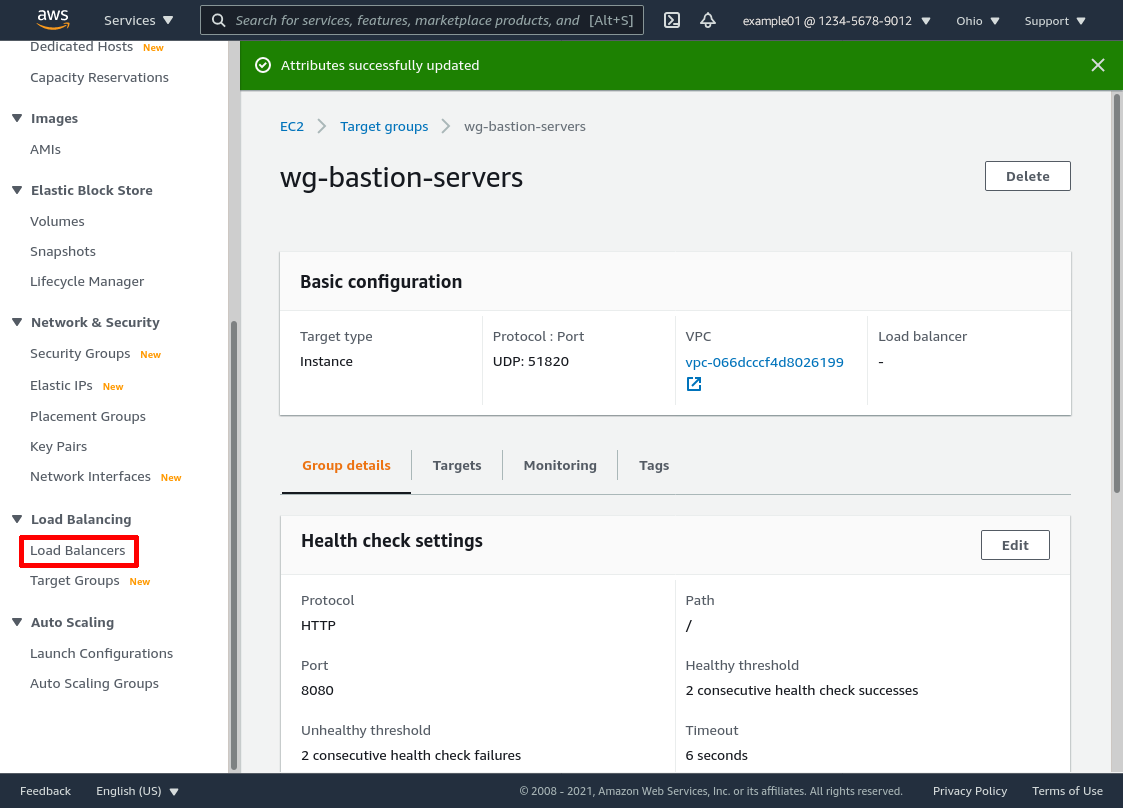
Click the link to the new target group (wg-bastion-servers) in the target group list:
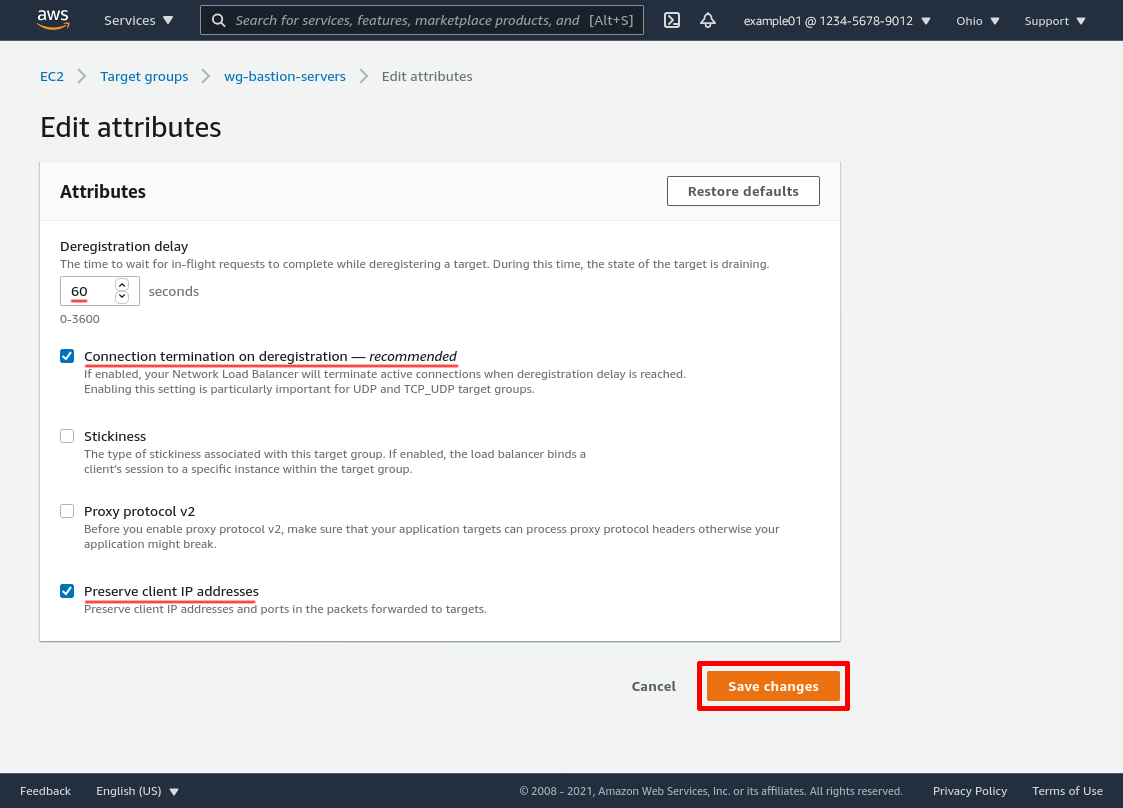
Then scroll down to the “Attributes” section of the group’s details page, and click the Edit button:
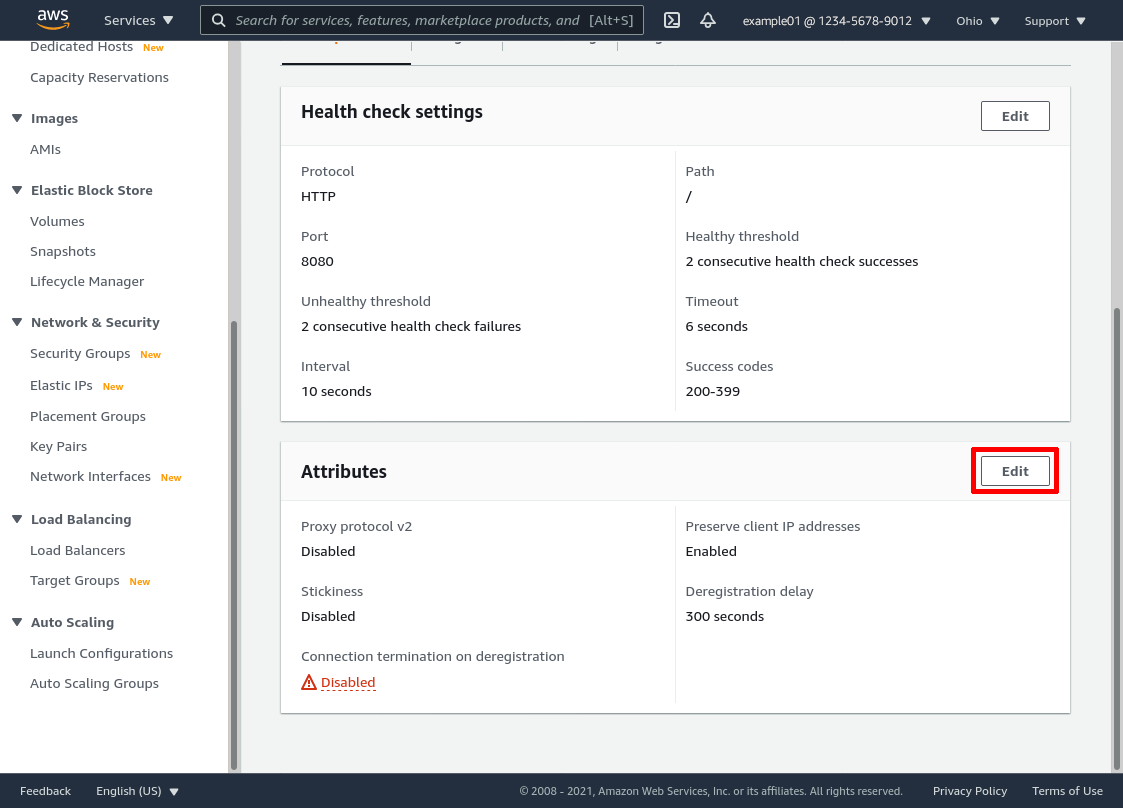
Adjust the Deregistration delay setting to the maximum number of seconds you expect your internal applications to take to respond to user requests (in this example, I lowered it to 60 because I’m impatient — the drawback to setting this to a higher number is that you have to wait longer when you want to remove an old server from service). Check the Connection termination on deregistration and Preserve client IP addresses checkboxes (but leave “Stickiness” and “Proxy protocol v2” unchecked). Then click the Save changes button:
Create Load Balancer
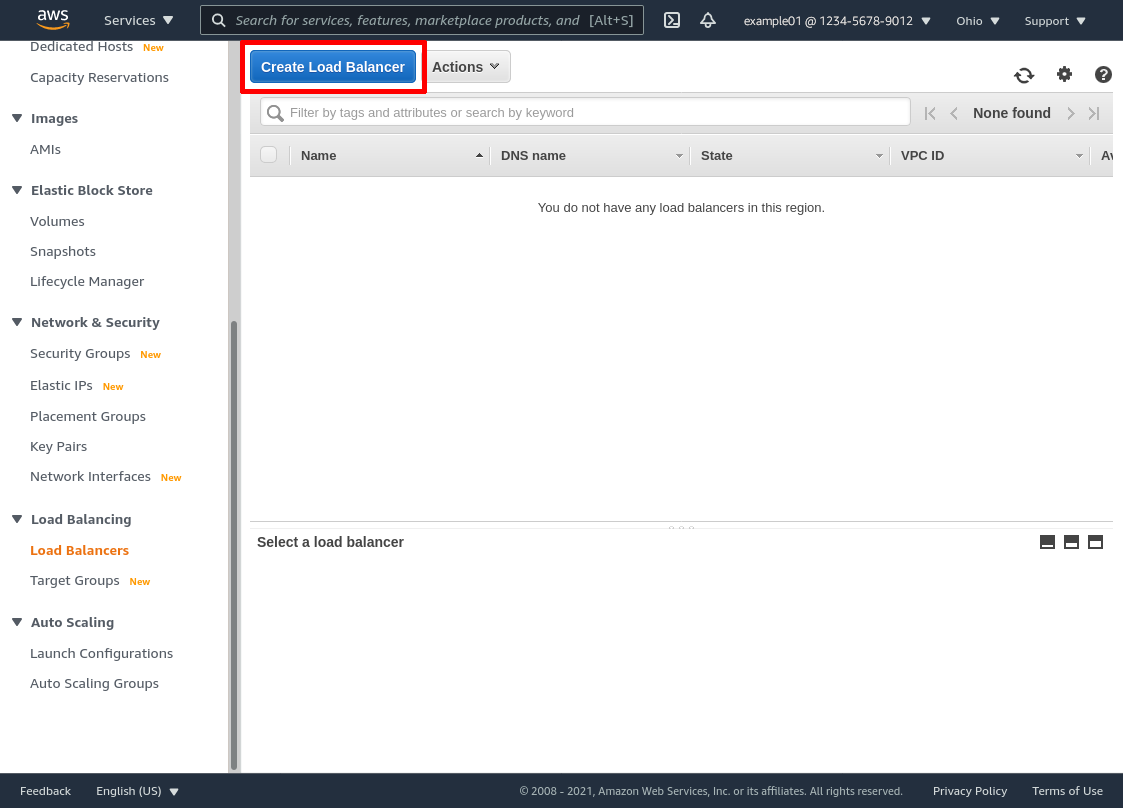
Now we can set up the NLB proper. In the leftnav of the AWS console, click the Load Balancers link:
Then click the Create Load Balancers button:
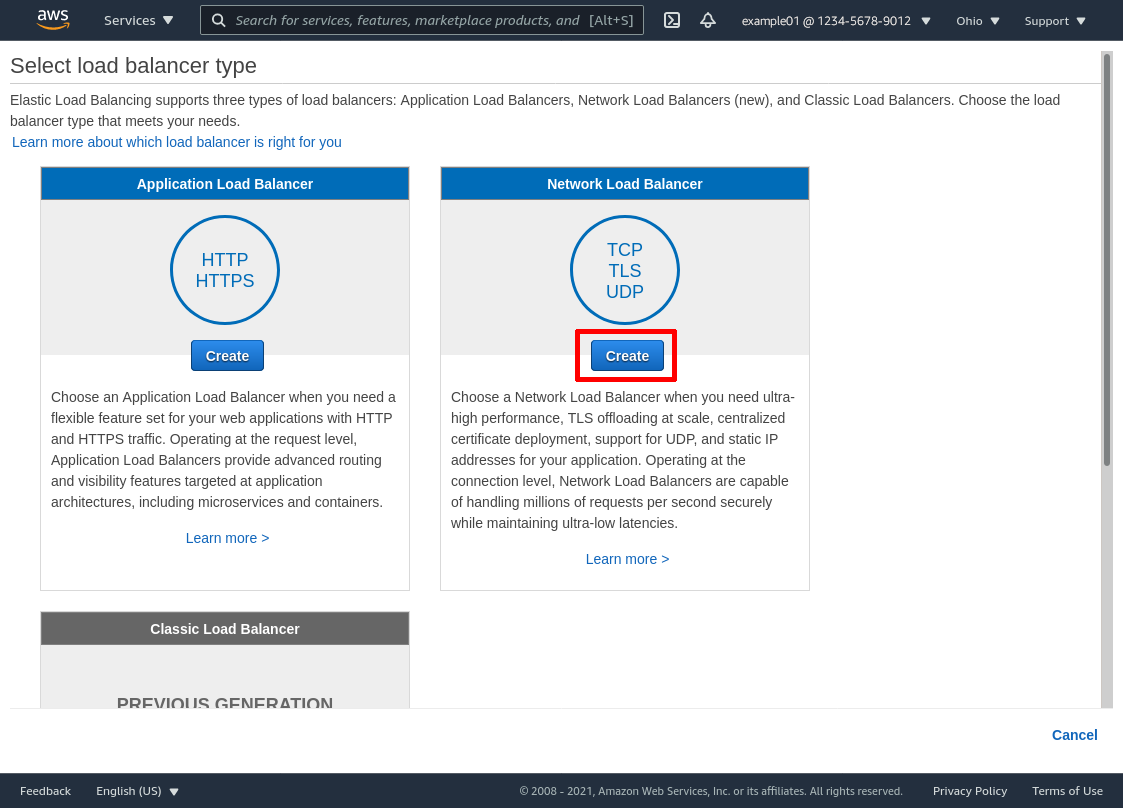
Then click the Create button under the “Network Load Balancer” section:
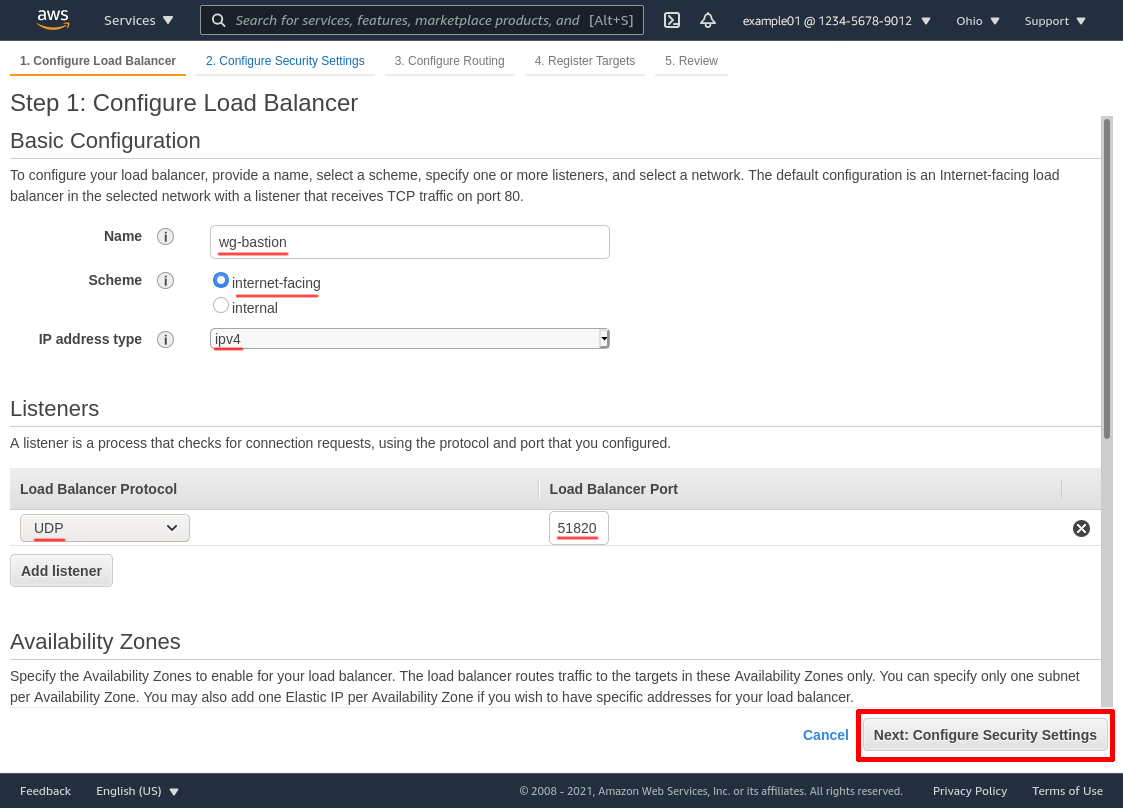
In the “Basic Configuration” section, enter a Name for the load balancer that will help you distinguish it from other load balancers you set up (in this example, I simply named it wg-bastion). Select internet-facing for Scheme, and ipv4 for IP address type. In the “Listeners” section, you need just the one row: for Load Balancer Protocol, select UDP, and for Load Balancer Port, enter 51820:
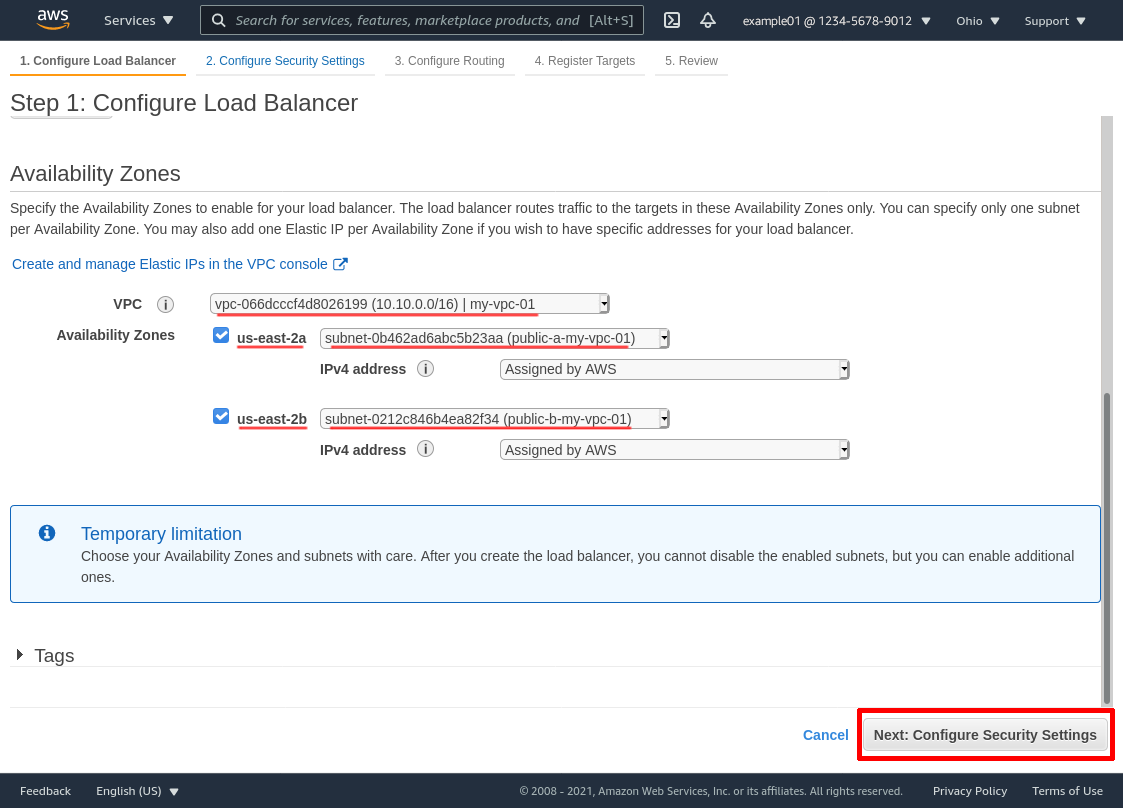
In the “Availability Zones” section, select the VPC in which the WireGuard servers live (my-vpc-01 in this example). Select all the Availability Zones in which you run WireGuard servers — and select the public subnet for each zone (named public-a-my-vpc-01 and public-b-my-vpc-01 in this example). Then click the Next: Configure Security Settings button:
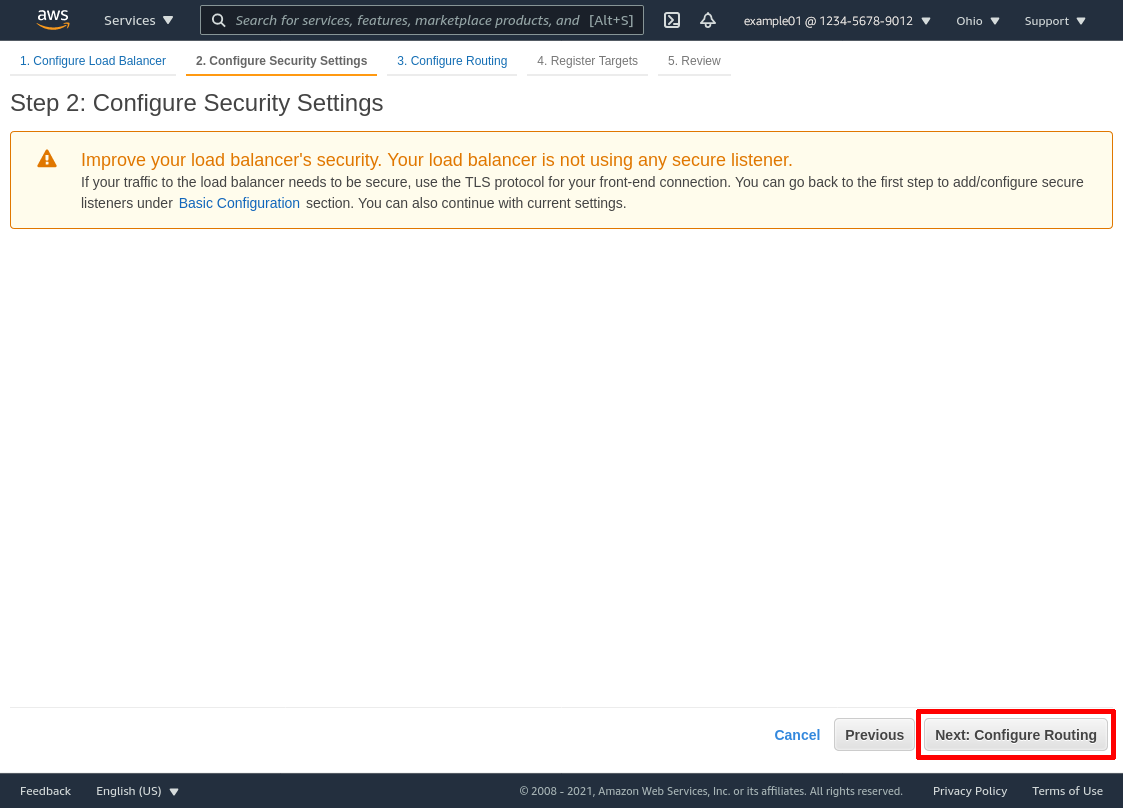
On the next page, ignore the warning (TLS is a non-sequitur in this case), and click the Next: Configure Routing button:
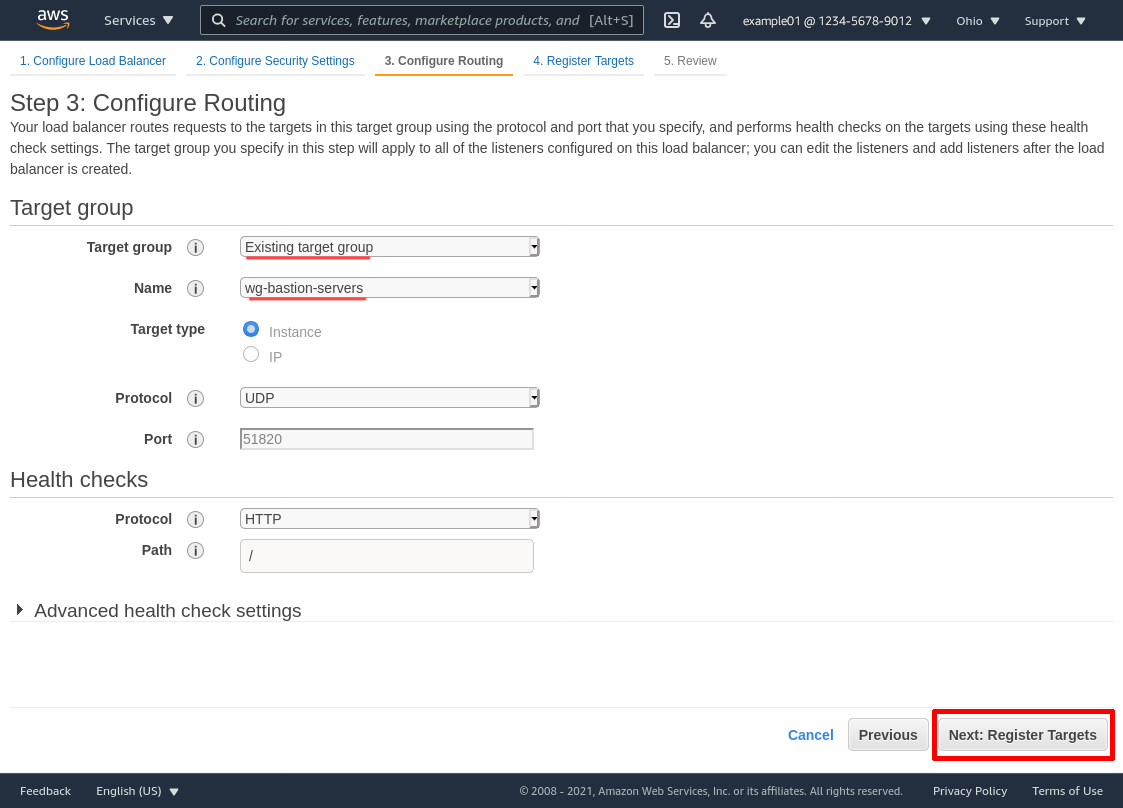
In the “Target Group” section, select Existing target group from the Target group dropdown, and then select the target group we created earlier (wg-bastion-servers in this example) from the Name dropdown. Then click the Next: Register Targets button:
On this page, the WireGuard server EC2 instances we selected previously for the target group should be listed. So click the Next: Review button:
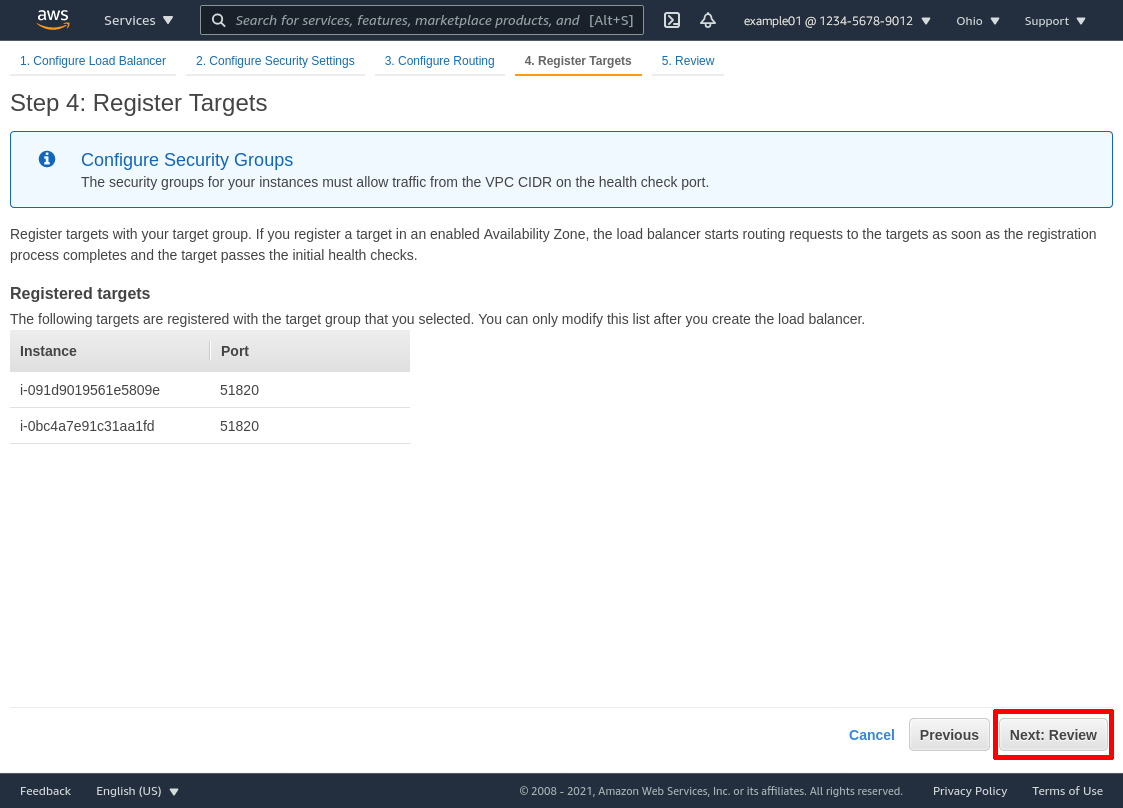
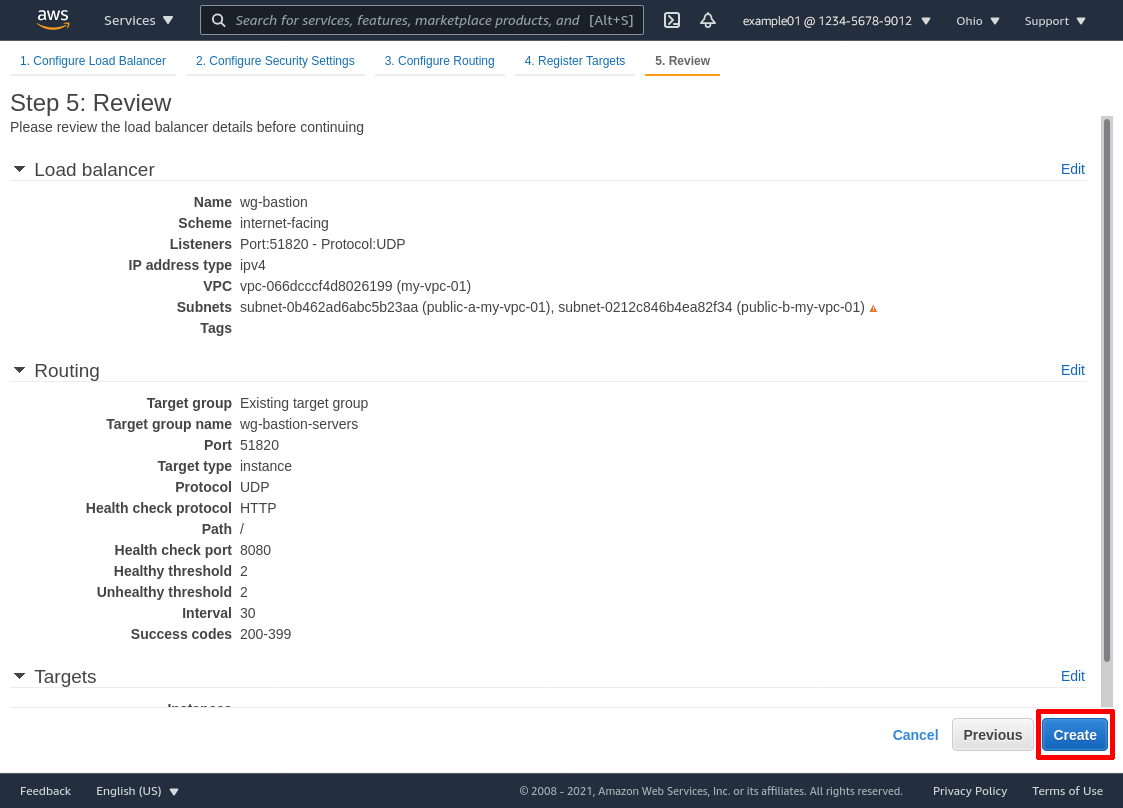
If everything looks good, click the Create button:
Create Global Accelerator
The IP addresses used by the AWS’s elastic load balancers may change from time to time. To avoid having to re-configure our WireGuard clients when this happens, we can allocate a pair of static IP addresses for the NLB by creating a Global Accelerator for it.
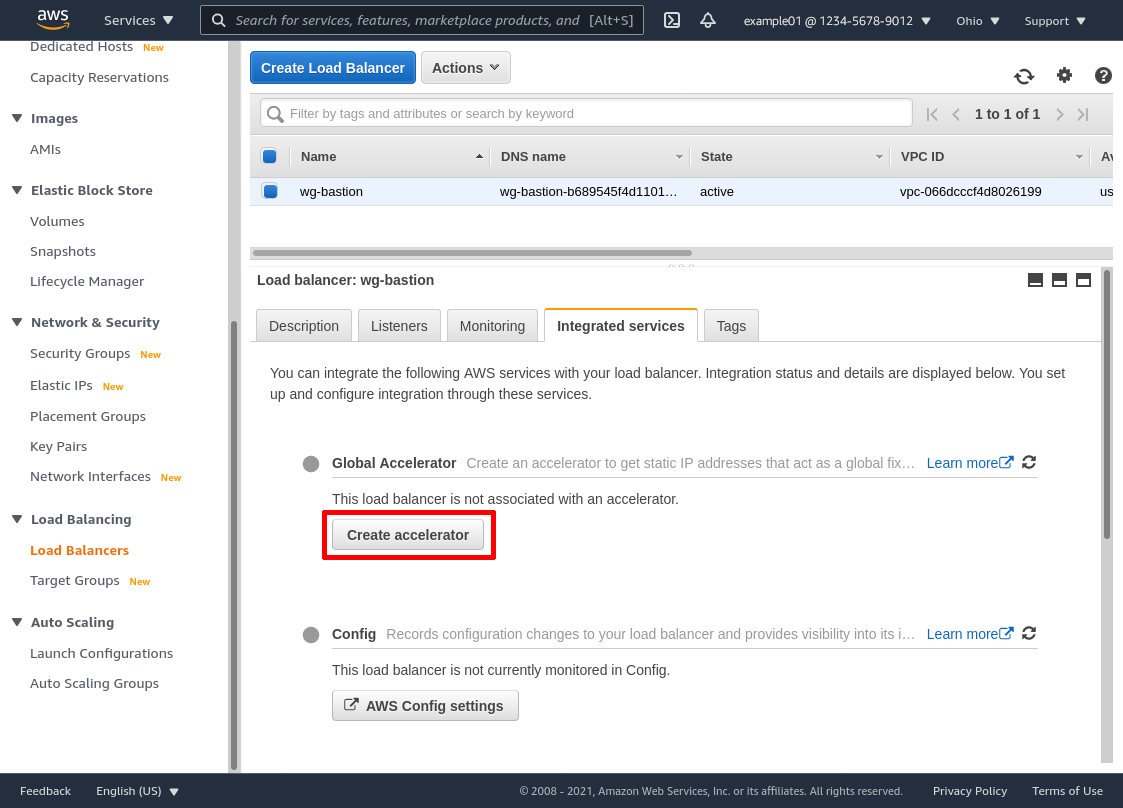
To do so, go back to your list of load balancers, select your new load balancer (wg-bastion in this example), click the Integrated services tab, and then click the Create accelerator button:
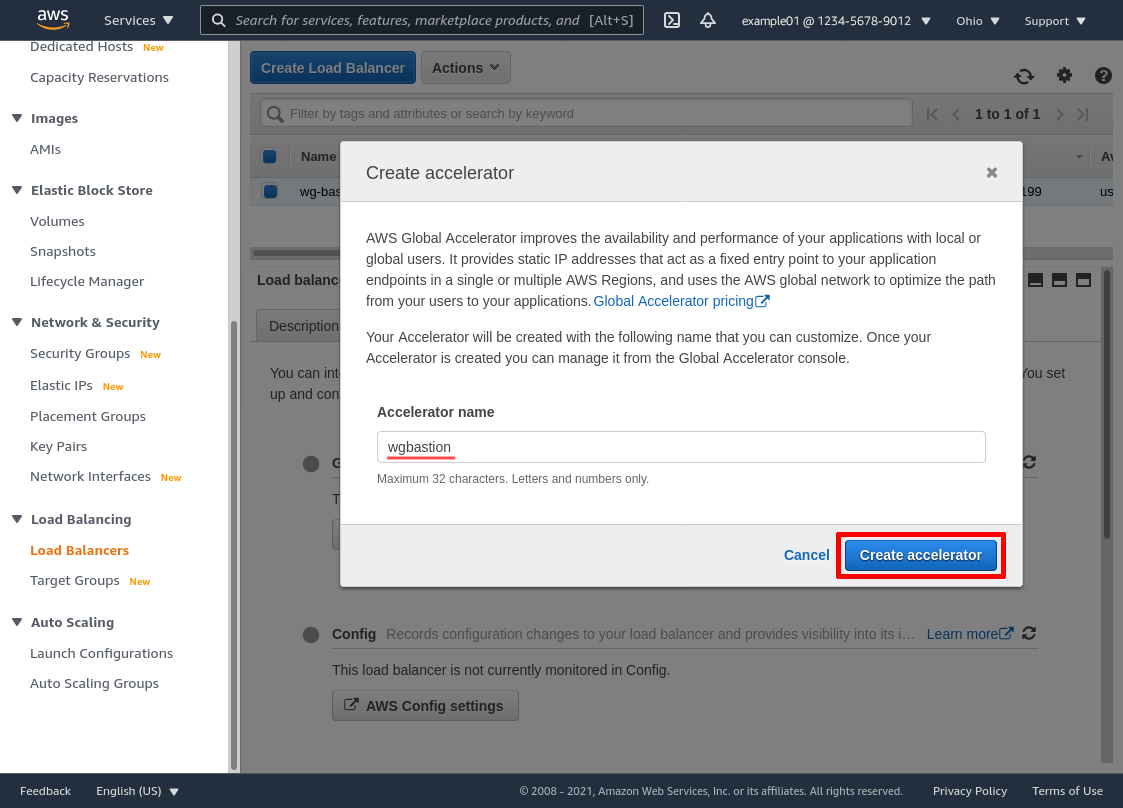
Enter an Accelerator name (wgbastion in this example), and click the Create accelerator button:
Wait a moment for the accelerator to be created, then copy one of the IP addresses from the Static IP address set (I’ll use 75.2.2.228 for this example). This will be the IP address you distribute to WireGuard clients as the endpoint for your WireGuard bastion servers:
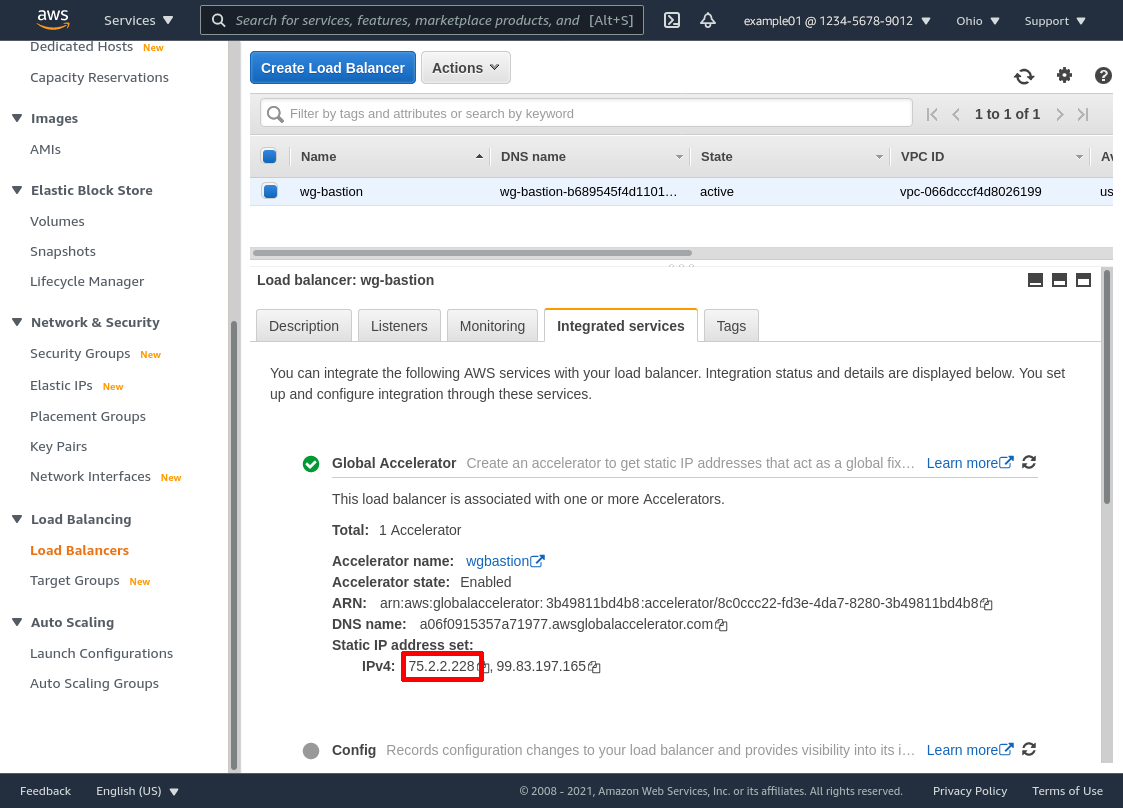
Alternately, you could distribute the DNS name for the accelerator (a06f0915357a71977.awsglobalaccelerator.com in this example) to clients instead of an IP address; or you could create a custom DNS record (eg internal-vpn.example.com) that points (via CNAME or Route53 alias) to the DNS name for the accelerator, and distribute that custom DNS name to clients instead.
Update WireGuard Client Config
On your local workstation, update the WireGuard configuration for your connection to the VPC we set up in the Configure WireGuard Client section of the original Point to Cloud With AWS Private Subnets article (this file was named /etc/wireguard/my-vpc-01.conf). Replace the Endpoint setting in that config file with the IP address of the accelerator copied above (75.2.2.228):
# /etc/wireguard/my-vpc-01.conf

# local settings for Justin's Workstation
[Interface]
PrivateKey = AAAAAAAAAAAAAAAAAAAAAAAAAAAAAAAAAAAAAAAAAEE=
Address = 10.0.0.1/32

# remote settings for WireGuard Server
[Peer]
PublicKey = fE/wdxzl0klVp/IR8UcaoGUMjqaWi3jAd7KzHKFS6Ds=
Endpoint = 75.2.2.228:51820
AllowedIPs = 10.10.0.0/16
Then restart your my-vpc-01 WireGuard interface with the following command:
justin@jws:~$ sudo systemctl restart wg-quick@my-vpc-01.service
Now, just like in the original article, with the new endpoint in place you should be able to connect to the internal applications you have running in the private subnets of your VPC from your workstation, simply by using the private IPv4 addresses of those applications. In the original article, we set up a test web app running on port 8080 of an EC2 instance with a private IPv4 address of 10.10.21.130. With our updated WireGuard connection (and that app still running), we should be able to access it from our local workstation just as before:
justin@jws:~$ curl 10.10.21.130:8080
<!DOCTYPE html PUBLIC "-//W3C//DTD HTML 3.2 Final//EN"><html>
<title>Directory listing for /</title>
...
Limitations
Under normal conditions, using a Network Load Balancer with WireGuard will work quite smoothly. As described in AWS’s Connection Idle Timeout documentation, NLB with UDP maintains a “flow state” similar to NAT (Network Address Translation), where incoming UDP packets received with the same source IP address and port will be sent to the same load balancer target. Under normal conditions, this flow state is maintained until the NLB doesn’t see any new UDP packets from the same source address and port for 120 seconds. (This flow state setting is not configurable, and is separate from the “Stickiness” setting for NLB target groups.)
This flow state matches WireGuard’s internal session state quite nicely — WireGuard re-keys existing connections via a new “handshake” every 120 seconds. Furthermore, if NLB didn’t maintain any session affinity, and routed each UDP packet to a different WireGuard server at random, WireGuard clients would never be able to set up a stable connection with any individual WireGuard server.
So with this flow state affinity, as long as a connection between an individual WireGuard client and the NLB is under frequent use, the NLB will route the client’s traffic to the same WireGuard server, where it can continue using its existing session (no extra handshakes required); and when that connection pauses (for at least 2 minutes or more), and then is taken up again, the NLB may route it to the same server, or to a different WireGuard server. Either way, the WireGuard server and client will perform a new handshake and allow the end user to maintain their connectivity to your internal applications without missing a beat.
Where this flow state affinity doesn’t work well is when a server becomes unhealthy (or you deregister it from service). It appears that NLB has an undocumented behavior where when a server becomes unhealthy or is deregistered, the flow state affinity for the old server still persists — albeit with a reduced inactivity timeout. Whereas under normal conditions, this (documented) timeout is 120 seconds, when a server becomes unhealthy or is deregistered, the (undocumented) timeout appears to be 30 seconds.
This means that if a WireGuard client is actively communicating through a WireGuard server via NLB, and the WireGuard server fails, is shut down, or is deregistered, the NLB will continue to route that client’s traffic to the old, unresponsive server until the client stops trying to send traffic to the NLB for at least 30 seconds. Only after the client pauses for at least 30 seconds will the NLB reset its flow state, and send new traffic from the client to a new, healthy WireGuard server.
This is a bigger problem then you might think at first blush. If the client was tunneling TCP through the WireGuard connection, the client’s own network stack will continue to retry packets for which it didn’t receive a response, sometimes for minutes at a time. And if the client is running an application that automatically sends keep-alive or other repeated, periodic messages through the WireGuard connection, the client may never pause sending traffic long enough for the NLB to reset its flow state. In particular, WireGuard’s own PersistentKeepalive setting (if set to less than a couple of minutes) will generate enough traffic to prevent a flow-state reset.
There are two workarounds for this issue. The first is to register at least two targets (ie run and maintain two WireGuard servers) in each availability zone for which the NLB is configured. When one target goes down, if another target in the same AZ is healthy, the NLB will failover to that other target after 90 seconds, even if the client hasn’t yet paused its traffic for 30 seconds. (This is why I recommend running at least two WireGuard servers per AZ.)
The first workaround won’t help you if an entire AZ goes down, however. The second workaround is to tell your users that if their connection to an internal application appears to hang, shut down their WireGuard client (ie bring down the WireGuard interface connected to the VPC on their computer) and wait a minute before starting it back up again. Shutting down the WireGuard interface will ensure no packets will be sent from their client to the NLB, allowing the NLB to reset its flow state for the client. Once reset, the NLB will route their traffic to a healthy WireGuard server when they start their client back up again.
As kludgy as these two workarounds may be, the silver lining is that users who aren’t actively using their WireGuard connection when a server goes down (like if it dies during off hours) won’t notice any issues, and won’t have to do anything to adjust to the missing server.