Point to Cloud WireGuard With an Azure Hub VNet
This article will walk through how to set up WireGuard to enable remote client access to an internal web application, where the internal application is in an isolated Microsoft Azure Virtual Network (VNet). This is a common design, embodied in the Hub-Spoke Network Topology in Azure reference architecture.
In this article, we’ll first build an example hub VNet and an isolated spoke VNet; then we’ll launch a VM (Virtual Machine) for a bastion WireGuard server into the hub VNet, and a VM for an example web app into the spoke VNet. Through the WireGuard server, we’ll connect from our local workstation to the example app. The following diagram illustrates this scenario:

The WireGuard server in this scenario, located in the wg-bastion subnet of the demo-hub VNet in the above diagram, allows your local workstation to access otherwise isolated subnets in spoke VNets — like the example app located in the internal-apps subnet of the demo-spoke VNet. The WireGuard server acts as a bastion host (also known as a relay server or jump box) for spoke VNets, providing similar functionality as the Azure Bastion service (albeit not as a managed service).
The advantage of using a WireGuard server instead of Azure Bastion, however, is that you’re not just limited to SSH and RDP — you can easily connect to any type of network application running in your internal networks. You can still use Azure Network Security Groups (NSGs) to limit access from the bastion host to those specific network applications, and you can use the internal firewall on the WireGuard server itself to customize access per user.
We’ll set up the WireGuard network in this article with a Point to Site Topology, where the WireGuard server (with an IP address of 10.0.0.2 in the above diagram) provides NAT (Network Address Translation) to your spoke VNets for the other WireGuard peers in its network (like your workstation, with an IP address of 10.0.0.1 in the above diagram). This is the easiest way to enable access to internal networks in Azure, requiring no changes to your existing Azure route tables or other network configuration. Once you complete the initial WireGuard server setup, you can grant more clients access to the same VPN (Virtual Private Network) simply by adding additional peers to the WireGuard server’s configuration file.
If you already have a hub VNet set up with several spoke VNets and internal applications, you don’t have to create new ones to try out this scenario. You can skip the first four sections of this article, and just create a subnet in your existing hub VNet for the WireGuard bastion server (in the article, I named this subnet wg-bastion and gave it the 10.10.0.0/24 address space). You can also skip sections 6 and 11, and just update the existing NSGs that apply to your internal applications to Allow Inbound HTTP Access Through WireGuard (or whatever protocol is appropriate for your applications, if not HTTP).
Otherwise, follow these steps:
Register SSH Key
If you already have an SSH key registered with Azure with which you can connect to the VMs we’ll launch in later steps, you can skip this first step. Otherwise, we’ll register one now.
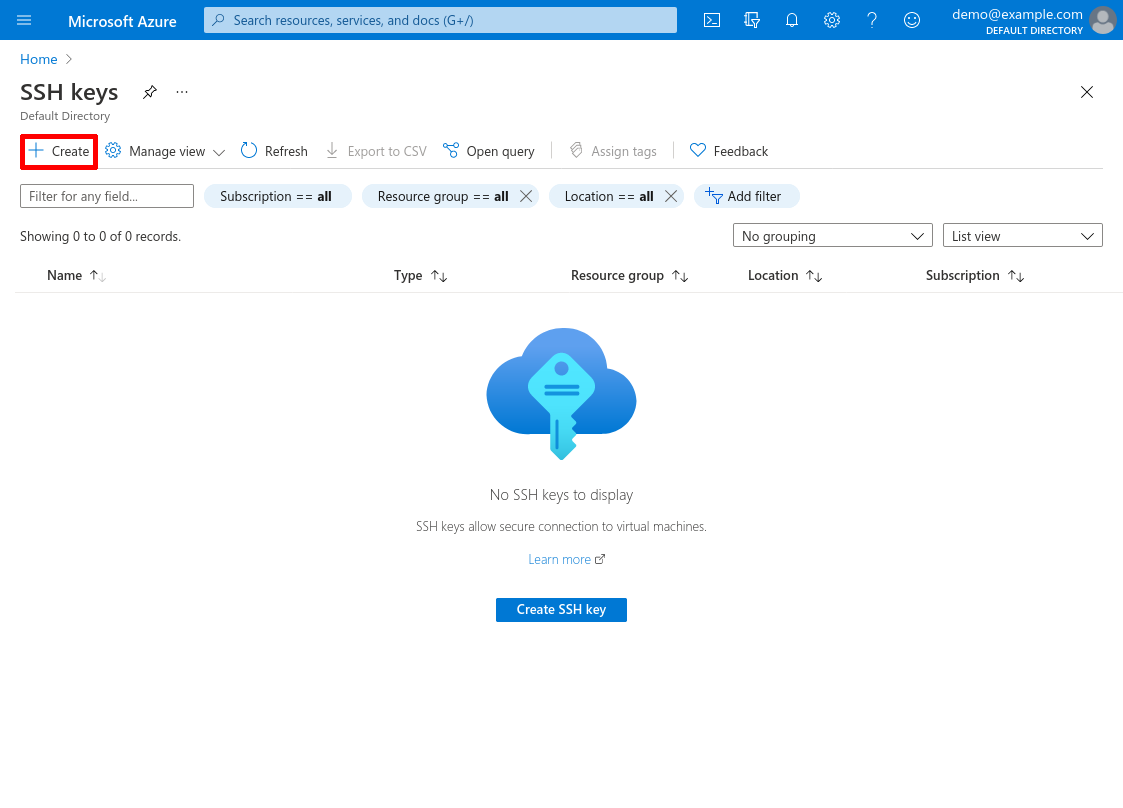
Log into the Azure Portal, and navigate to the SSH keys service (type ssh keys into the Azure search bar and click the “SSH keys” result under “Services”). On the main service page, click the Create button:
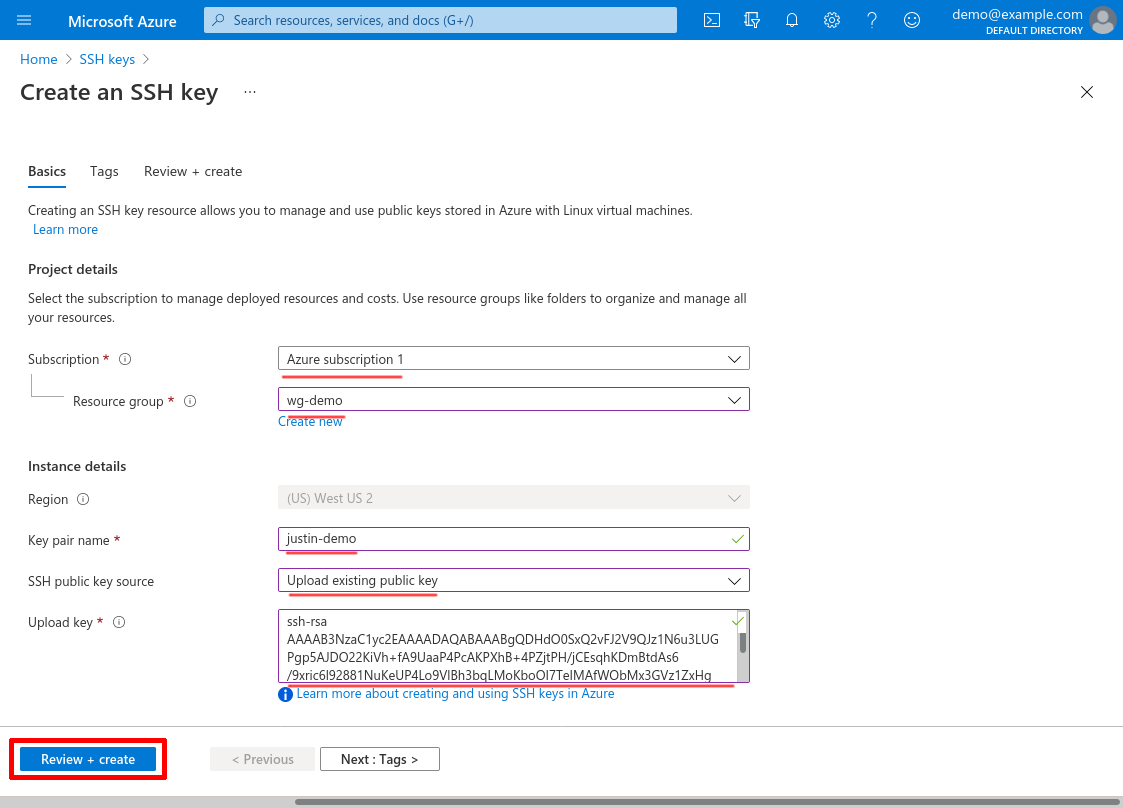
Select the Subscription and Resource group under which you’ll launch your VMs, then enter a Key pair name. I’ll name mine justin-demo for this example. Select Upload existing public key for SSH public key source, and paste in the content of the id_rsa.pub file containing the public key of the SSH key pair that you’ll use to connect to your VMs (this content should begin with ssh-rsa, followed by a long string of base64-encoded text). Then click the Review + create button:
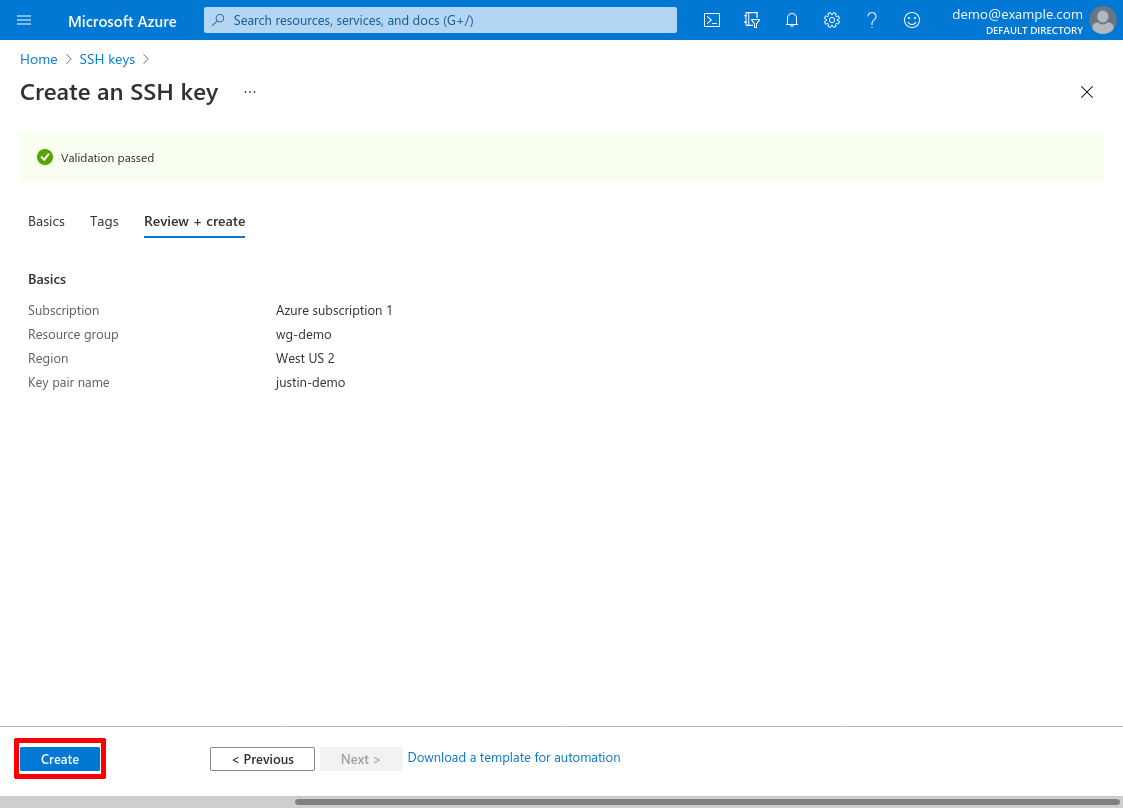
Then click the Create button:
Create Hub VNet
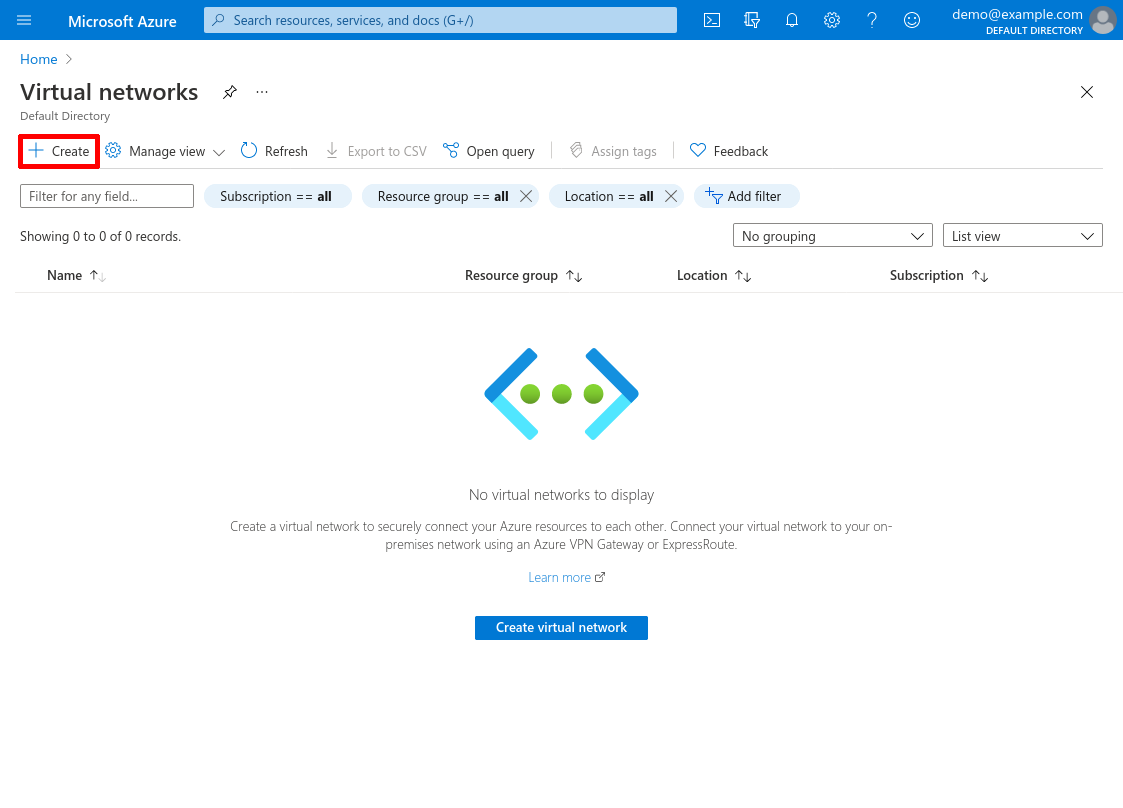
Now navigate to the Virtual networks service (type virtual networks into the Azure search bar and click the “Virtual networks” result under “Services”).
Click the Create button:
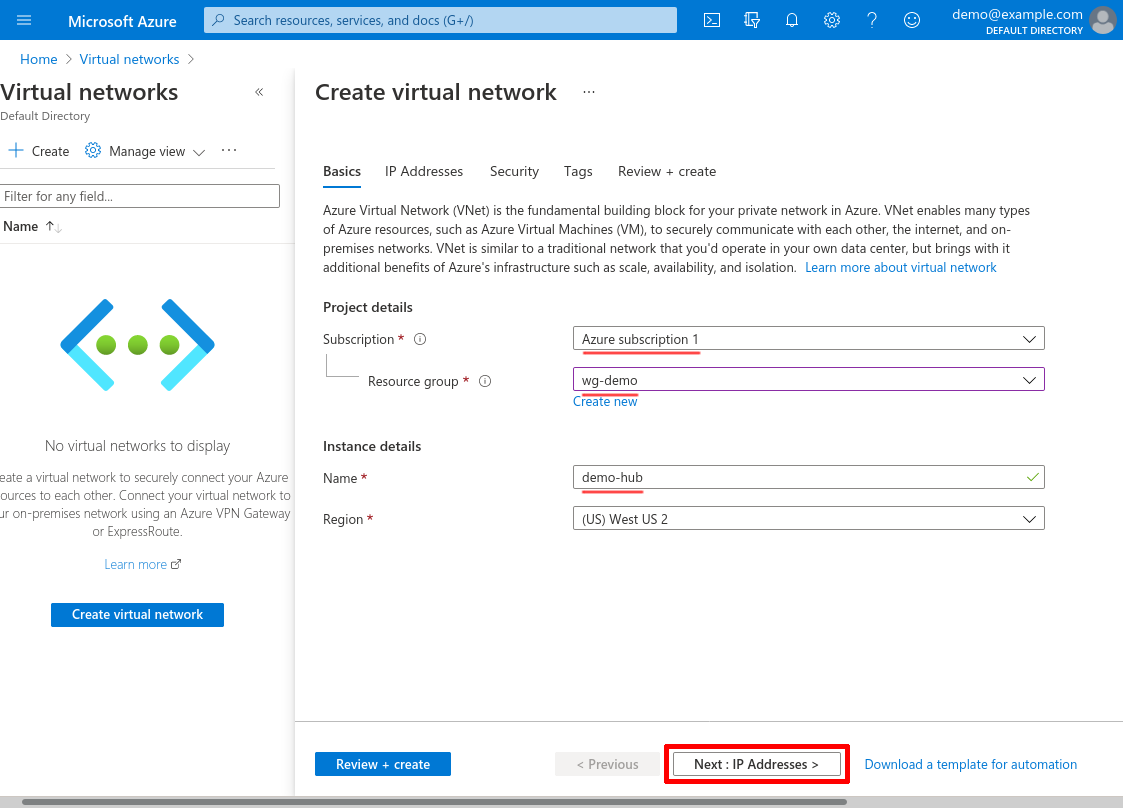
Select the Subscription and Resource group in which to create the VNet, then enter its Name. I’ll name the VNet demo-hub for this example. Then click the Next: IP Addresses button:
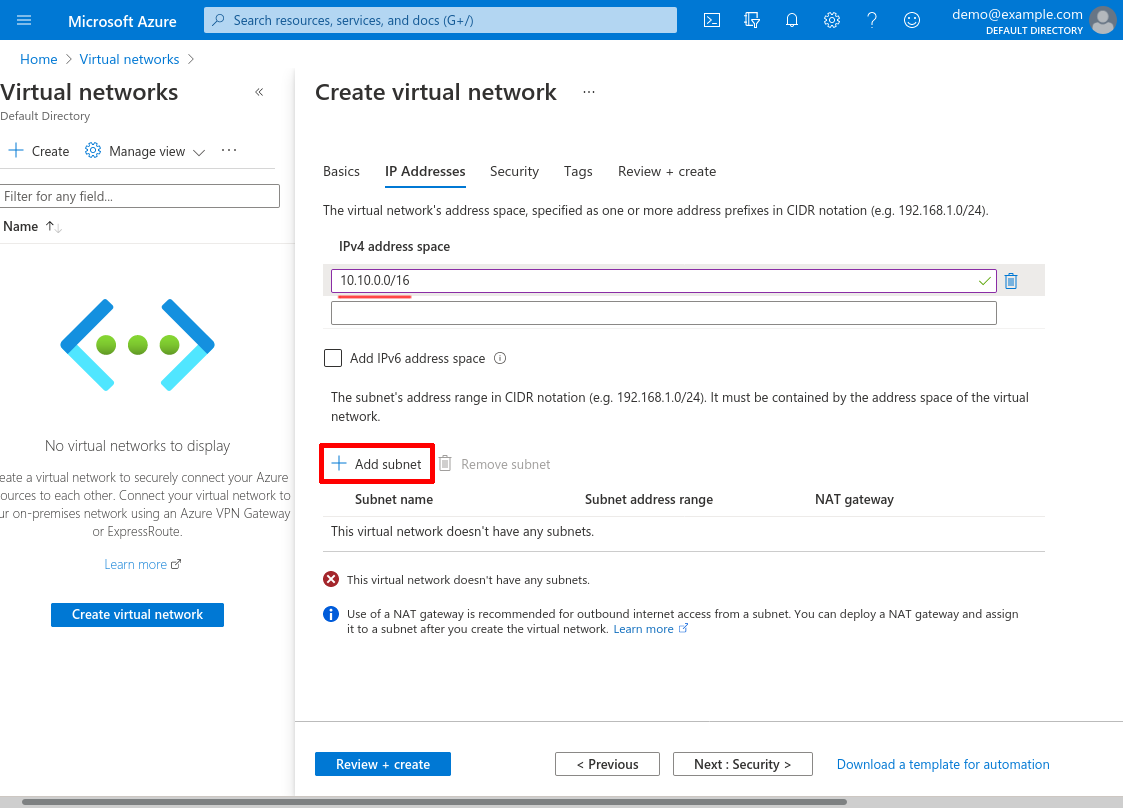
Enter an IPv4 address space for the hub VNet. I’ll use 10.10.0.0/16 for this example. Then click the Add subnet button:
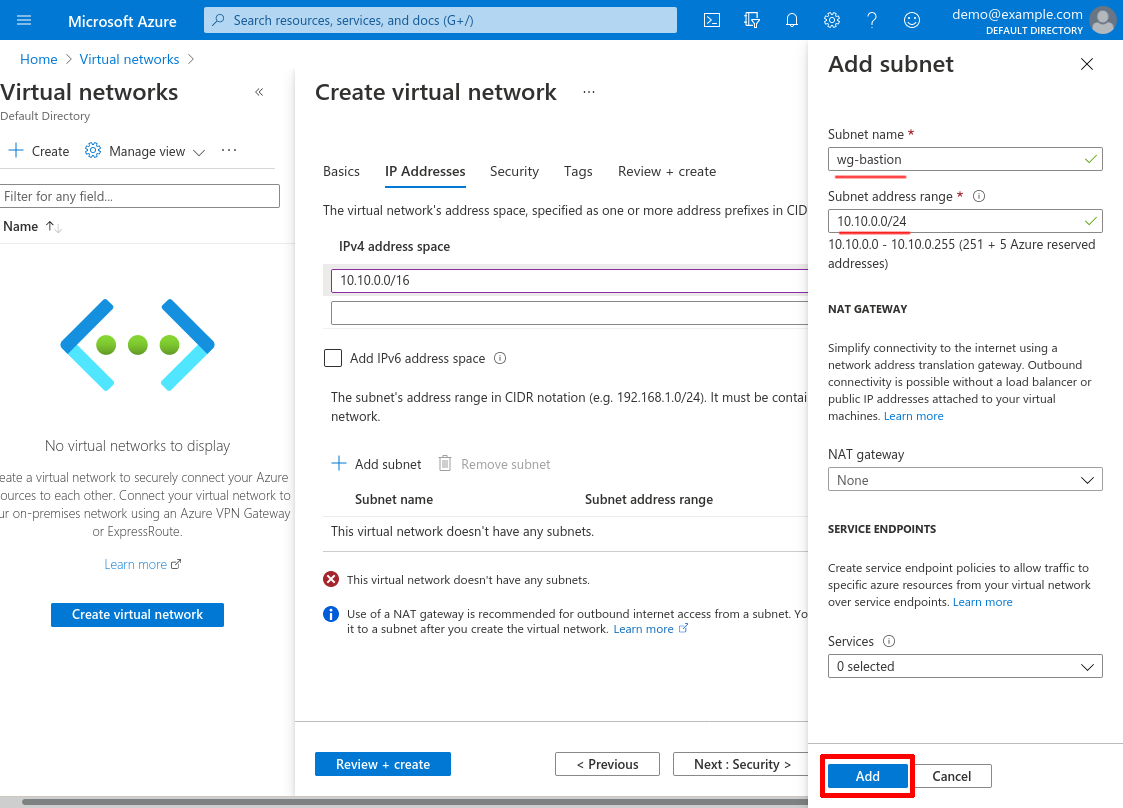
This subnet will be exclusively for WireGuard bastion servers, so for Subnet name, enter something like wg-bastion; and specify a Subnet address range that is a subnet of the IPv4 address space you selected for the VNnet — I’ll use 10.10.0.0/24 for this example (we’ll use this address range later in the Create Internal Application NSG step). Click the Add button:
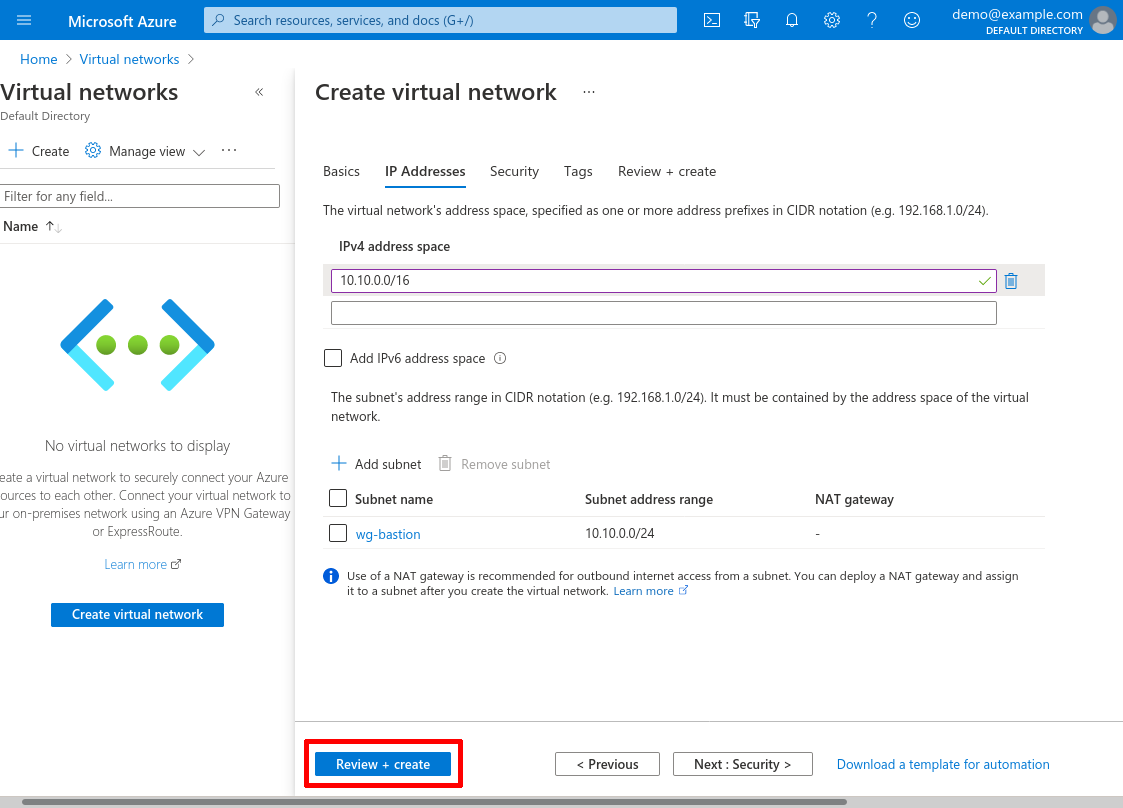
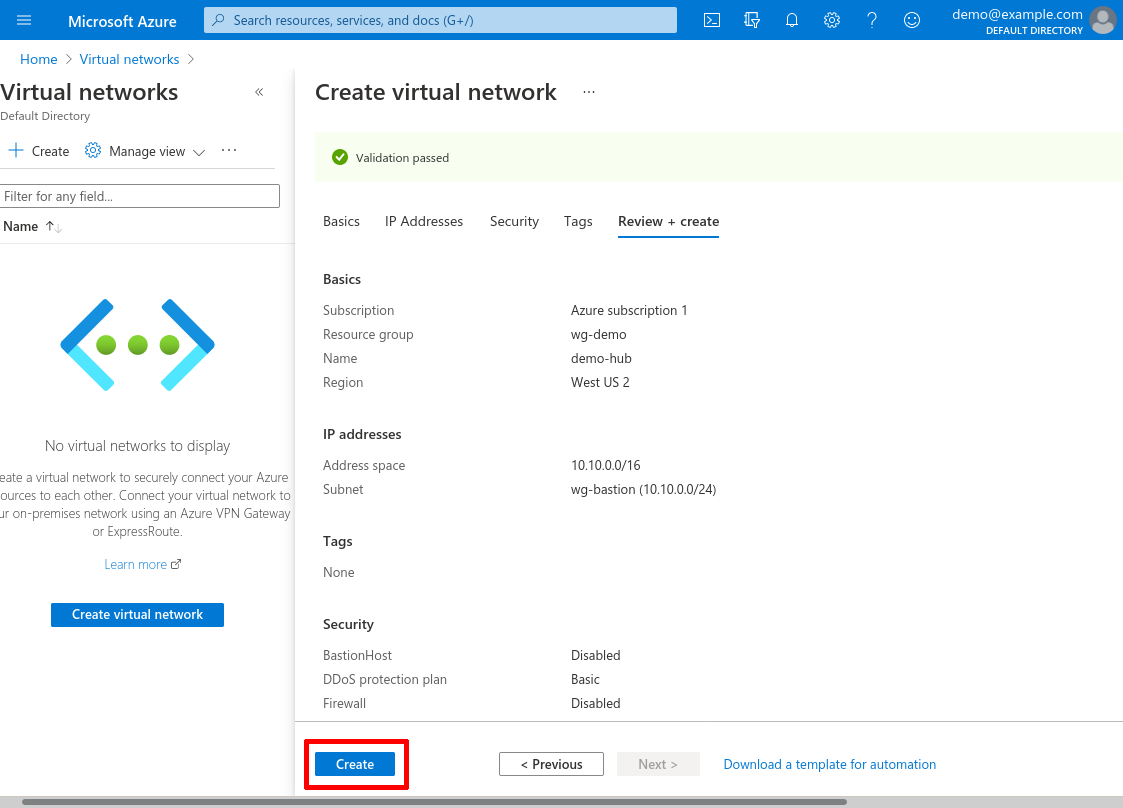
After that, click the Review + create button:
And then click the Create button:
Create Spoke VNet
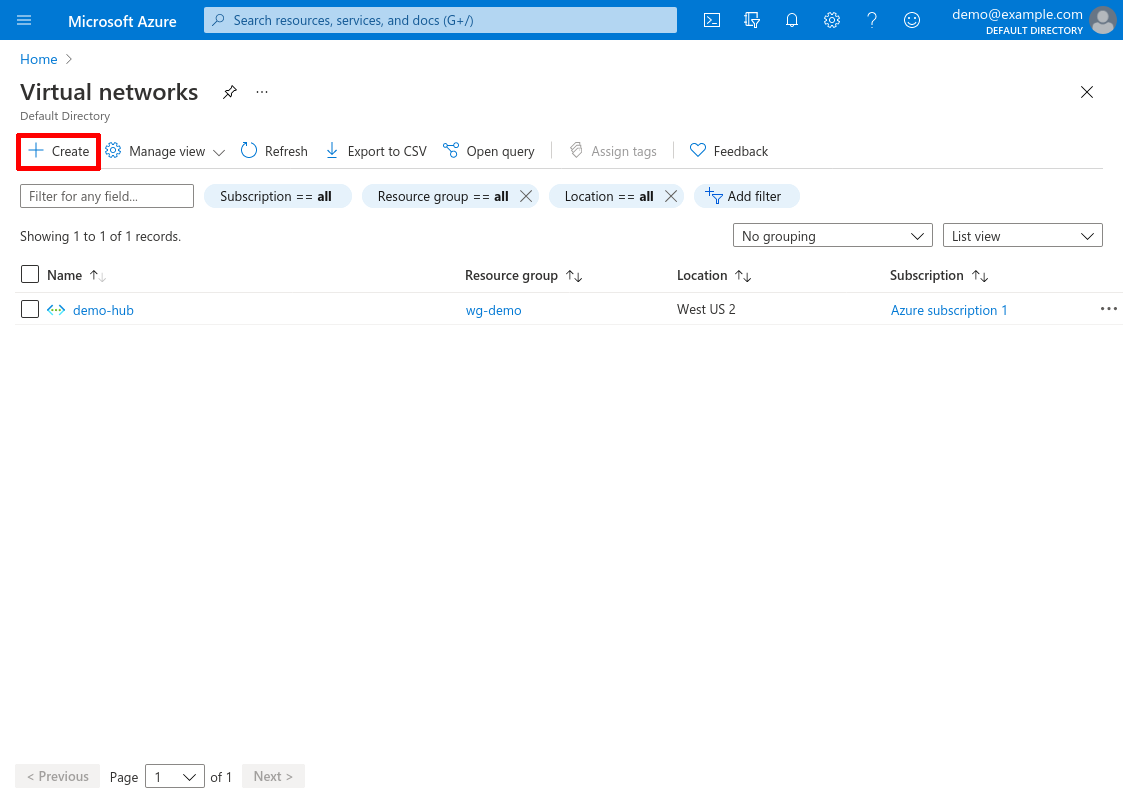
Now we’ll repeat the process for a spoke VNet. Navigate back to the main page of to the Virtual networks service, and click the Create button:
Select the Subscription and Resource group in which to create the spoke VNet, then enter its Name. I’ll name it demo-spoke for this example. Then click the Next: IP Addresses button:

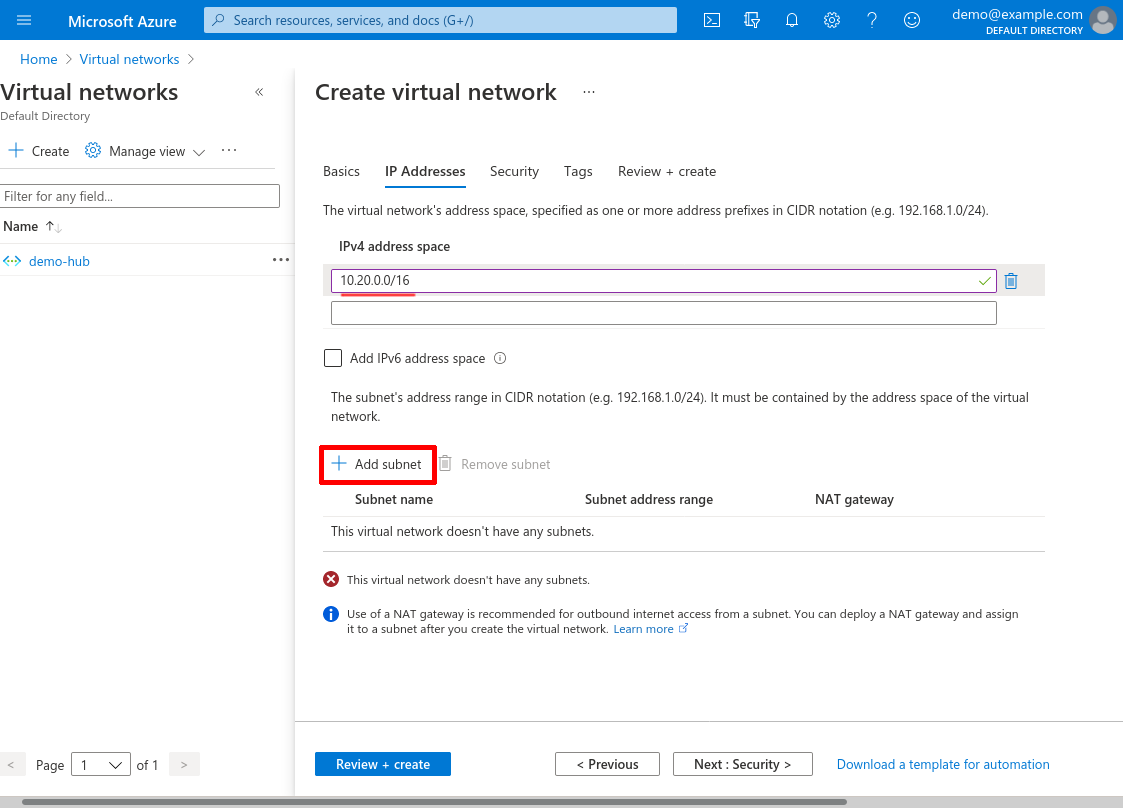
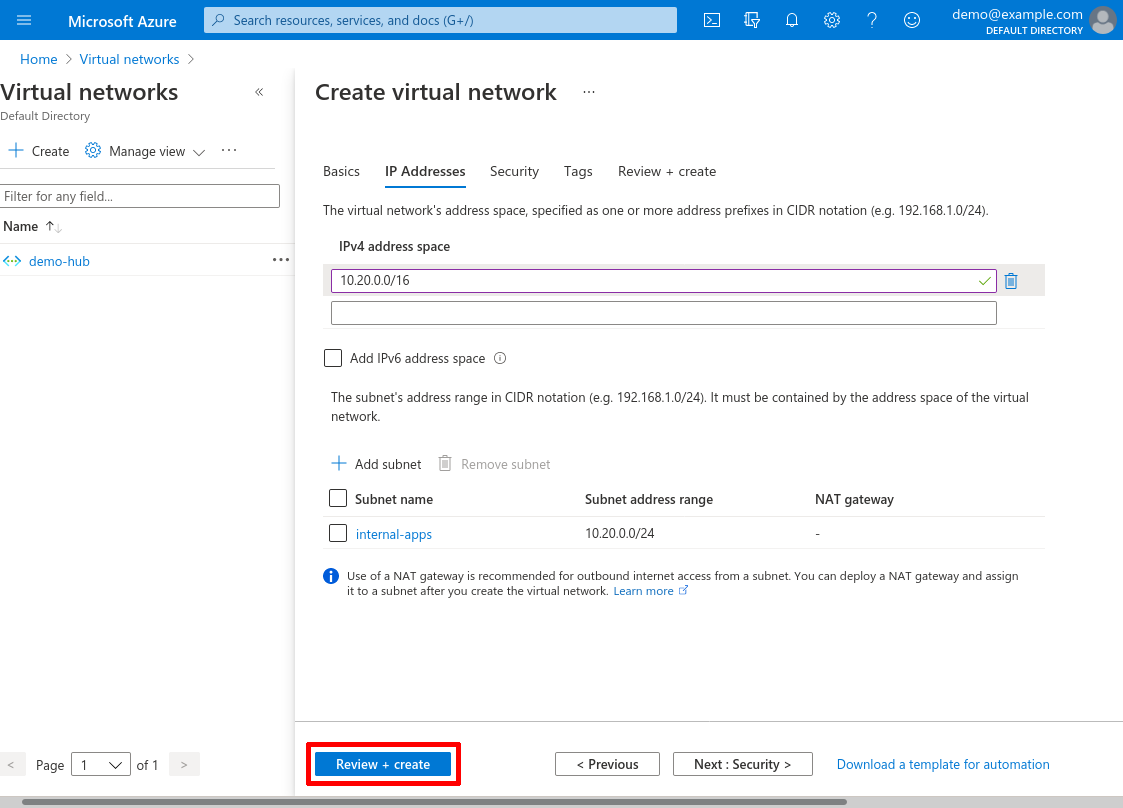
Enter an IPv4 address space. I’ll use 10.20.0.0/16 for this example. Then click the Add subnet button:
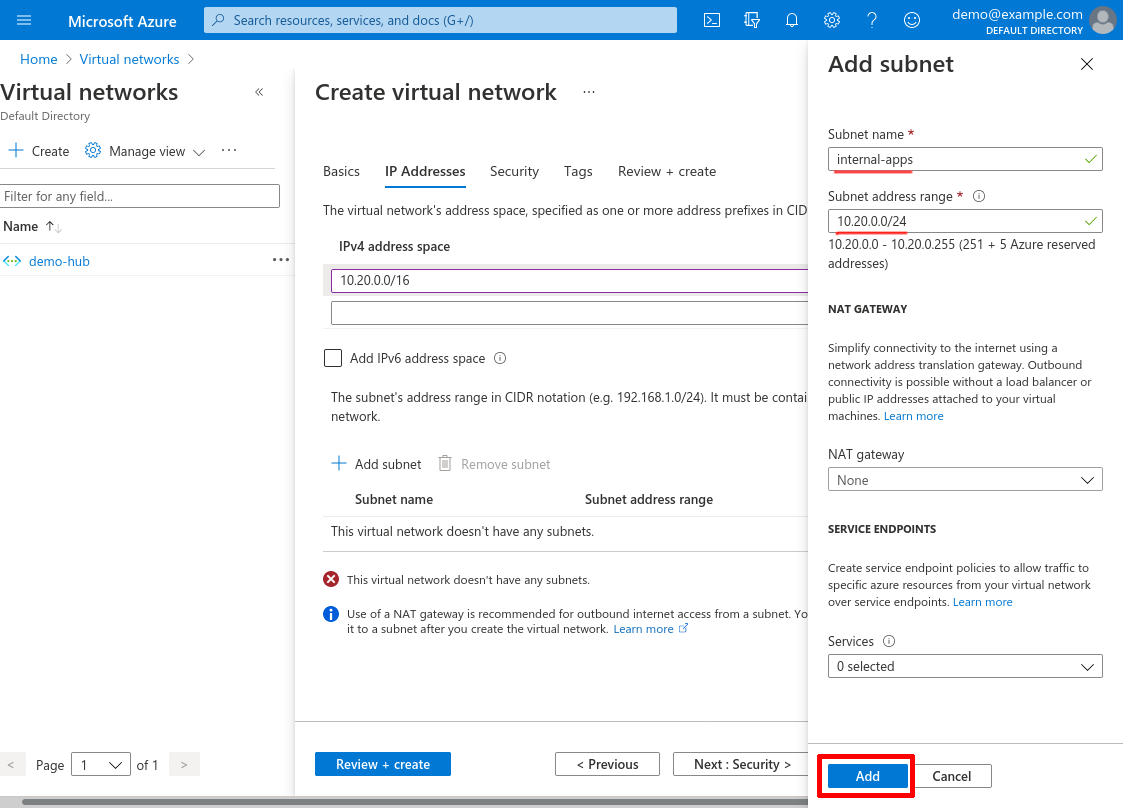
Enter a Subnet name and specify a Subnet address range that is a subnet of the IPv4 address space you selected for the VNet. I’ll name this subnet internal-apps, and use 10.20.0.0/24 for its range (we’ll use this range later in the Create WireGuard Server NSG section). Then click the Add button:
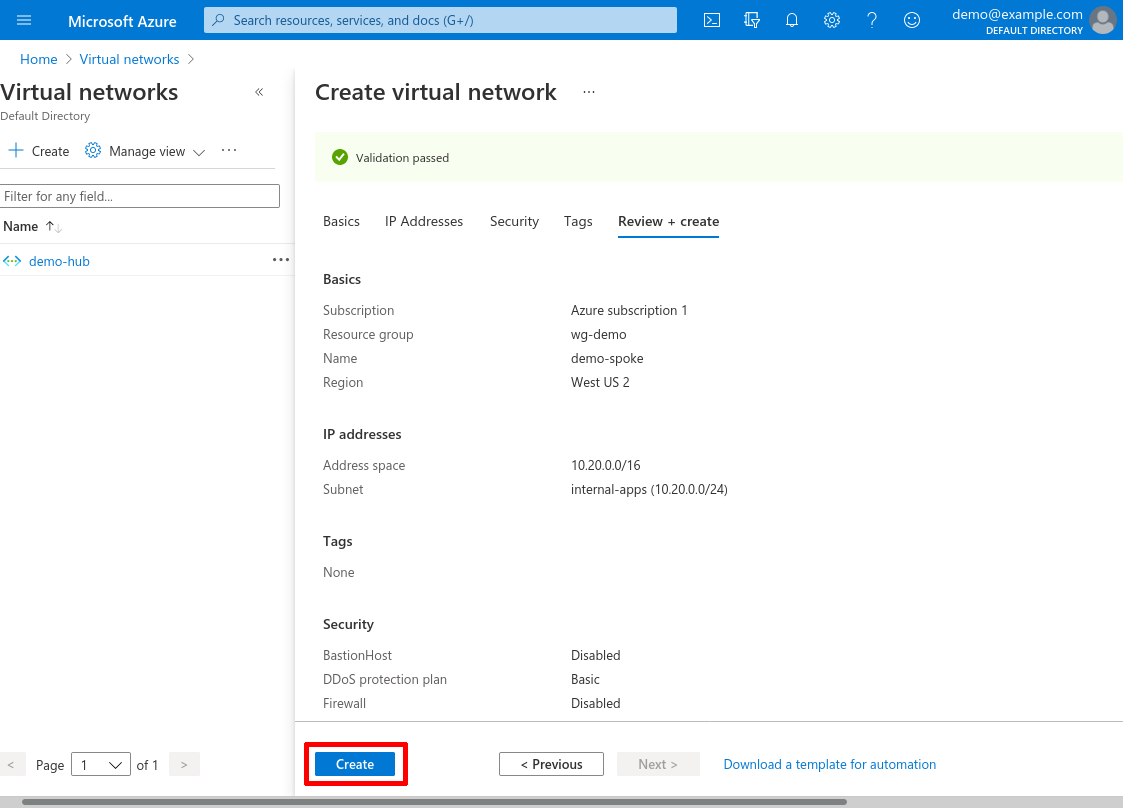
After that, click the Review + create button:
And then click the Create button:
Peer the VNets
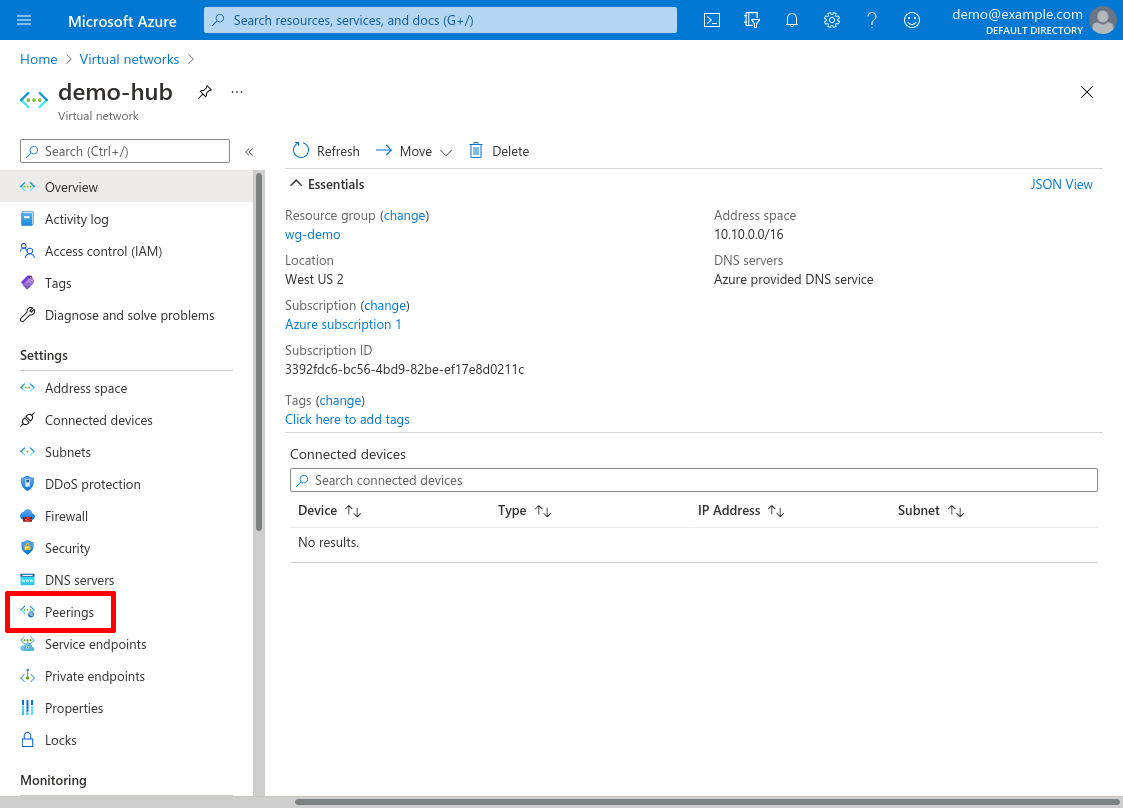
Now we need to peer the hub VNet (demo-hub) to the spoke VNet (demo-spoke) so that traffic can be exchanged between the two. Navigate to one of the subnets, and click the Peerings link in the leftnav (in this case I’ll start with the demo-hub VNet):
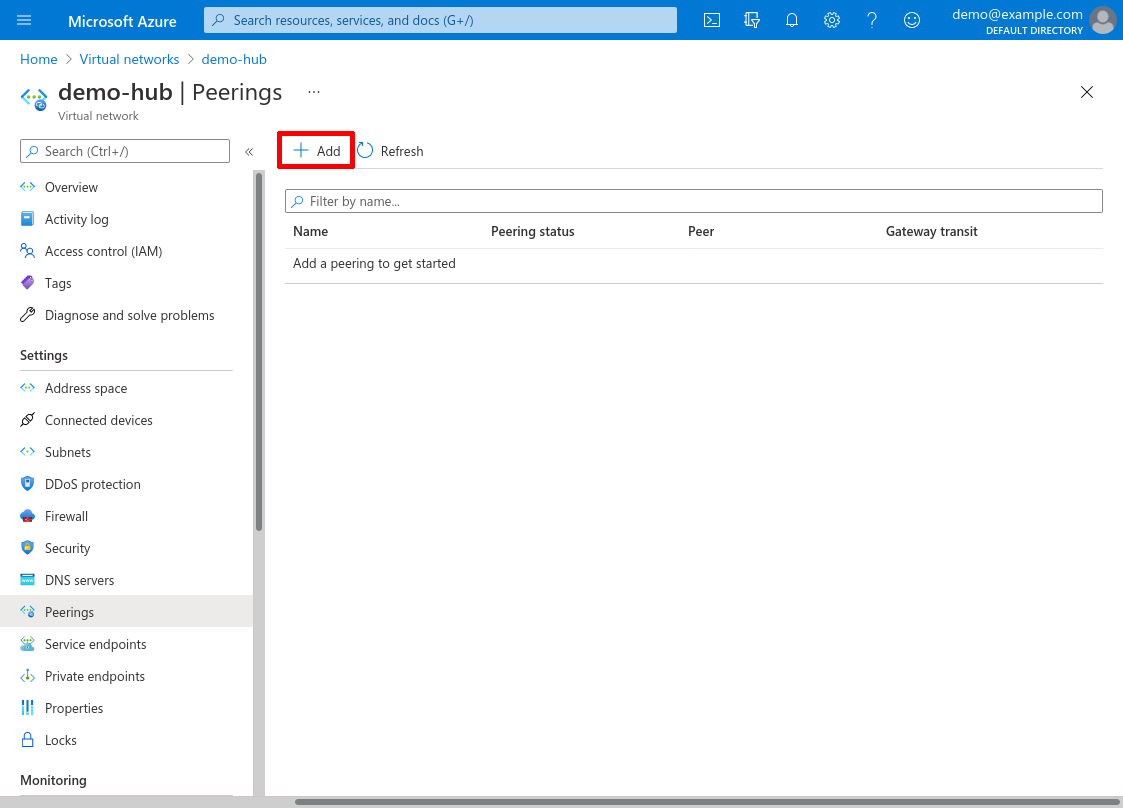
Click the Add button:
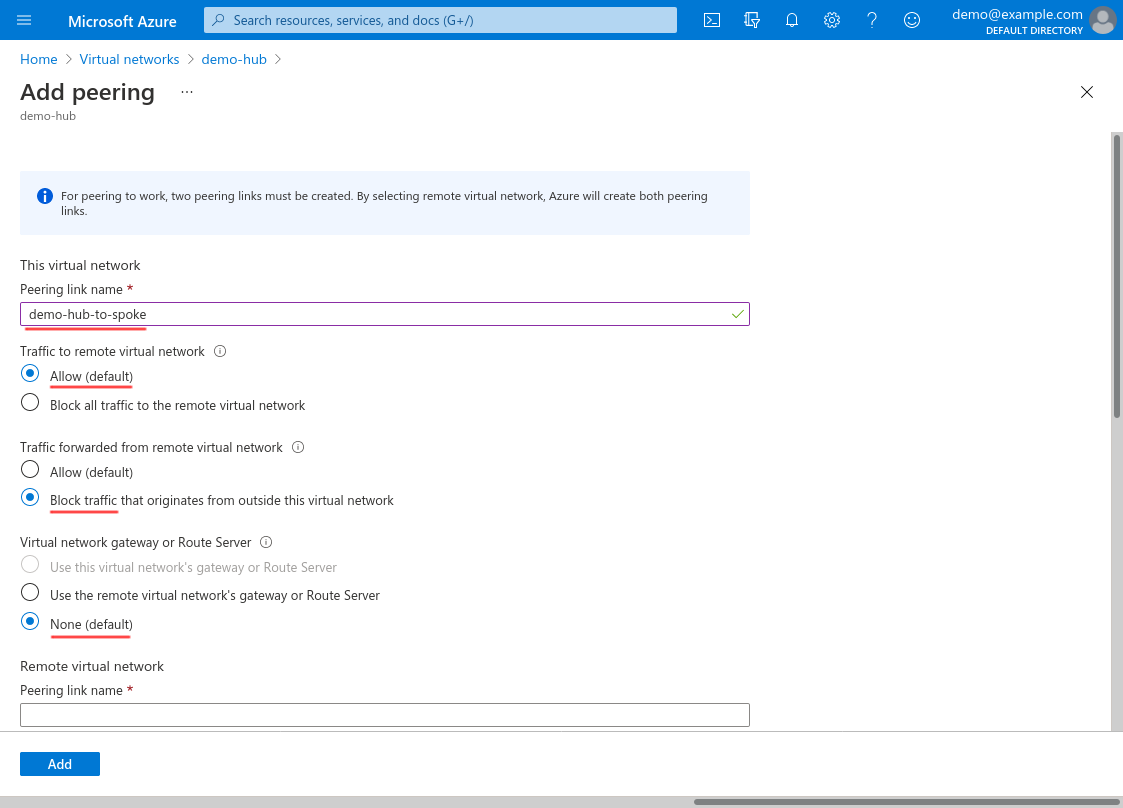
The resulting “Add peering” form has two parts, one for this VNet (demo-hub) and one for the VNet with which to peer (demo-spoke, the remote VNet from the perspective of demo-hub). In the first part of the form, enter a Peering link name for the demo-hub side of the connection. For the Traffic to remote virtual network setting, select Allow to allow traffic from demo-hub to be routed to demo-spoke. For the Traffic forwarded from remote virtual network setting, select Block to prevent traffic from the demo-spoke VNet from being forwarded into demo-hub. For the Virtual network gateway or Route Server setting, just select None:
Then scroll down to fill out the fields for the demo-spoke side of the connection. Enter a Peering link name for the peering link from the demo-spoke VNet’s perspective; use Resource manager for the Virtual network deployment model; select the Subscription of the demo-spoke VNet; and then select demo-spoke for the Virtual network. Next, select Allow for Traffic to remote virtual network; select Allow for Traffic forwarded from remote virtual network (this will allow our WireGuard server in the demo-hub VNet to forward traffic into demo-spoke); and select None for Virtual network gateway or Route Server. Then click the Add button:
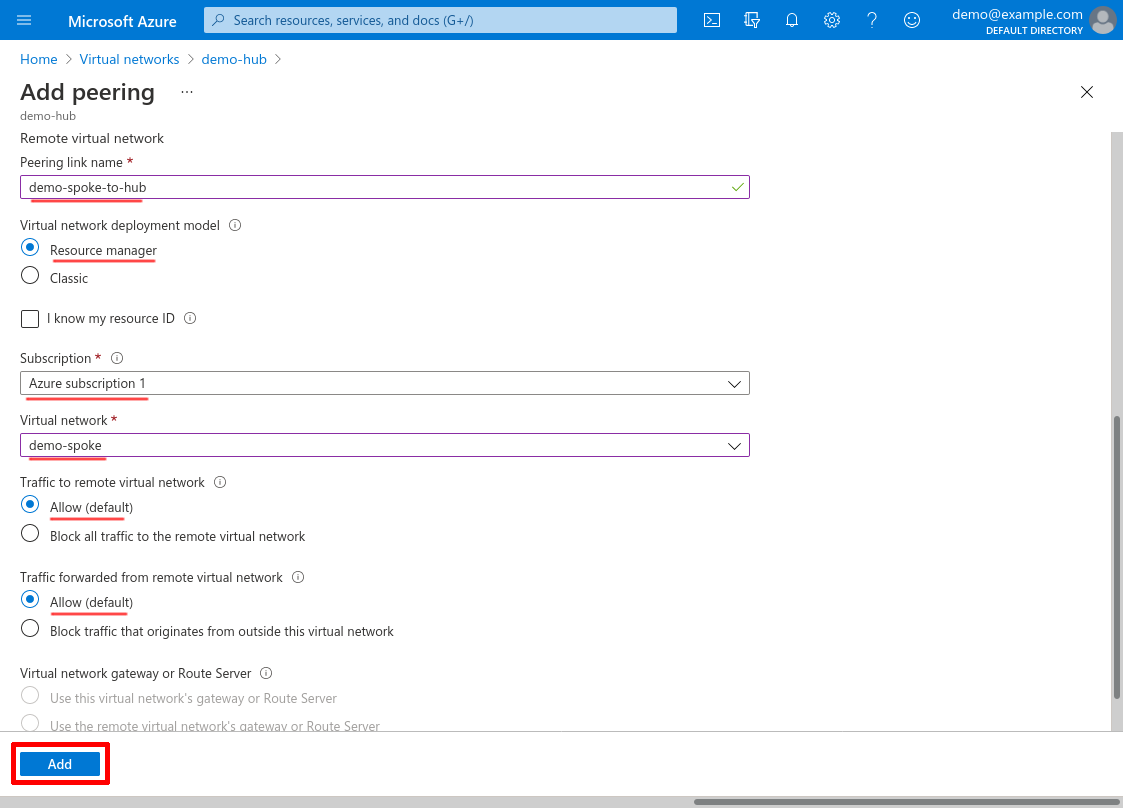
Note that we selected Allow for the Traffic forwarded from remote virtual network setting on the demo-spoke side of the peering link, but Block for the same setting on the demo-hub side. When using a hub-spoke network topology, the hub’s whole purpose is to forward traffic from other networks into the spoke networks (so on the demo-spoke side, we allow the hub to send us forwarded traffic); whereas the spokes should never need to forward traffic that originated elsewhere into the hub (so on the demo-hub side, we block the spoke from sending us forwarded traffic).
Create WireGuard Server NSG
Next, we’ll create an NSG (Network Security Group) to control network access to the WireGuard server that we’ll launch in the Launch WireGuard Server VM step. We’ll set up this NSG to allow inbound access through WireGuard (and also SSH, for administration) to our WireGuard server; and we’ll attach it to our dedicated WireGuard hub subnet.
Navigate to the Network security groups service (type network security groups into the Azure search bar and click the “Network security groups” result under “Services”). Click the Create button:

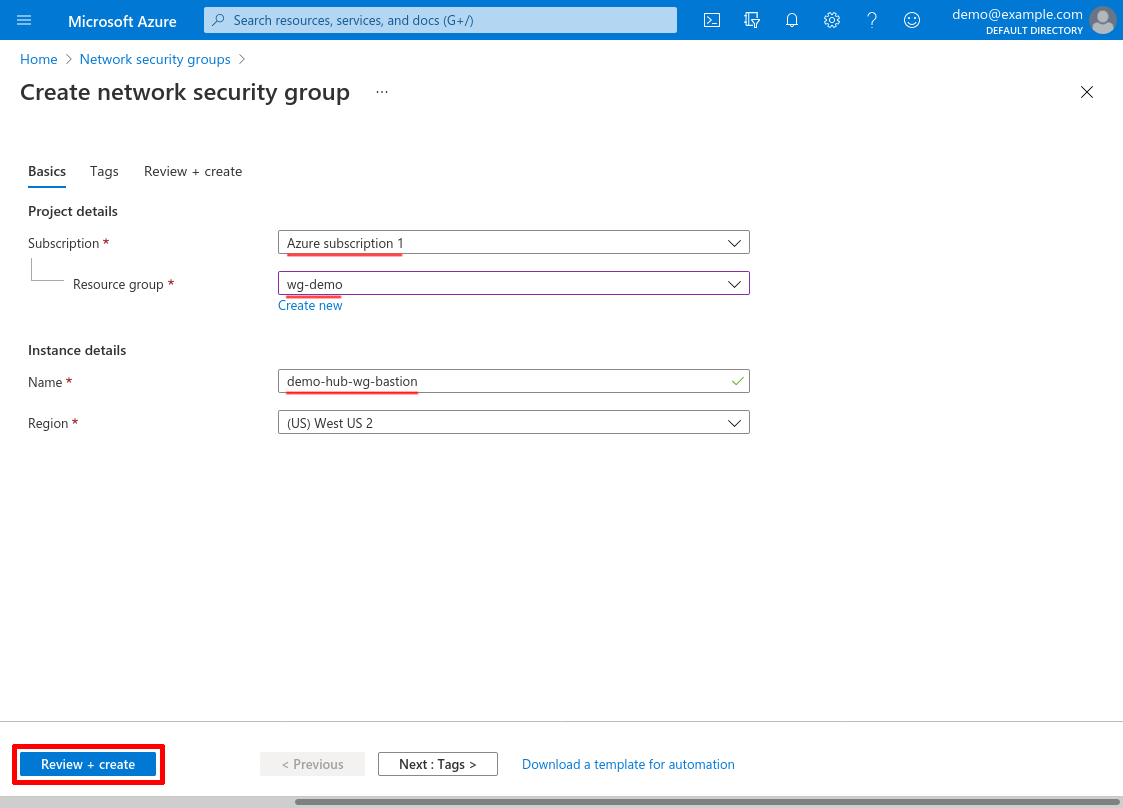
Select the Subscription and Resource group of the hub VNet, then enter a Name for the NSG. I’ll name the NSG demo-hub-wg-bastion for this example. Then click the Review + create button:
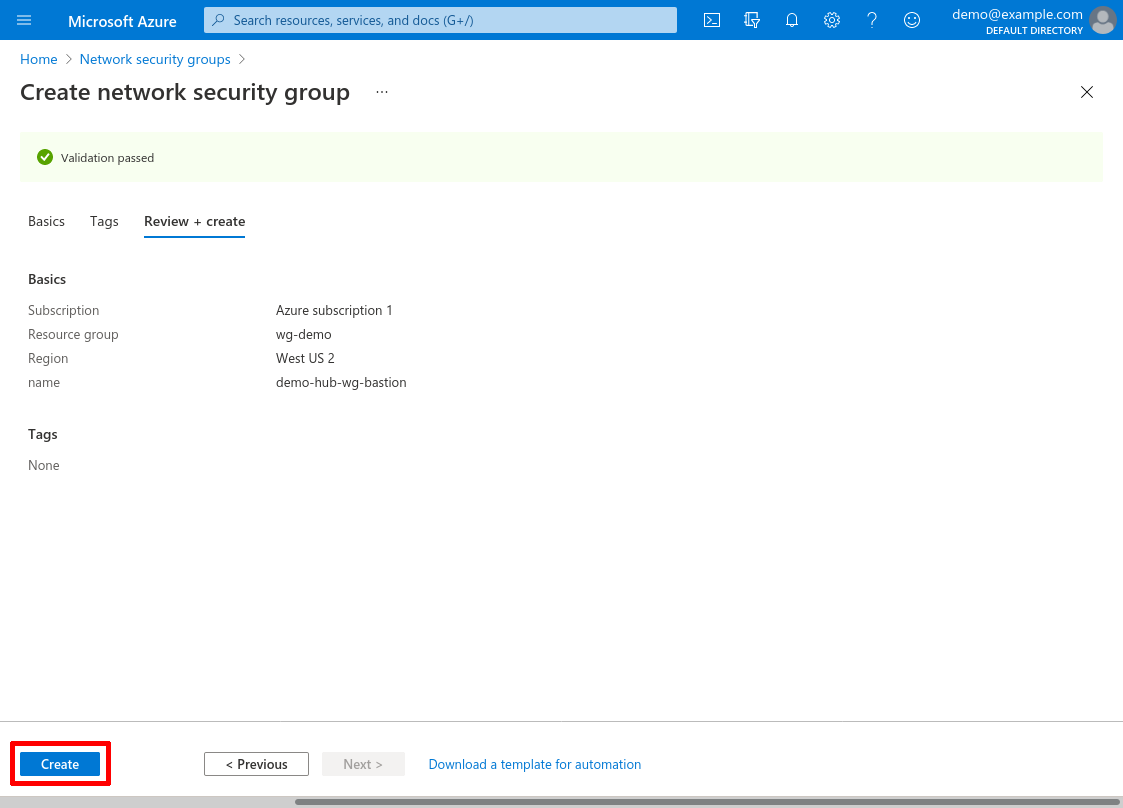
Then click the Create button:
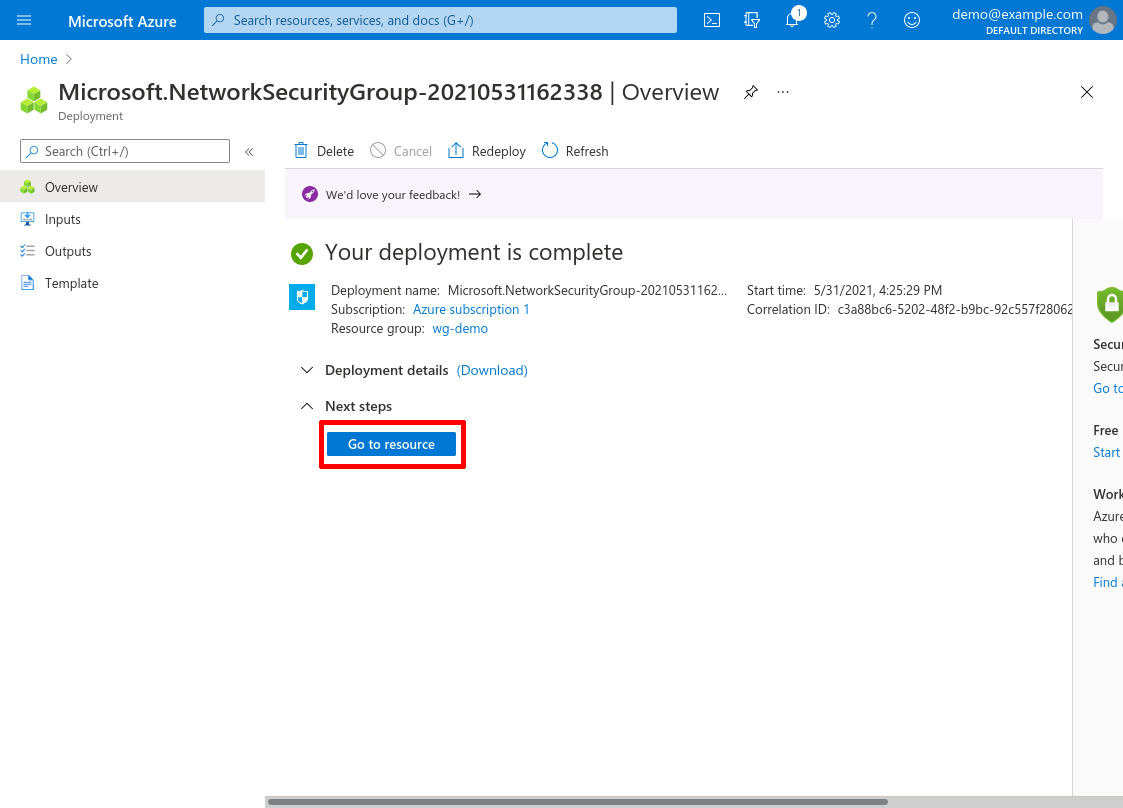
Once deployment has completed, click the Go to resource button:
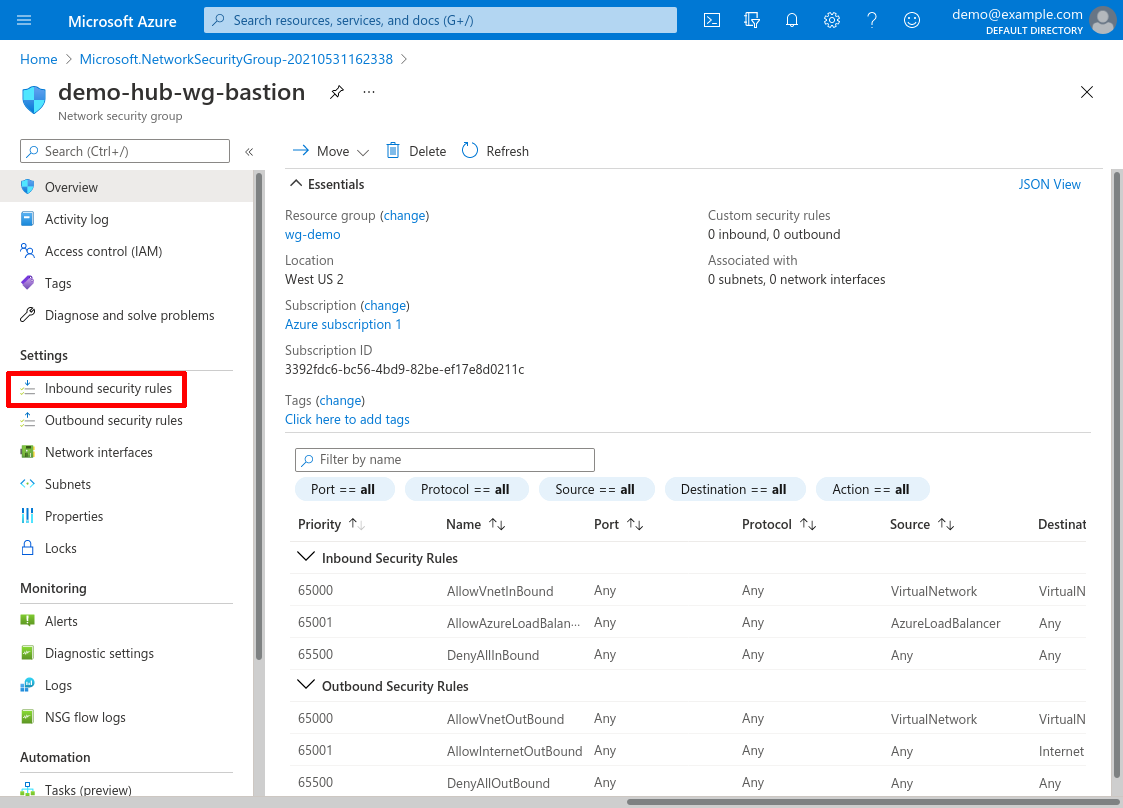
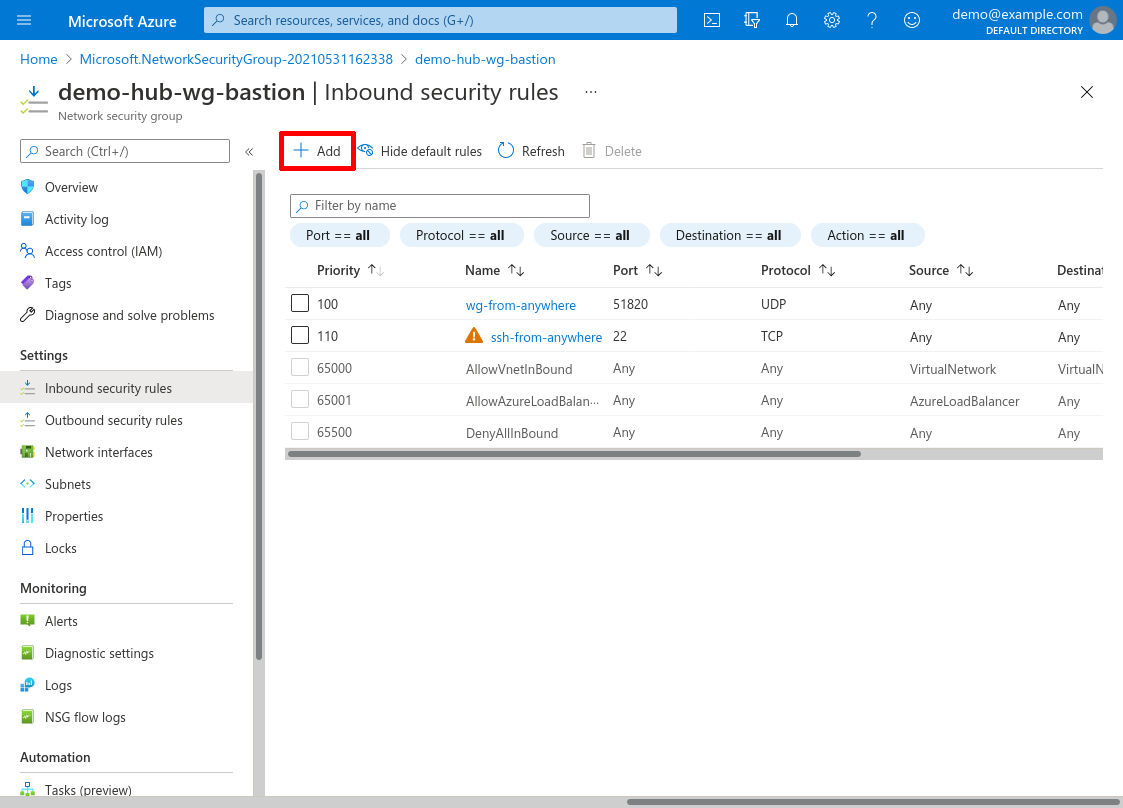
Then click the Inbound security rules link in the leftnav:
Allow Inbound WireGuard Access
The first inbound rule we’ll add will allow access to the WireGuard server over the WireGuard protocol (which uses UDP port 51820 by default, although you can select a different UDP port if you like). In this example, I’ll allow access to this WireGuard port from anywhere on the Internet.
But rather than allow Internet access from anywhere, it would be better, if you’re able, to limit access to just a few select IP addresses or blocks (like the IP addresses of the offices from which your users will need to access your internal apps). That way, if an attacker steals the private key of one of the WireGuard peers authorized to access your WireGuard server, the attacker will only be able to access the server through a computer physically located at one of your offices.
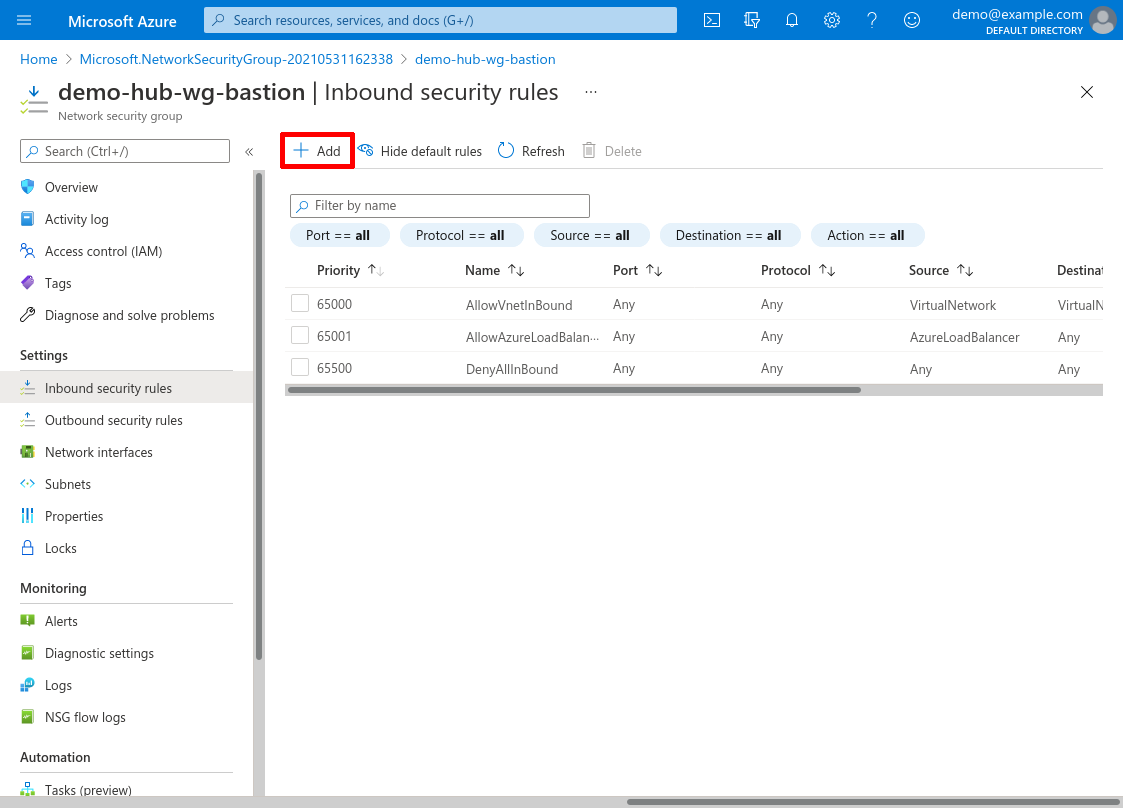
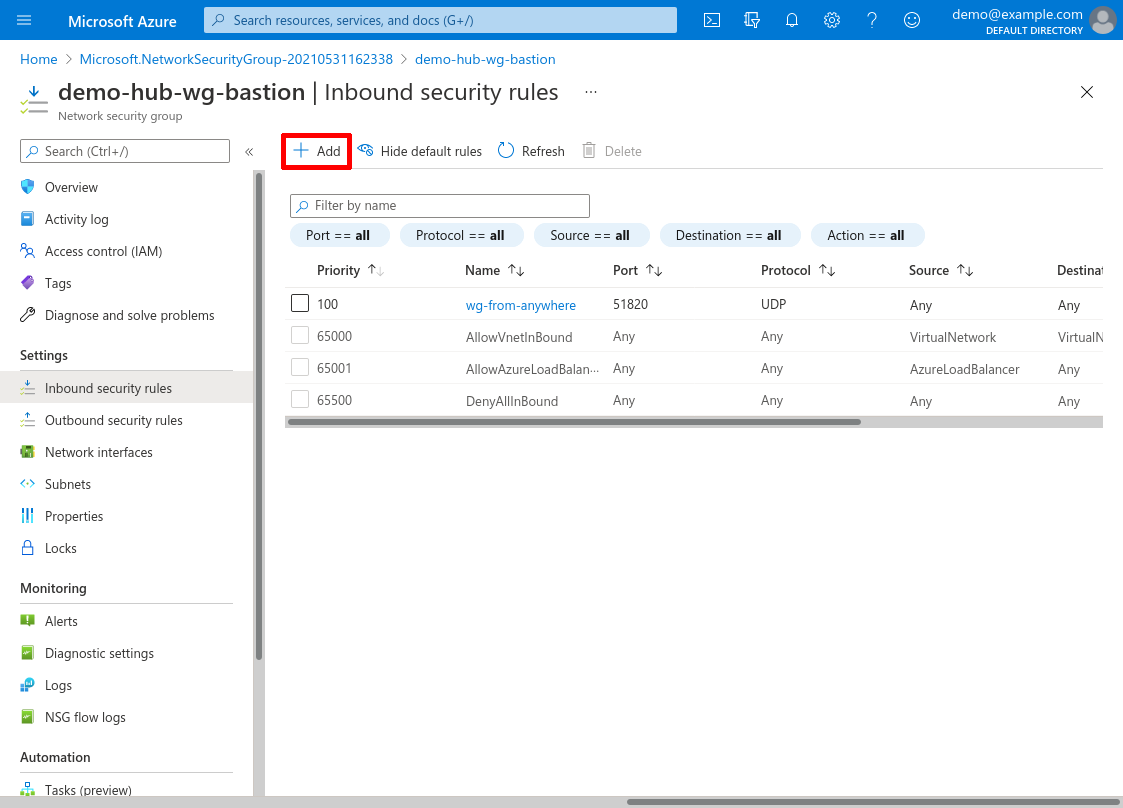
To add this rule, click the Add button:
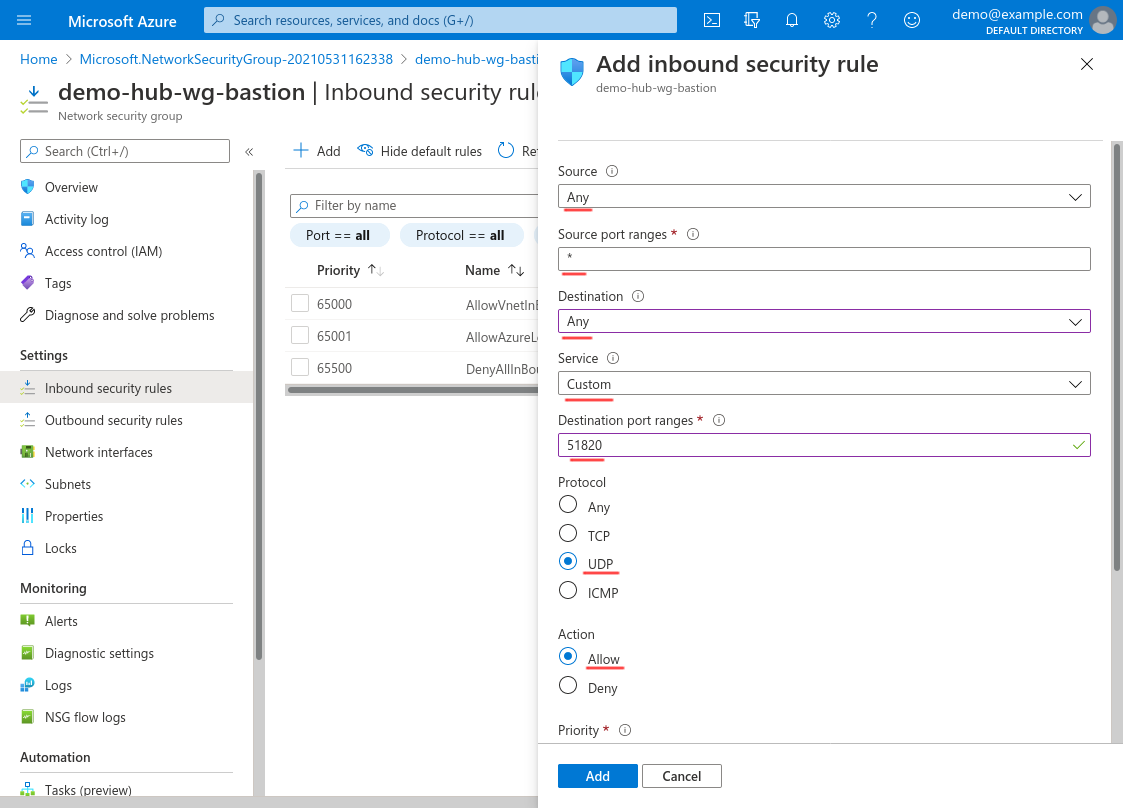
For Source, select Any if you want to allow access to your WireGuard bastion server from anywhere. To limit access to just a few specific addresses (like the public IP addresses used by your office locations), for Source select IP Addresses instead, and enter those IP addresses. Either way, for Source port ranges, enter *.
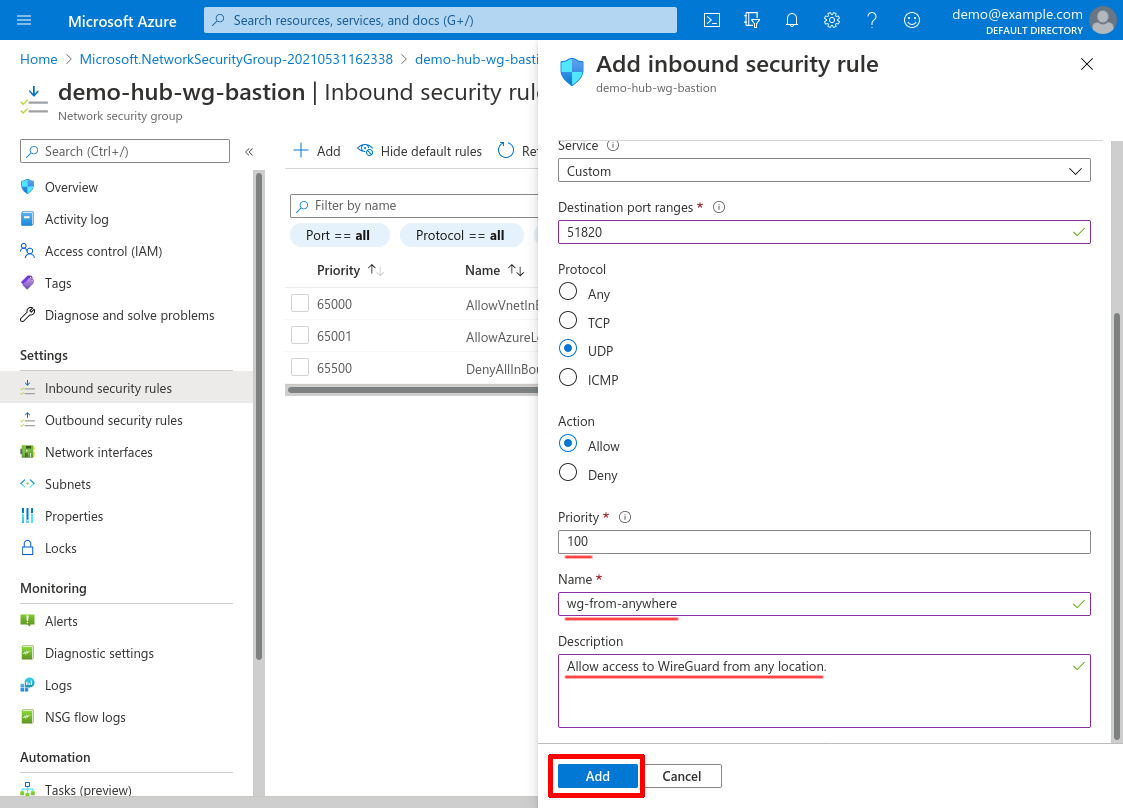
For Destination, select Any; for Service, select Custom; for Destination port ranges, enter 51280 (or the custom port on which you’ll set your WireGuard server to listen, if not 51820); and for Protocol, select UDP. For Action, select Allow:
Scroll down and set the Priority to 100 (or some other number lower than any of deny-access rules that you may set up); set the Name to something descriptive, like wg-from-anywhere (or wg-from-office if you configured the Source property to use your office locations); and use the Description for additional details. Then click the Add button:
Allow Inbound SSH Access
Next we’ll allow SSH access to the WireGuard server, so that we can administer it. Like for the WireGuard service itself, with this example I’ll allow access to the SSH service from anywhere on the Internet; but just like with the WireGuard service, with SSH if you’re able to limit access to just a few select IP addresses instead of the entire Internet, do that instead.
Click the Add button again to this next inbound rule:
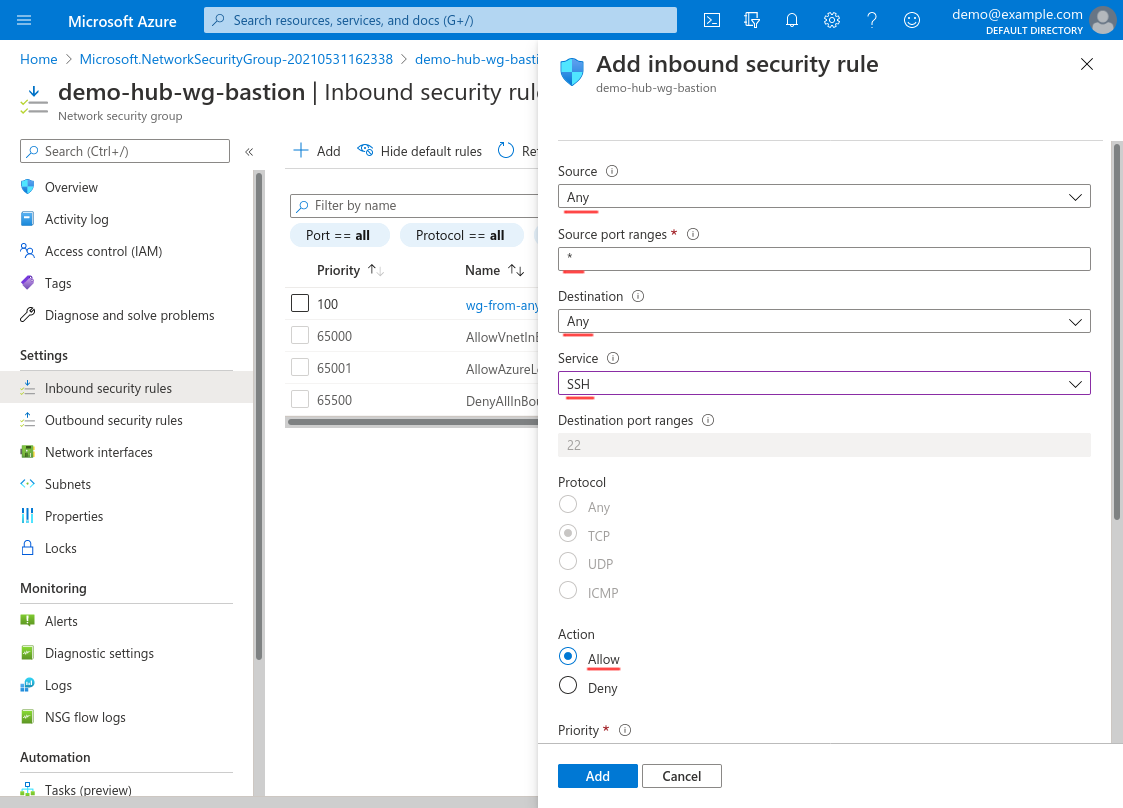
For Source, select Any if you want to allow SSH access to your WireGuard bastion server from anywhere. To limit access to just a few specific addresses (like the public IP addresses used by your office locations), for Source select IP Addresses instead, and enter those IP addresses. Either way, for Source port ranges, enter *.
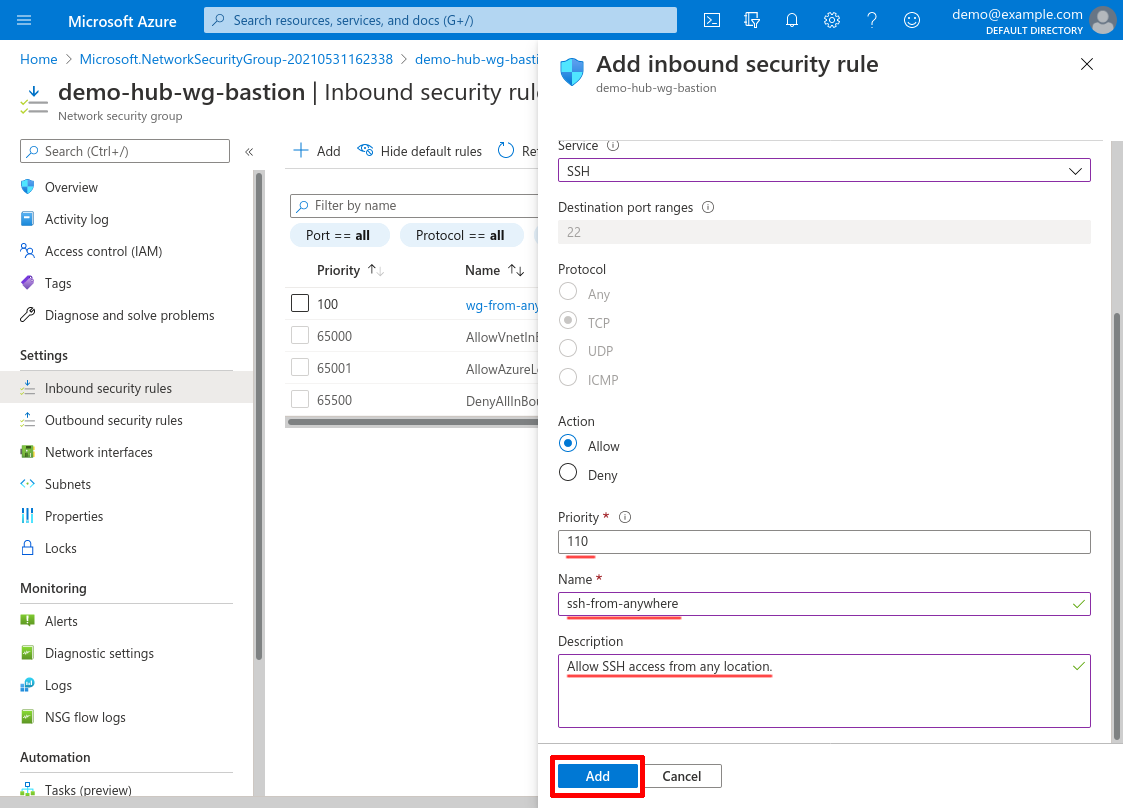
For Destination, select Any; for Service, select SSH. For Action, select Allow:
Scroll down and set the Priority to 110 (or some other number lower than any of deny-access rules that you may set up); set the Name to something descriptive, like ssh-from-anywhere (or ssh-from-office if you configured the Source property to use your office locations); and use the Description for any additional details. Then click the Add button:
Deny Everything Else Inbound
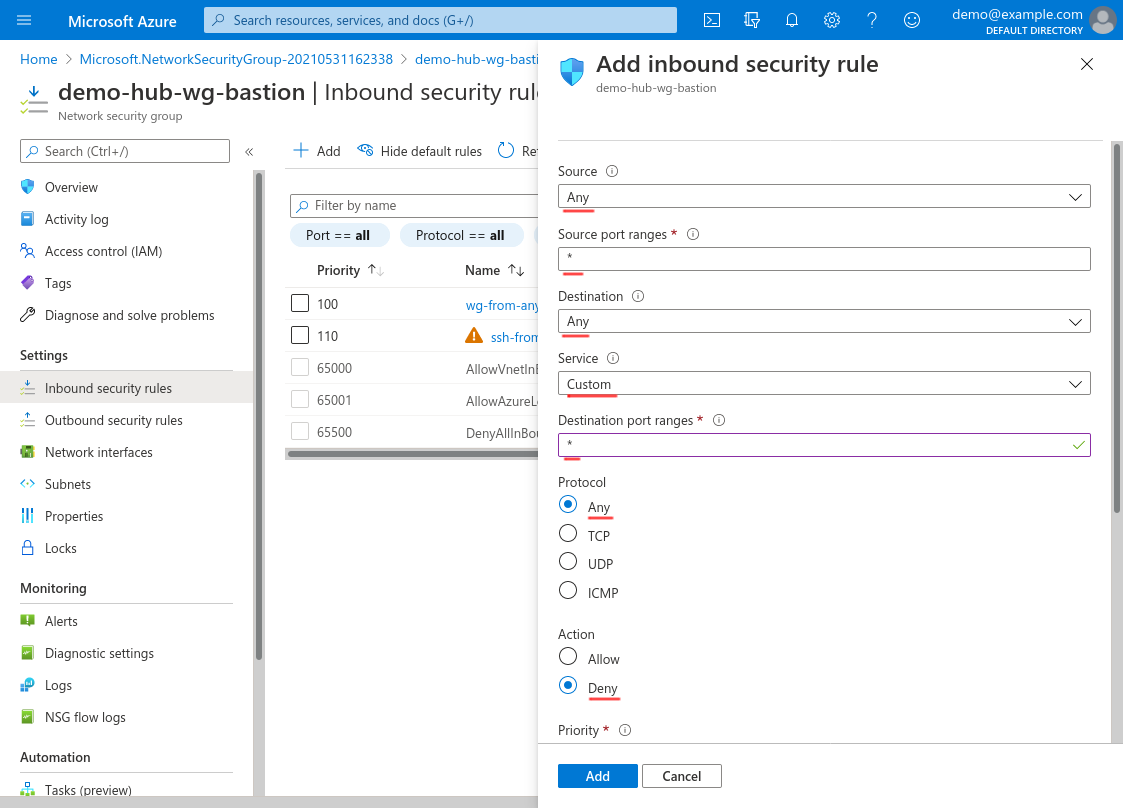
Now to deny all other access to our WireGuard bastion (including from other internal VNets), click the Add button again to add one more inbound rule:
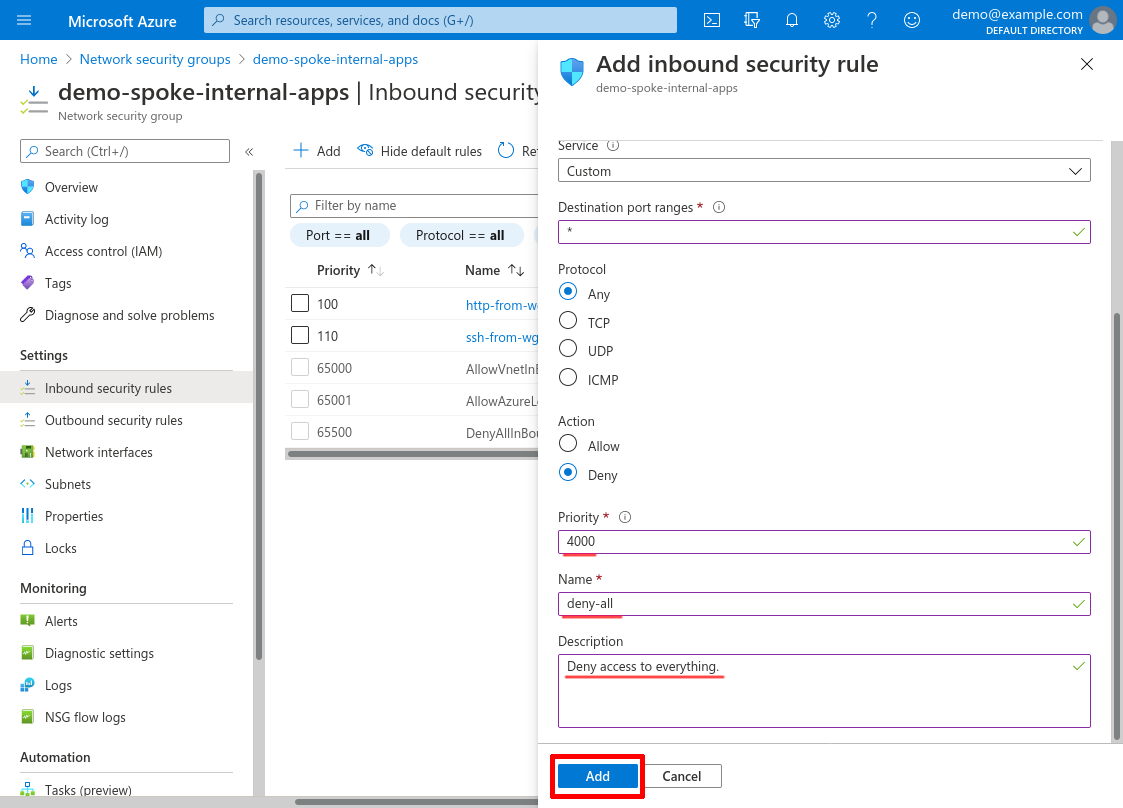
For Source, select Any; for Source port ranges, enter *. For Destination, select Any; for Service, select Custom; for Destination port ranges, enter *; and for Protocol, select Any. For Action, select Deny:
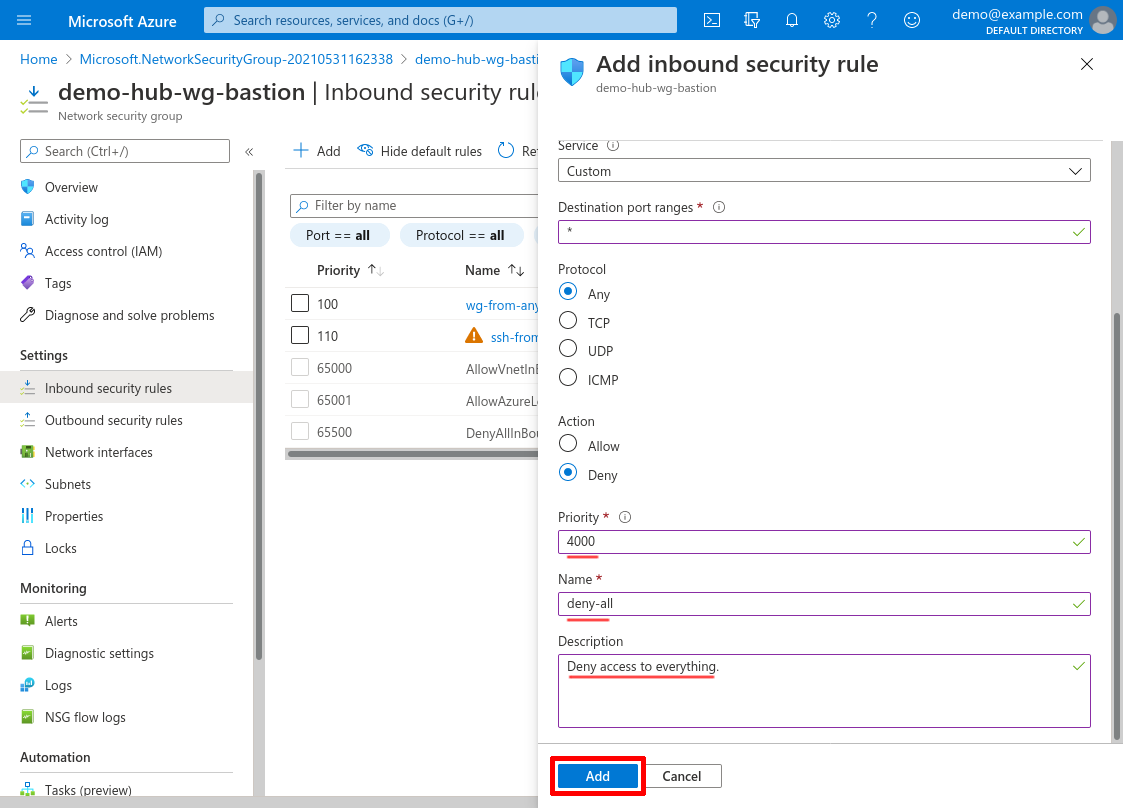
Scroll down and set the Priority to 4000 (or some other high number that will allow room for any future rules below it that you may want to add); set the Name to something descriptive, like deny-all; and set the Description to something appropriate. Then click the Add button:
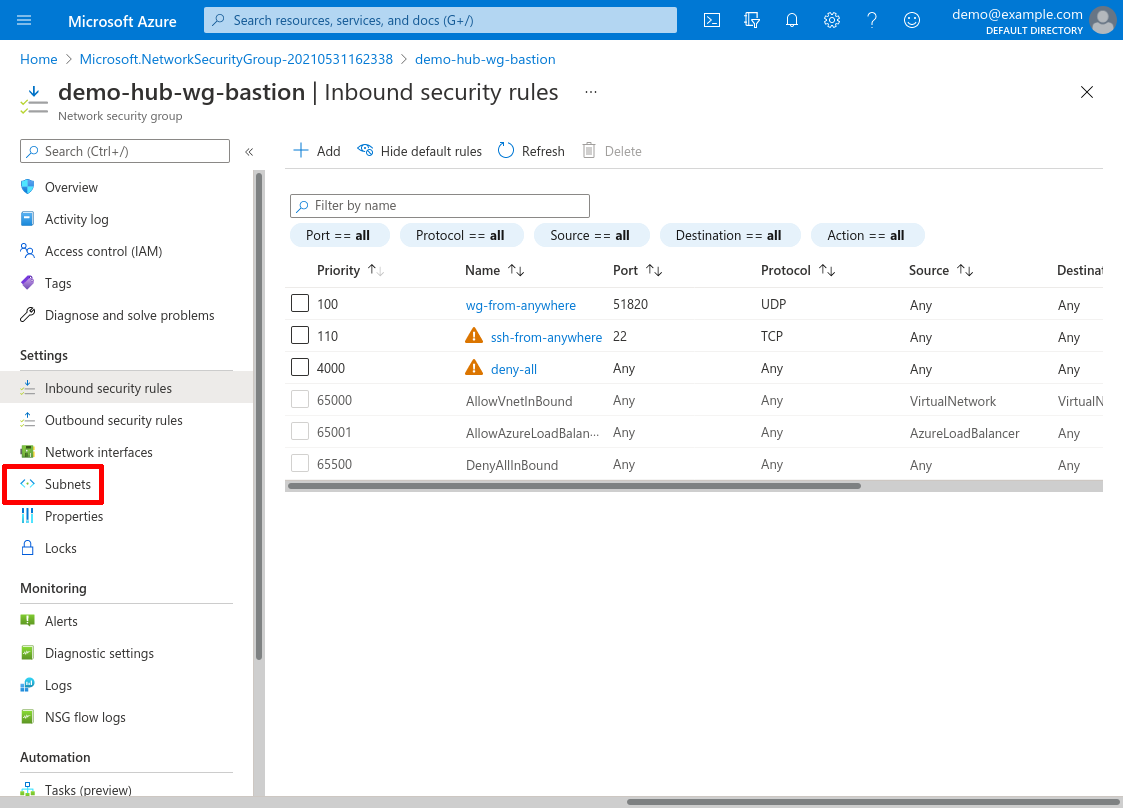
Attach to WireGuard Subnet
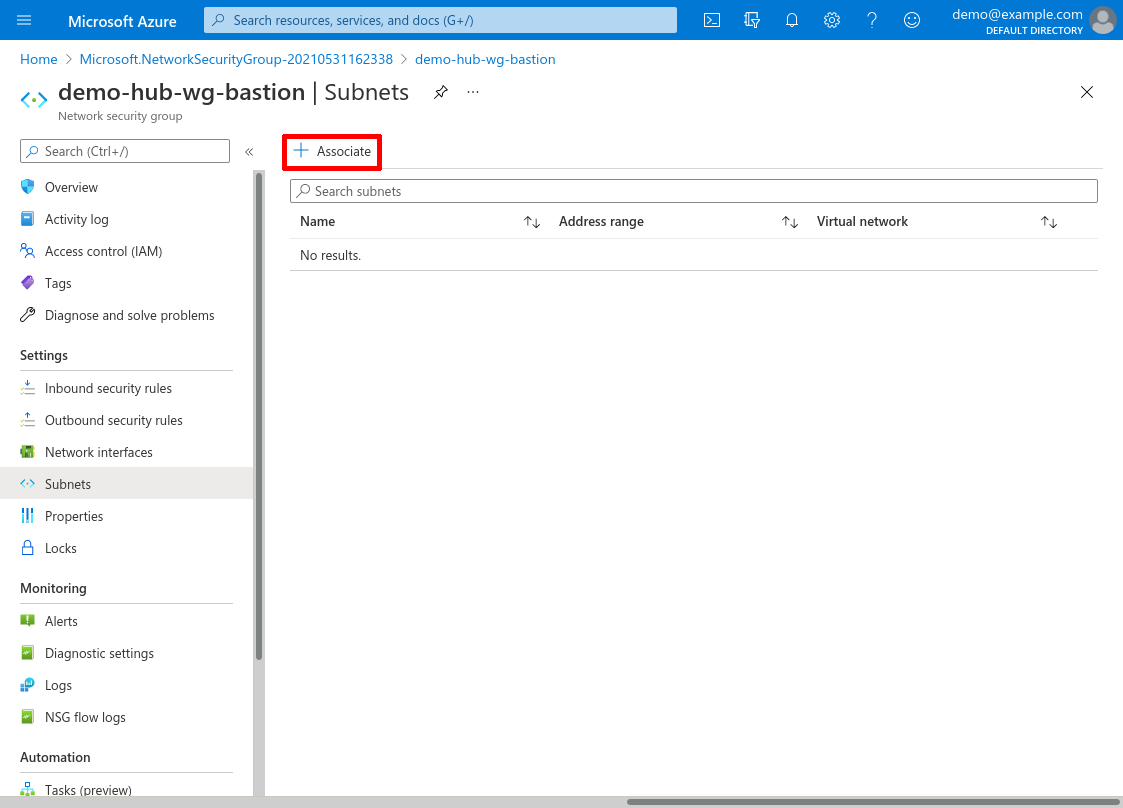
Now click the Subnets link in the leftnav to attach this NSG to the dedicated WireGuard subnet we added in the Create Hub VNet step above:
Click the Associate button:
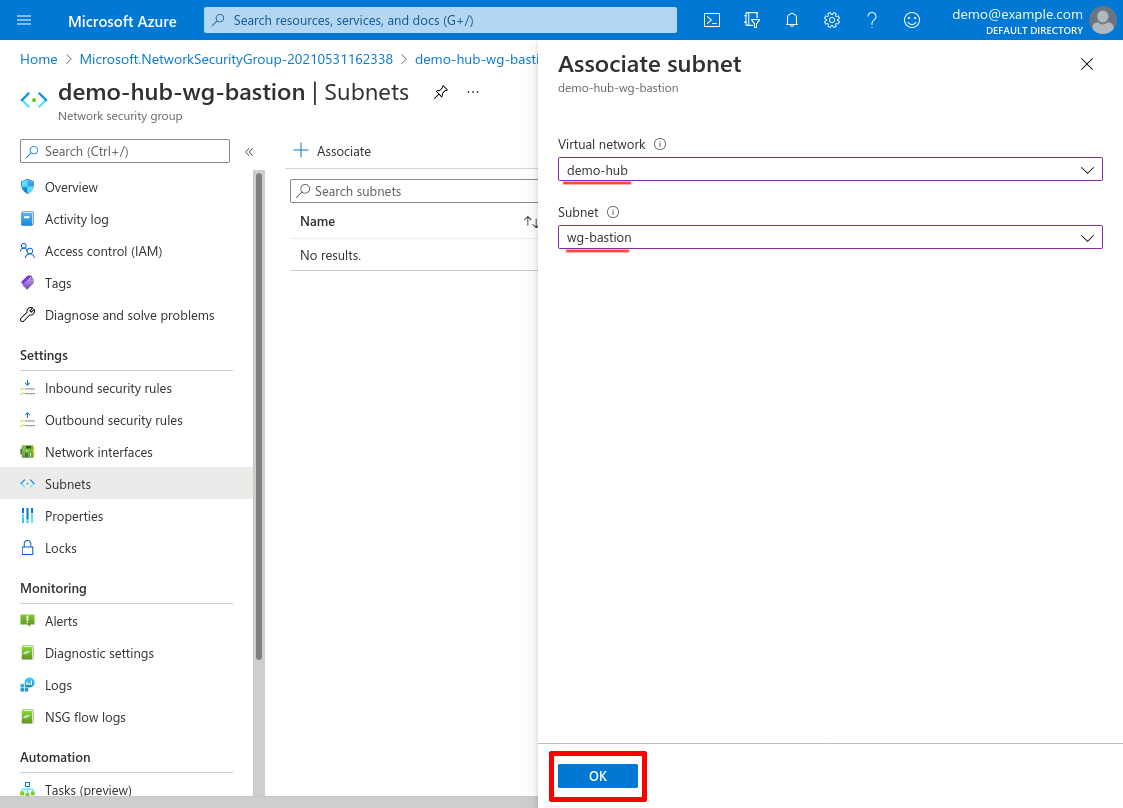
For Virtual network, select the demo-hub VNet we created in the Create Hub VNet step, and for Subnet, select the wg-bastion subnet we created at the same time. Then click the OK button:
Create Internal Application NSG
Next, we’ll create an NSG (Network Security Group) to control network access to the example internal web app that we’ll launch in the Launch Internal Application VM step. We’ll configure this NSG to allow inbound access from our WireGuard subnet (10.10.0.0/24 in this example); and we’ll attach it to the subnet we created for our demo internal app.
If you already some internal apps set up, you don’t need to create a new NSG for them just to use WireGuard — you can simply update the existing NSGs you already have for those apps to include similar rules as shown below to allow inbound access from the WireGuard subnet.
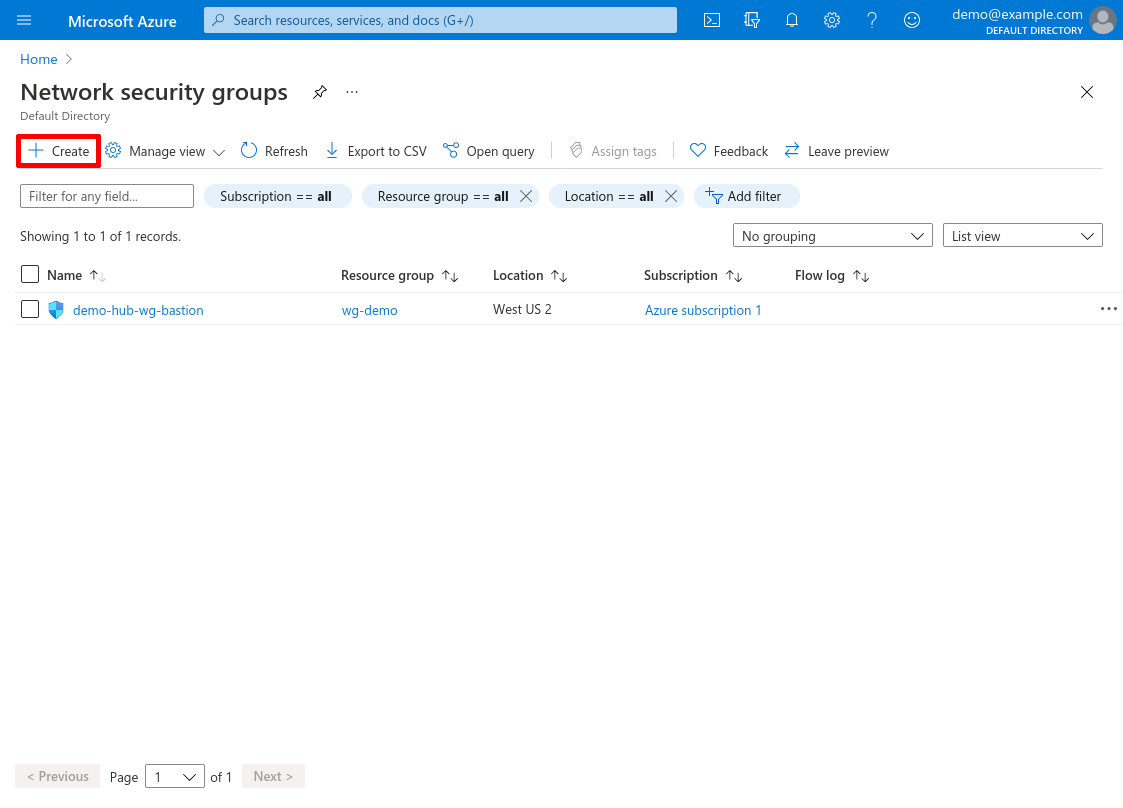
Start by navigating to the Network security groups service. Click the Create button:
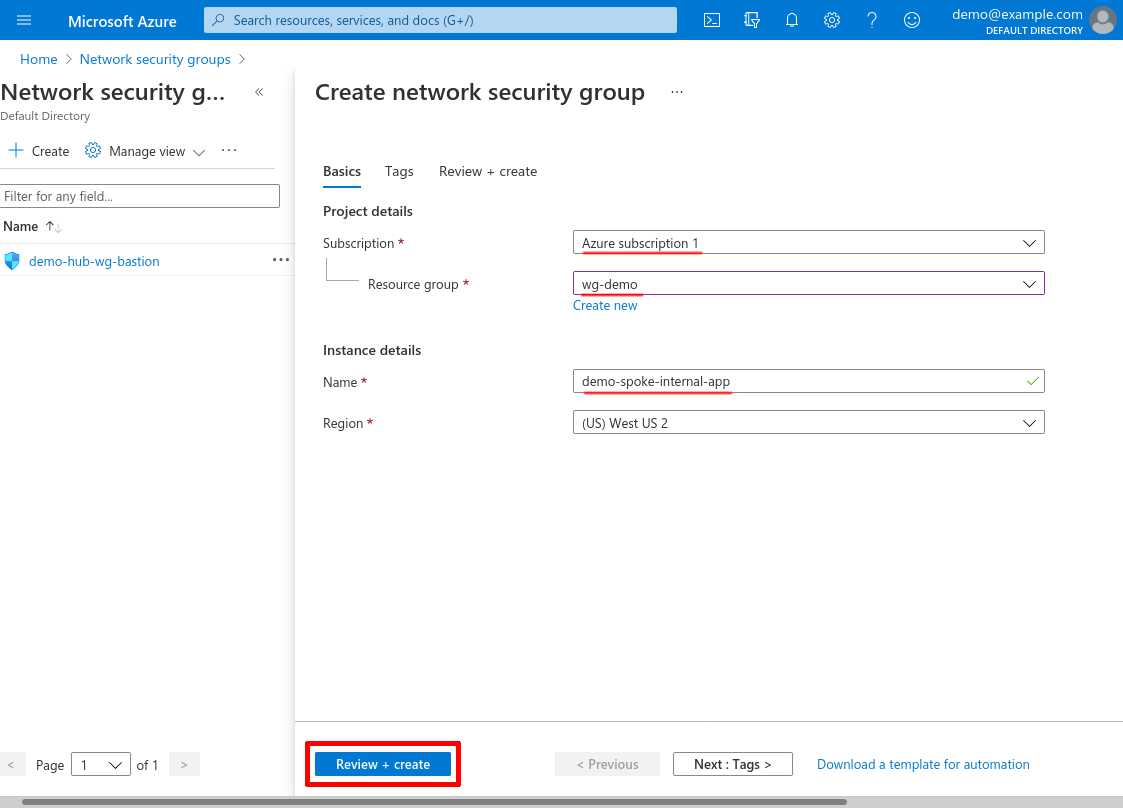
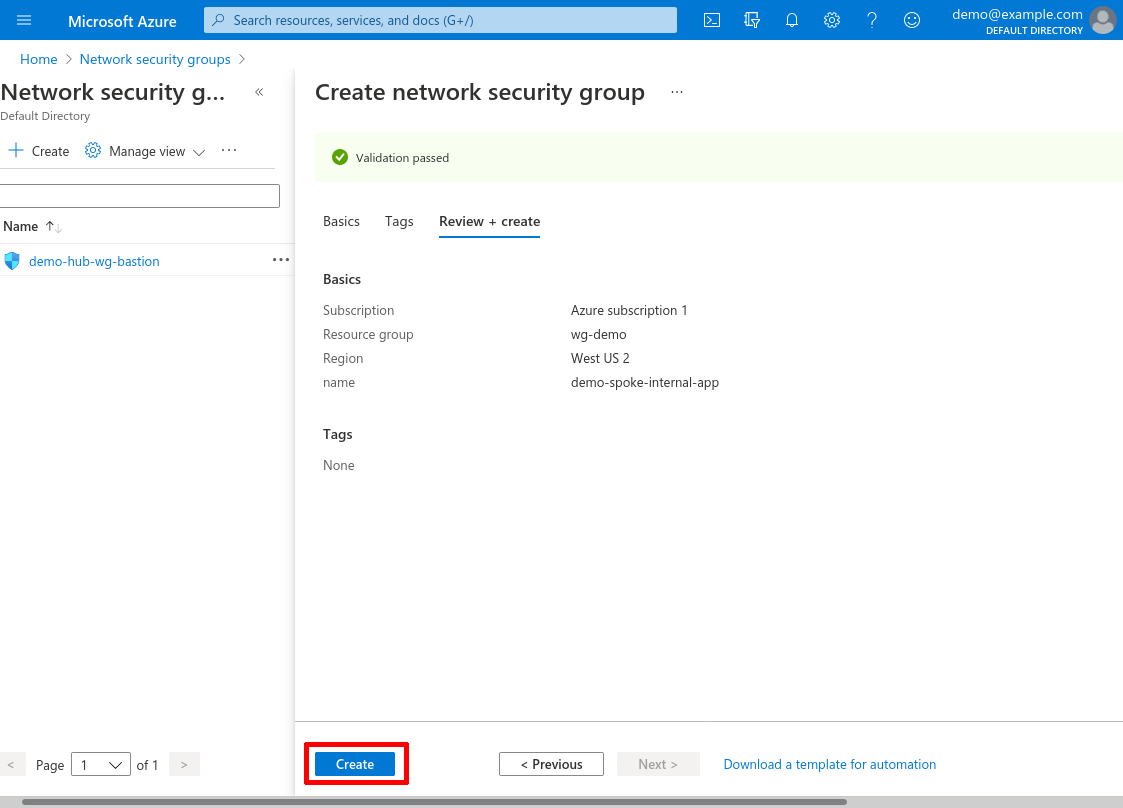
Select the Subscription and Resource group of the spoke VNet, then enter a Name for the NSG. I’ll name the NSG demo-spoke-internal-apps for this example. Then click the Review + create button:
Then click the Create button:
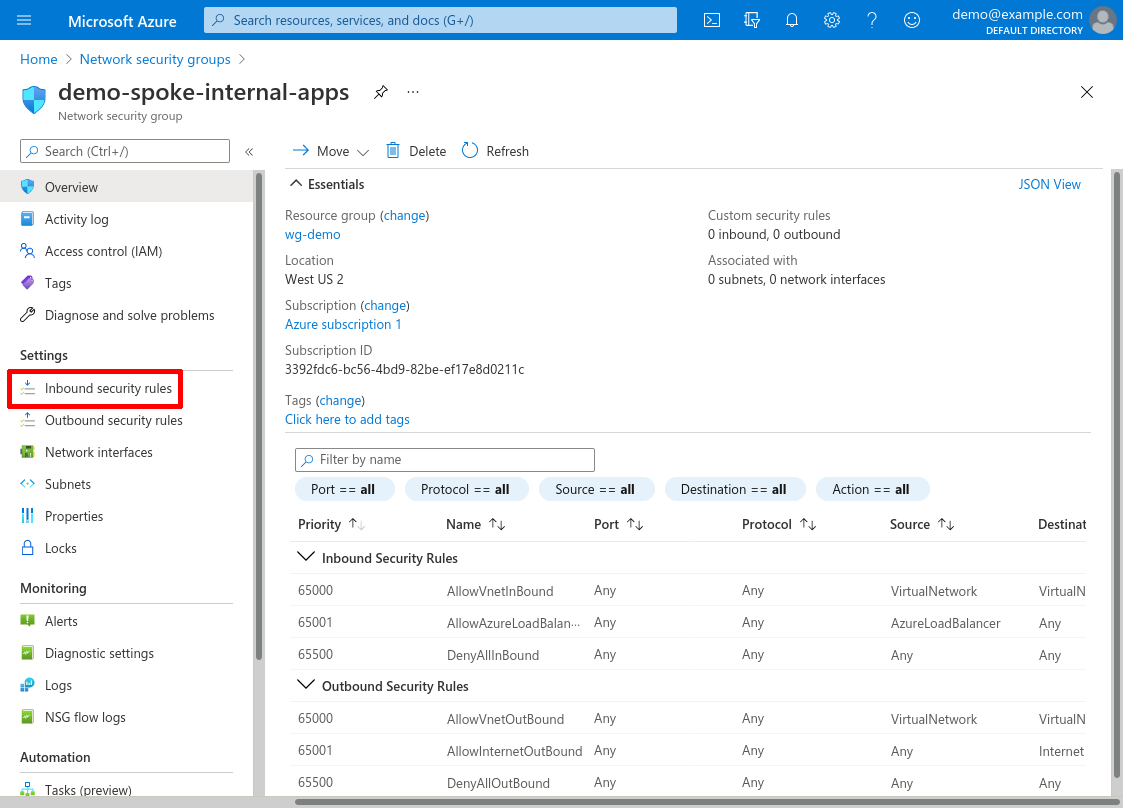
Once deployment has completed, click the Go to resource button:

Then click the Inbound security rules link in the leftnav:
Allow Inbound HTTP Access Through WireGuard
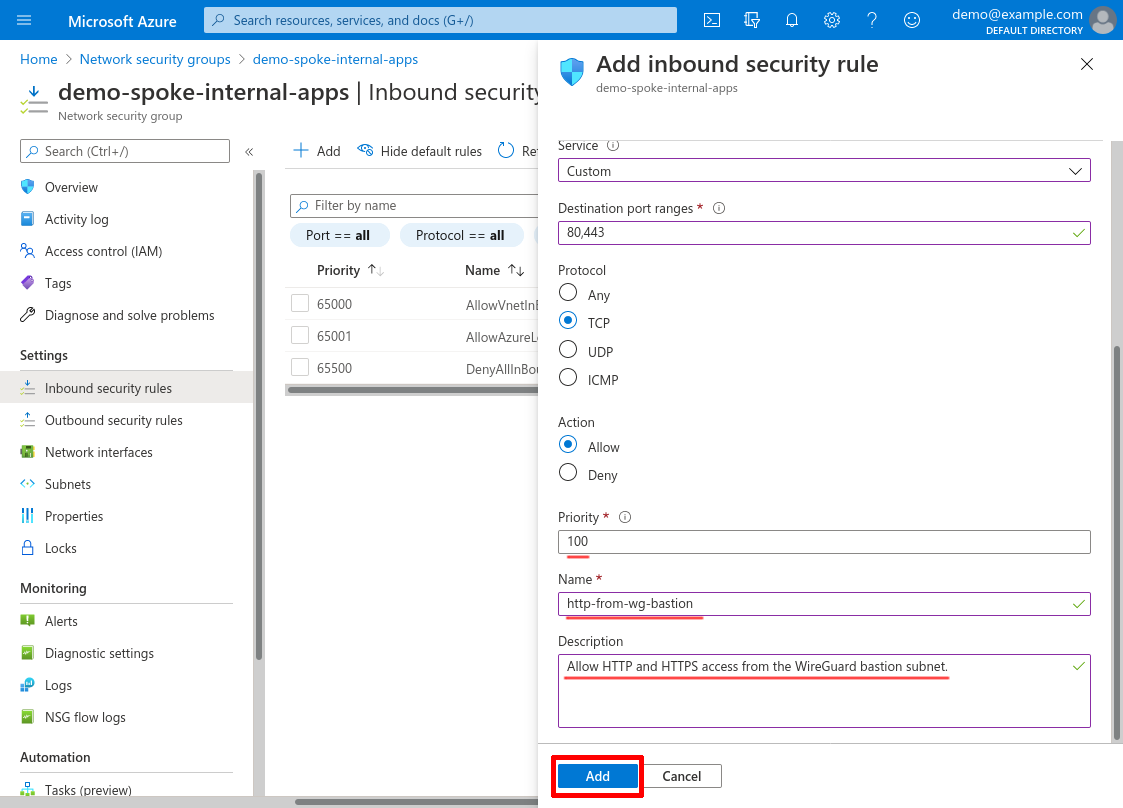
This is where we’ll grant access to connect to our internal apps through the WireGuard bastion. In this example, we’ll grant access to connect to TCP port 80 and 443 of our demo internal app — but you can customize this rule (and add others like it) for other ports as necessary.
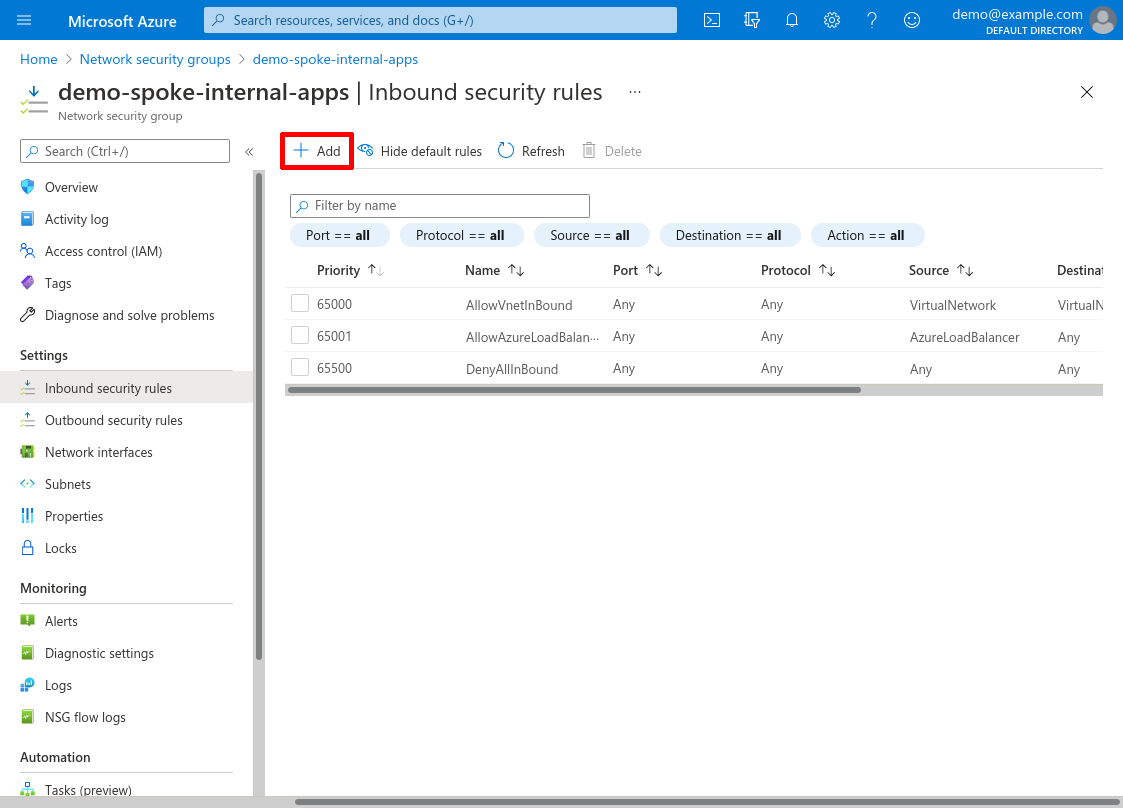
Click the Add button:
For Source, select IP Addresses; for Source IP addresses/CIDR ranges, enter the CIDR of the WireGuard subnet from your hub VNet — in our example, it’s 10.10.0.0/24 (which we set up in the Create Hub VNet step). For Source port ranges, enter *.
For Destination, select Any; for Service, select Custom; for Destination port ranges, enter 80,443; and for Protocol, select TCP. If you need access to different ports for your internal app (like you have a web app that listens on port 8080 instead of 80 and 443), specify those ports instead. (If you need a mix of TCP and UDP ports, or also want to allow ICMP messages, create another rule similar to this for the UDP ports or for ICMP.) For Action, select Allow:
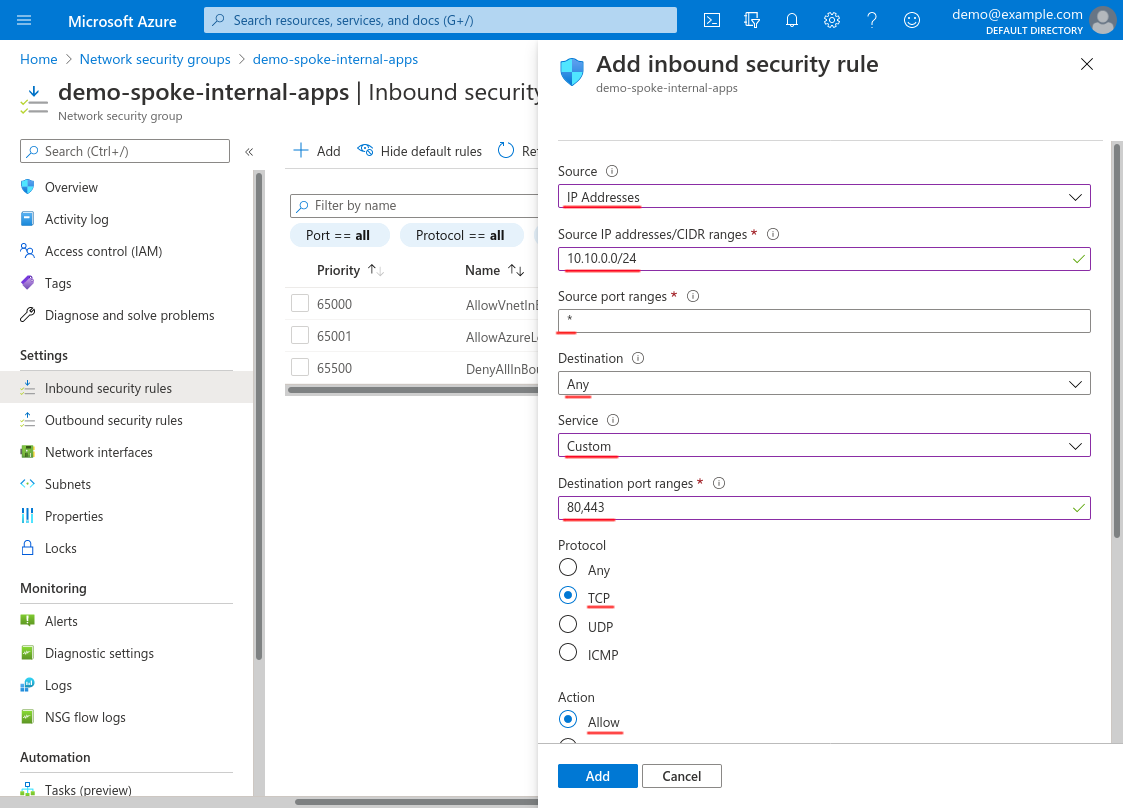
Scroll down and set the Priority to 100 (or some other number below any deny rules that you may create); set the Name to something descriptive, like http-from-wg-bastion; and use the Description for additional details. Then click the Add button:
Allow Inbound SSH Access Through WireGuard
We’ll also allow SSH access from our WireGuard bastion, so that we can use our WireGuard connection to administer our example app VM. You can omit this rule if you don’t need to SSH through your WireGuard connection to administer your internal apps (like because you can SSH into them through a different route, or because they’re baked into a VM or container or other service and you don’t need to SSH into them at all).
Click the Add button again to add another inbound rule:

For Source, select IP Addresses; for Source IP addresses/CIDR ranges, enter the CIDR of the WireGuard subnet from your hub VNet — in our example, it’s 10.10.0.0/24. For Source port ranges, enter *.
For Destination, select Any; and for Service, select SSH. For Action, select Allow:
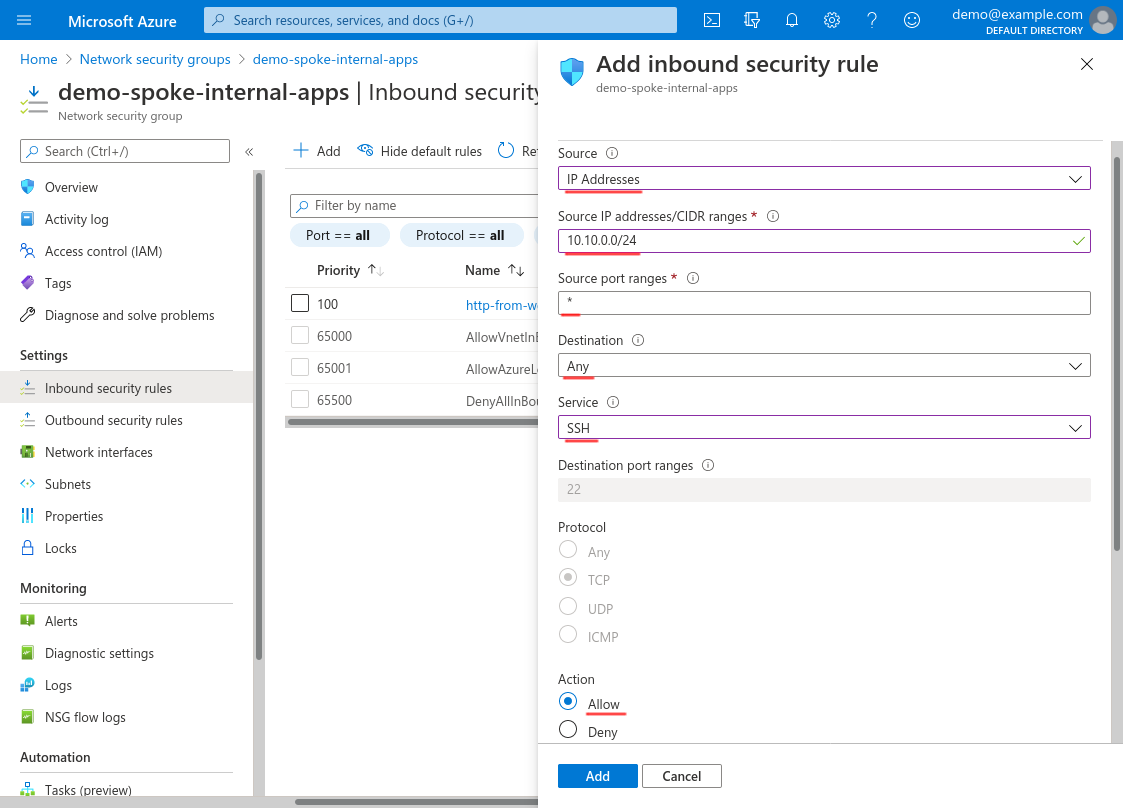
Scroll down and set the Priority to 110 (or some other number below any deny rules that you may create); set the Name to something descriptive, like ssh-from-wg-bastion; and use the Description for additional details. Then click the Add button:

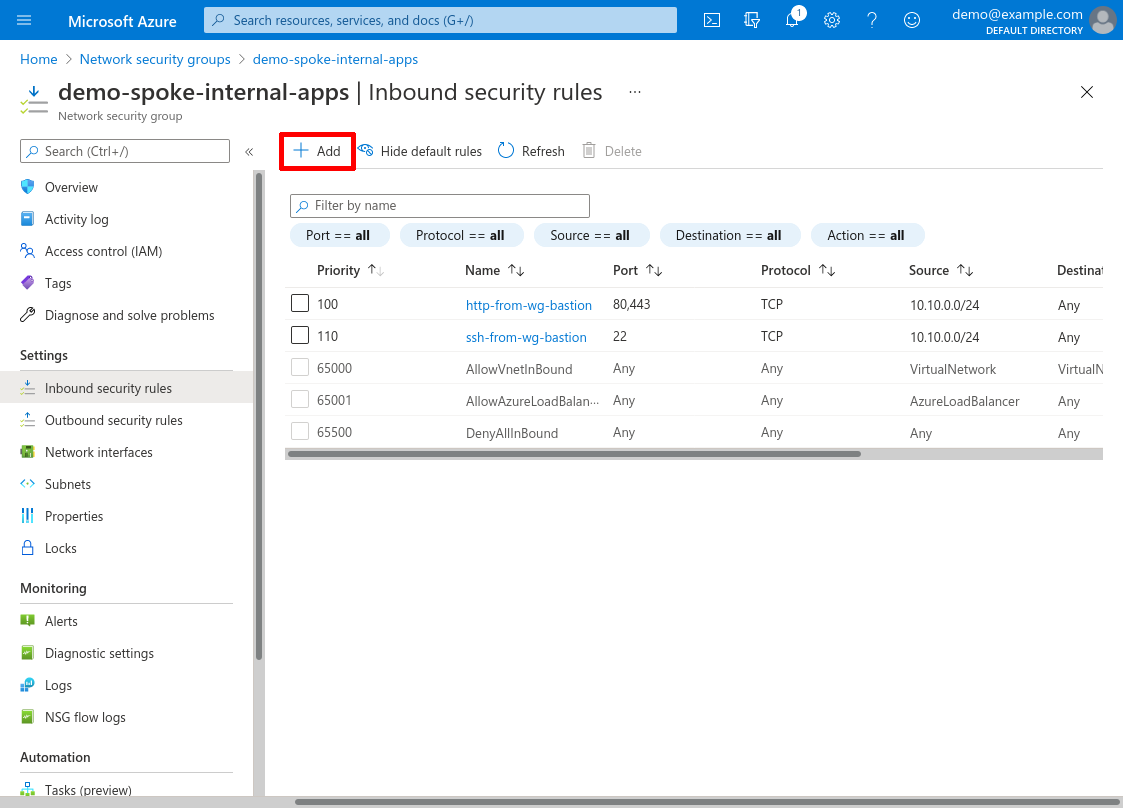
Deny Everything Else Inbound
Now we’ll make sure that nothing else can access our internal apps (including by accessing them through other internal VNets) with one more inbound rule. Click the Add button again:
For Source, select Any; for Source port ranges, enter *. For Destination, select Any; for Service, select Custom; for Destination port ranges, enter *; and for Protocol, select Any. For Action, select Deny:
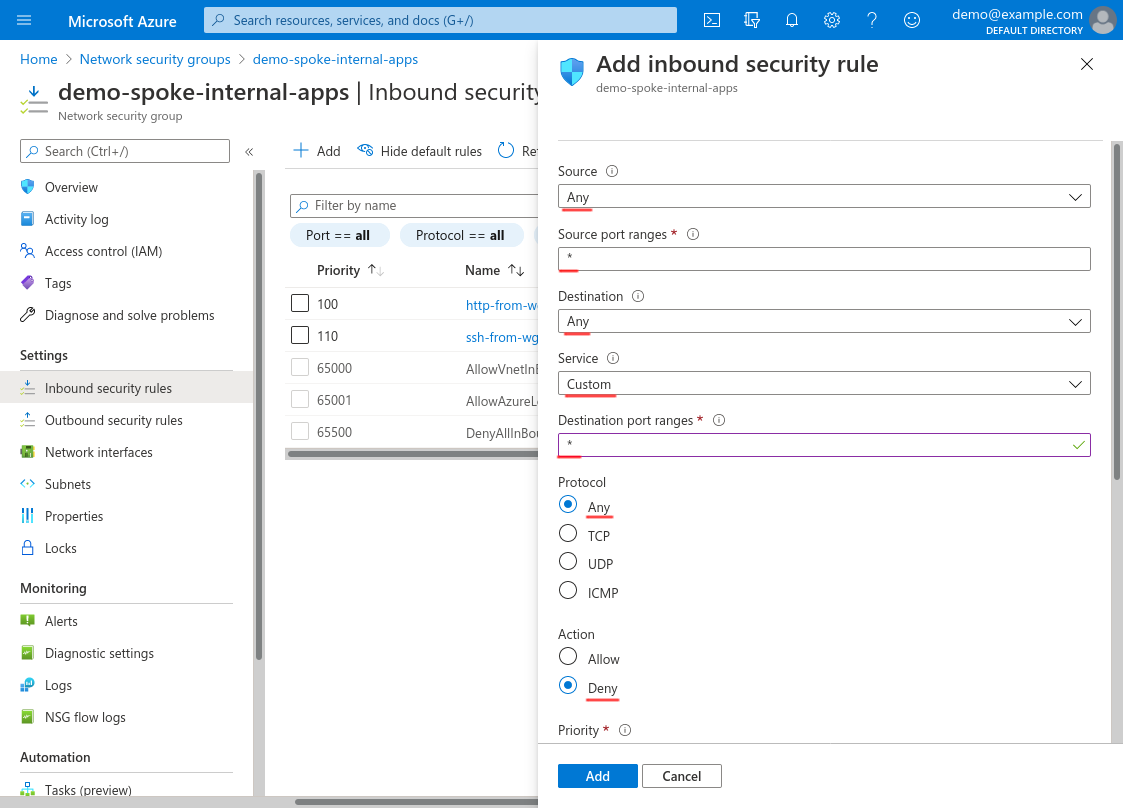
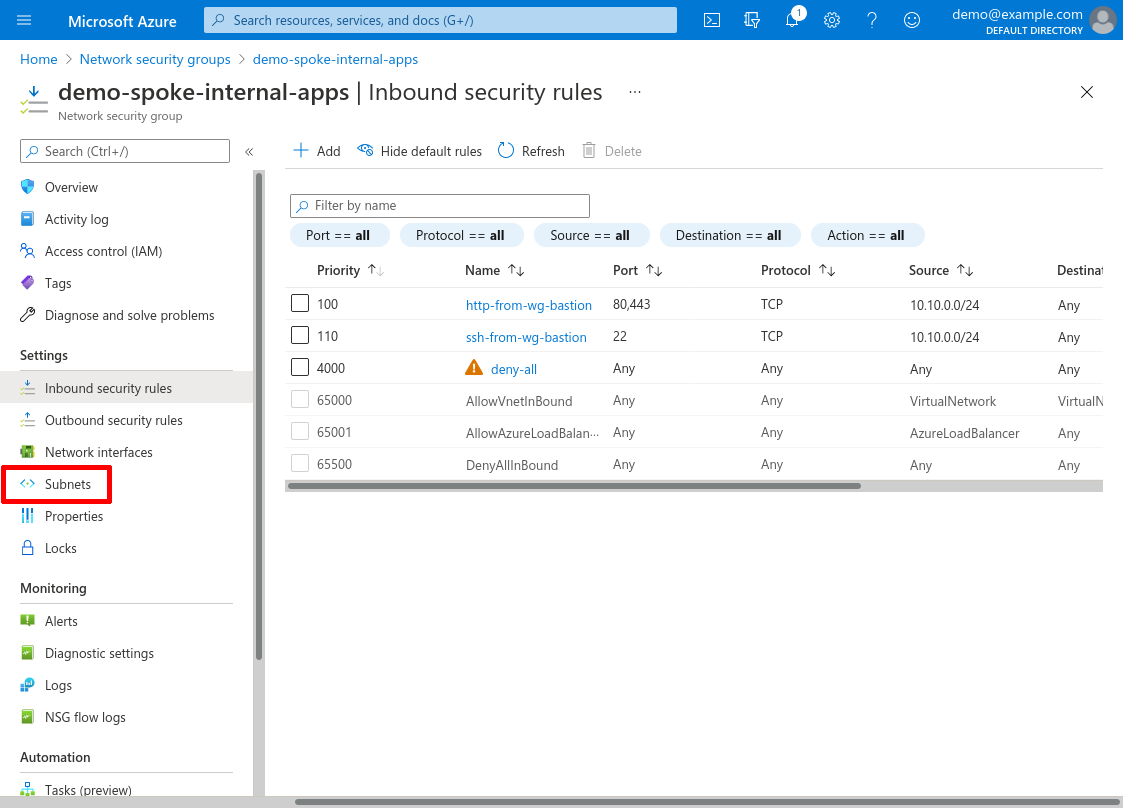
Scroll down and set the Priority to 4000 (or some other high number that will allow room for any future rules below it that you may want to add); set the Name to something descriptive, like deny-all; and set the Description to something appropriate. Then click the Add button:
Attach to Internal Applications Subnet
Now click the Subnets link in the leftnav to attach this NSG to the internal applications subnet we added in the Create Spoke VNet step above:
Click the Associate button:
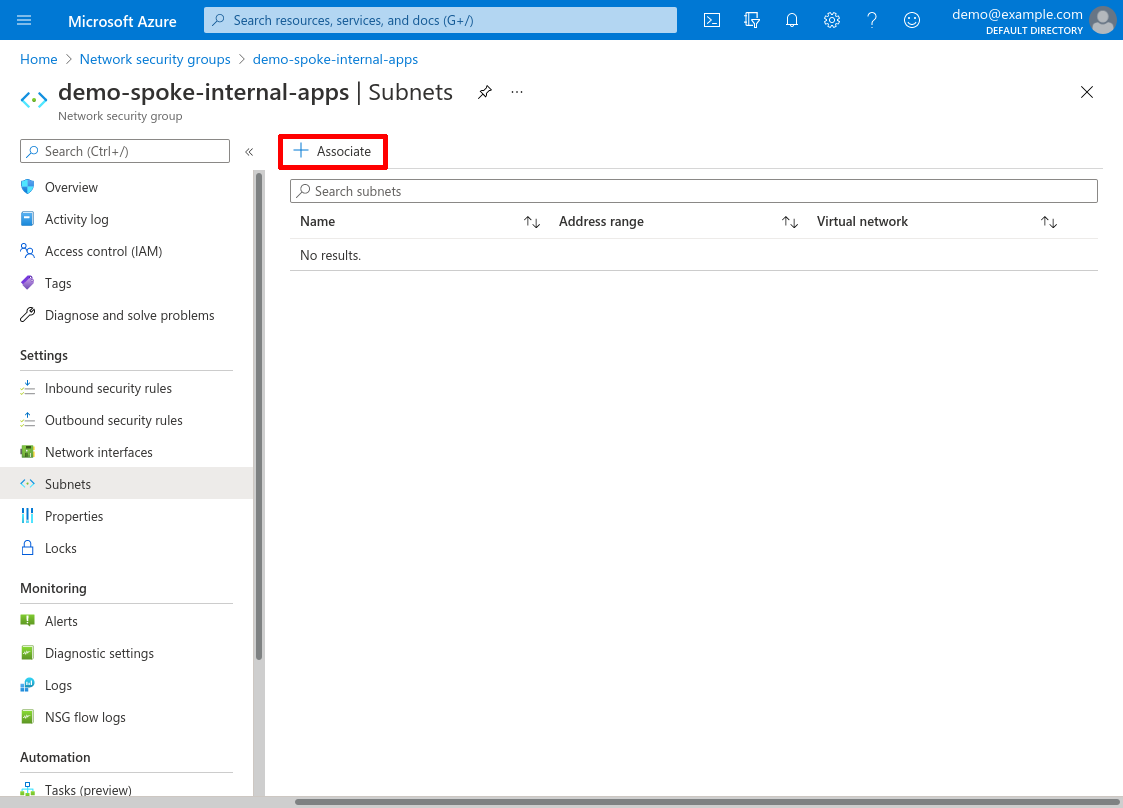
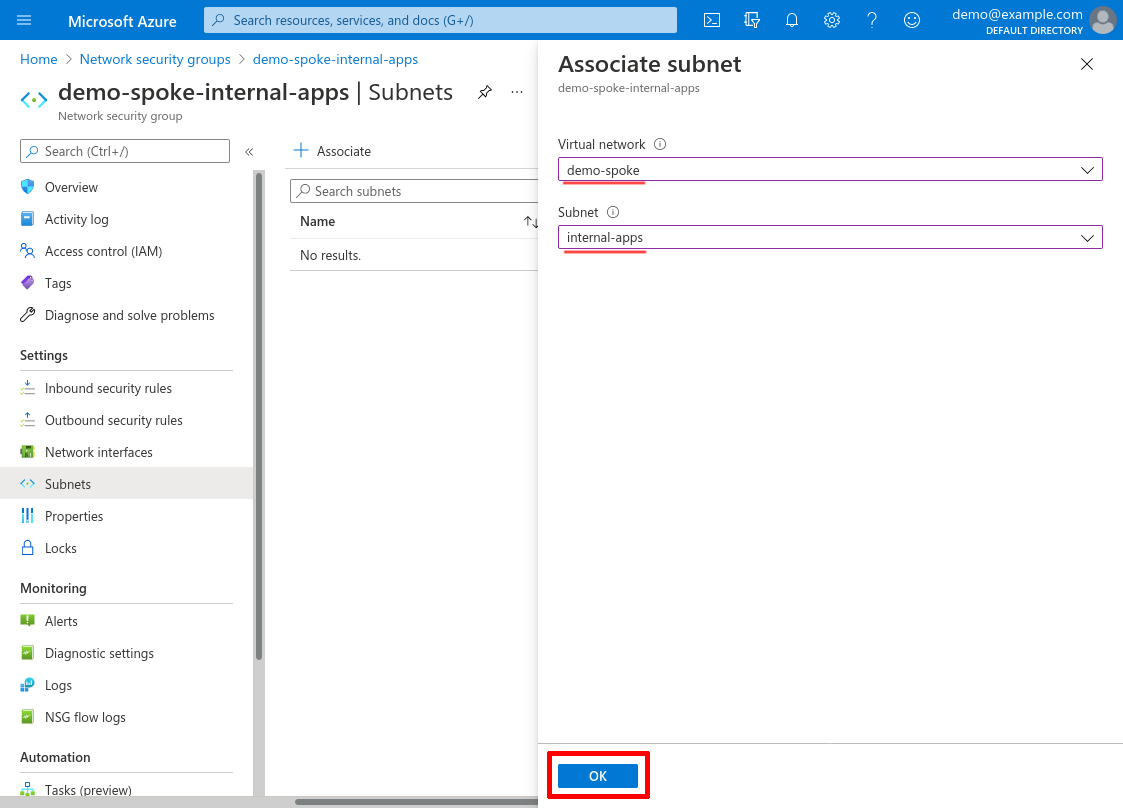
For Virtual network, select the demo-spoke VNet we created in the Create Spoke VNet step, and for Subnet, select the internal-apps subnet we created at the same time. Then click the OK button:
Create WireGuard Public IP
Now we’ll create a public IP address for the bastion WireGuard server that we’ll launch in the next step. When we launch that server, we’ll assign it this IP address.
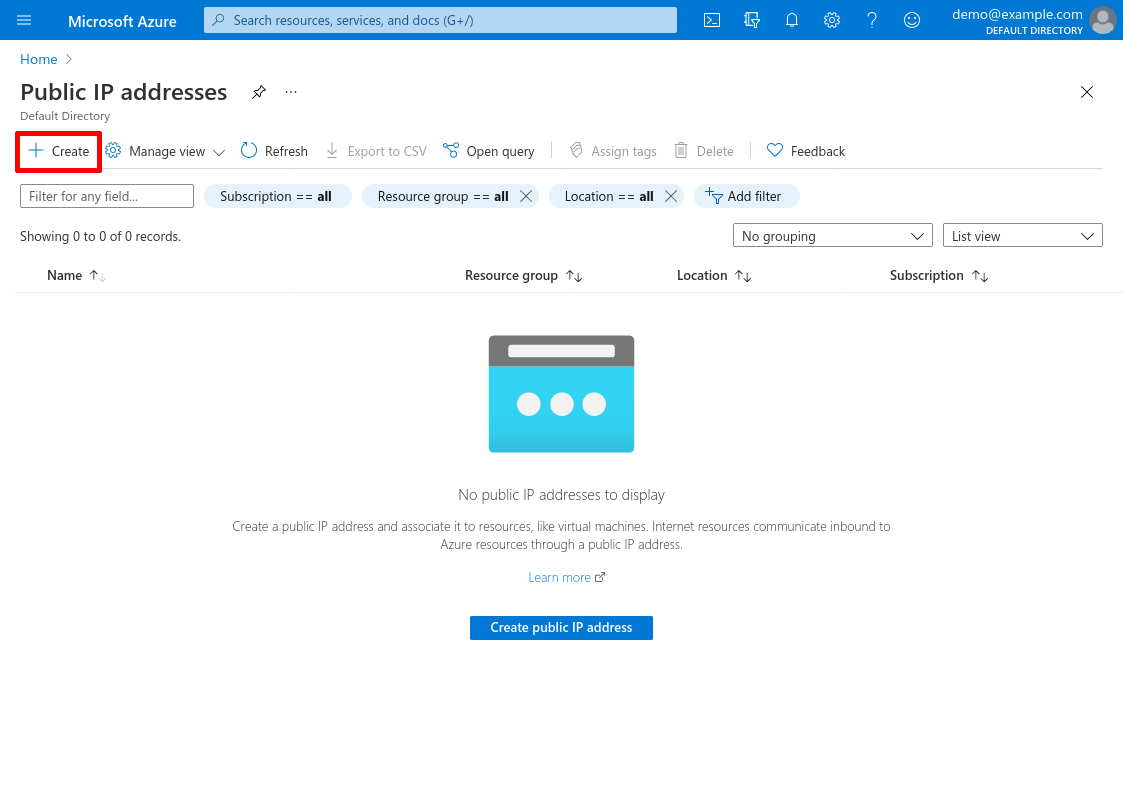
Navigate to the Public IP addresses service (type public ip addresses into the Azure search bar and click the “Public IP addresses” result under “Services”). Then click the Create button:
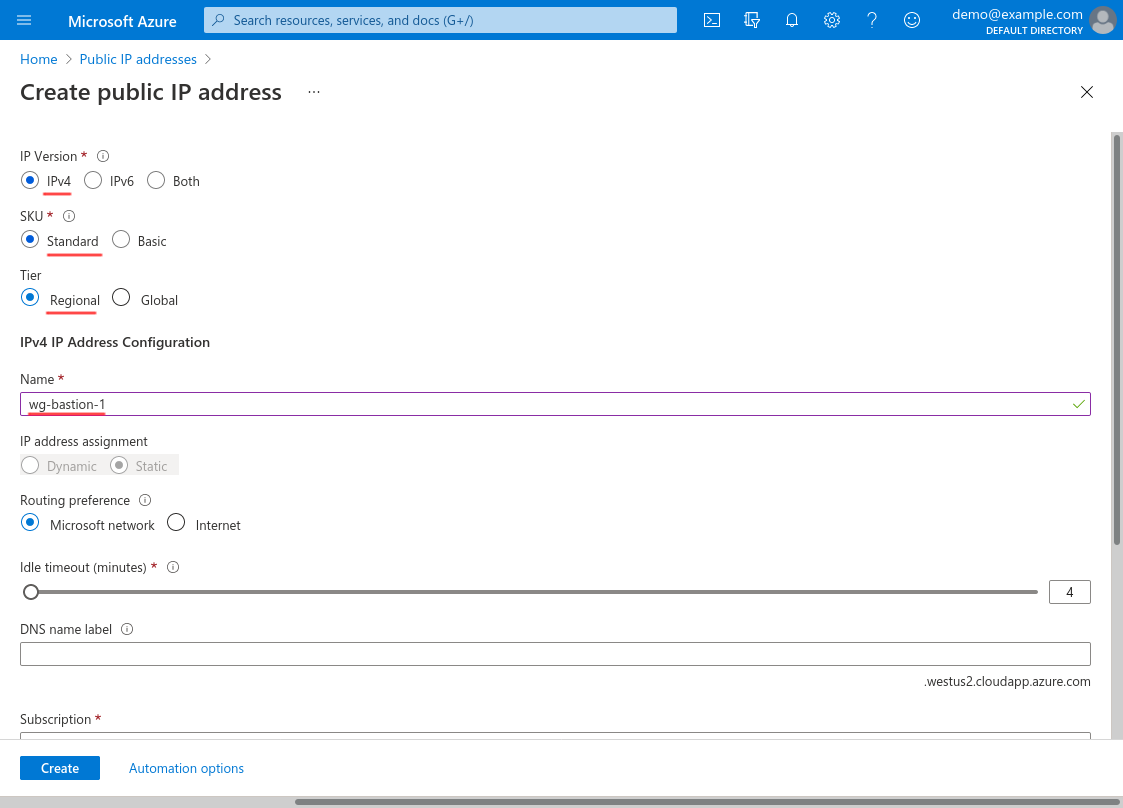
For IP Version, select IPv4; for SKU, select Standard; and for Tier, select Regional. Enter a descriptive Name for the IP address, like wg-bastion-1:
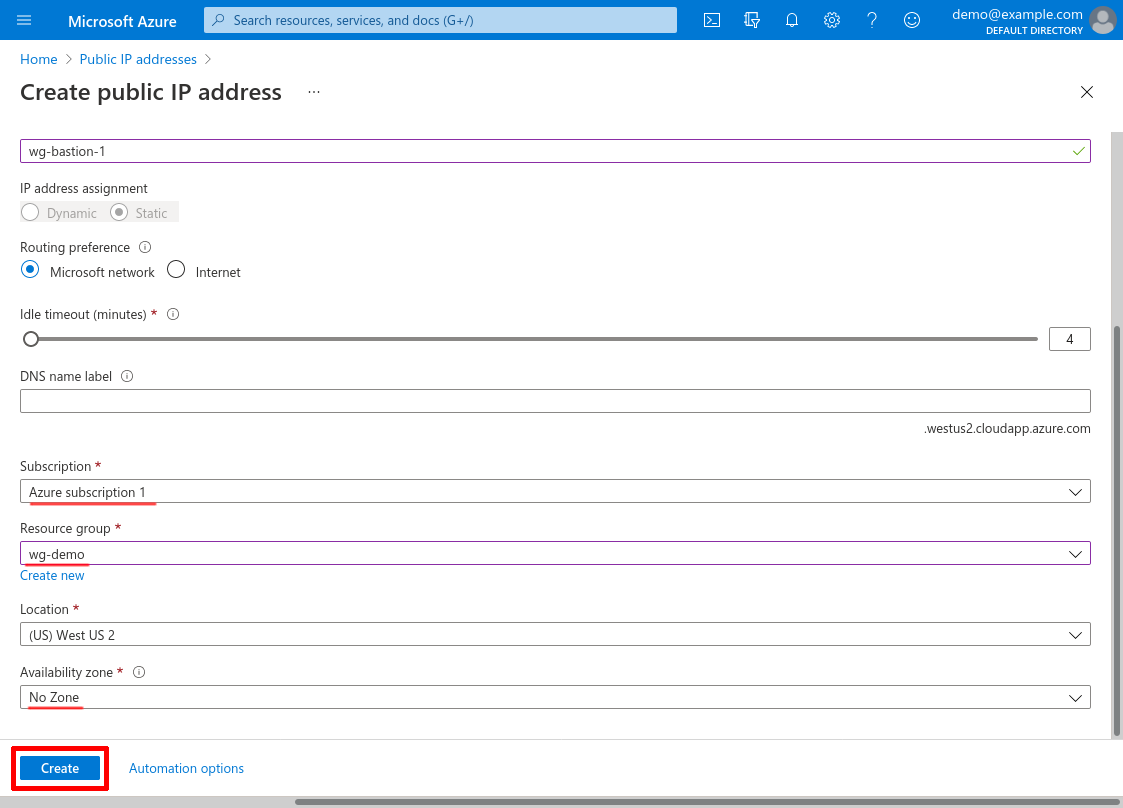
Then scroll down and select the Subscription and Resource group of the hub VNet; and select No Zone for the Availability zone option. Then click the Create button:
Launch WireGuard Server VM
Now we’re finally ready to launch or WireGuard server VM (Virtual Machine).
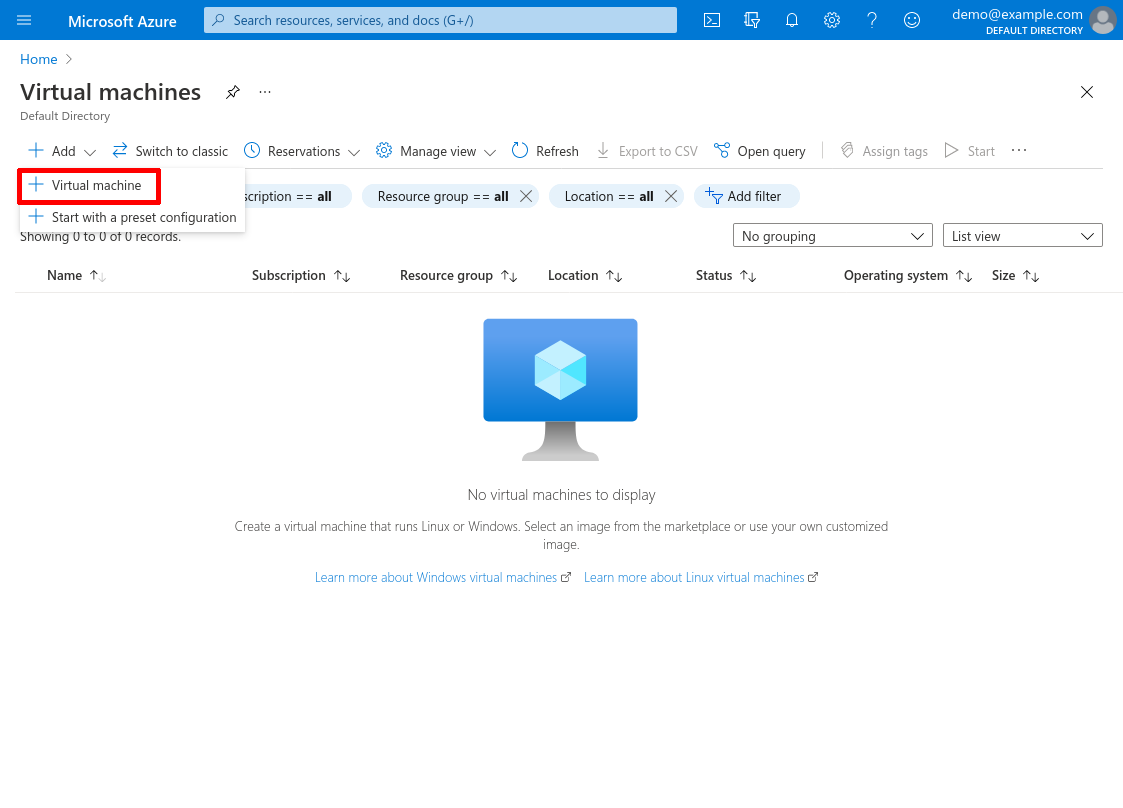
Navigate to the Virtual machines service (type virtual machines into the Azure search bar and click the “Virtual Machines” result under “Services”). Click the Add button, and select Virtual machine:
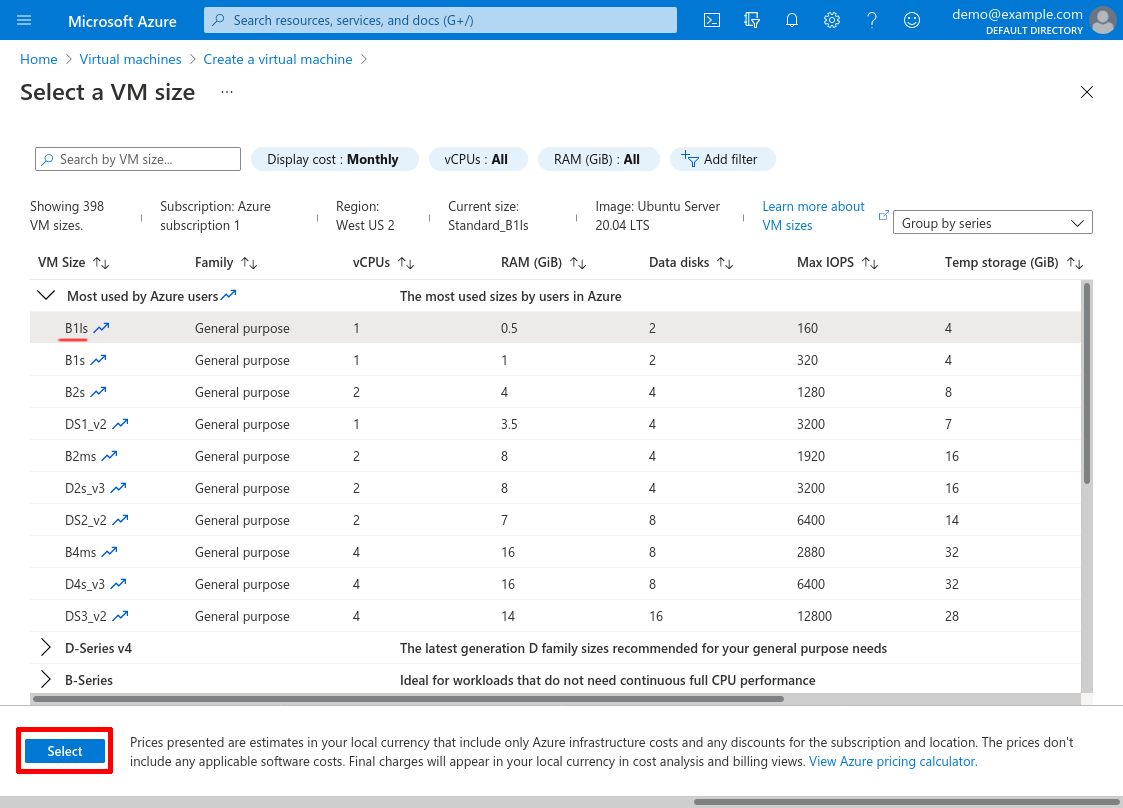
Select the Subscription and Resource group of the hub VNet, then enter a Virtual machine name. I’ll name the VM wg-bastion-1 for this example. For Availability options select No infrastructure redundancy required; and for Image select Ubuntu Server 20.04 LTS. For Size, click the See all sizes link to select the cheapest size available:

WireGuard doesn’t require much processing power, so unless you need to support dozens of concurrent users, the smallest Azure VM will work just fine. Sort this list by cheapest cost/month, and click the cheapest option (in this case B1ls). Then click the Select button:
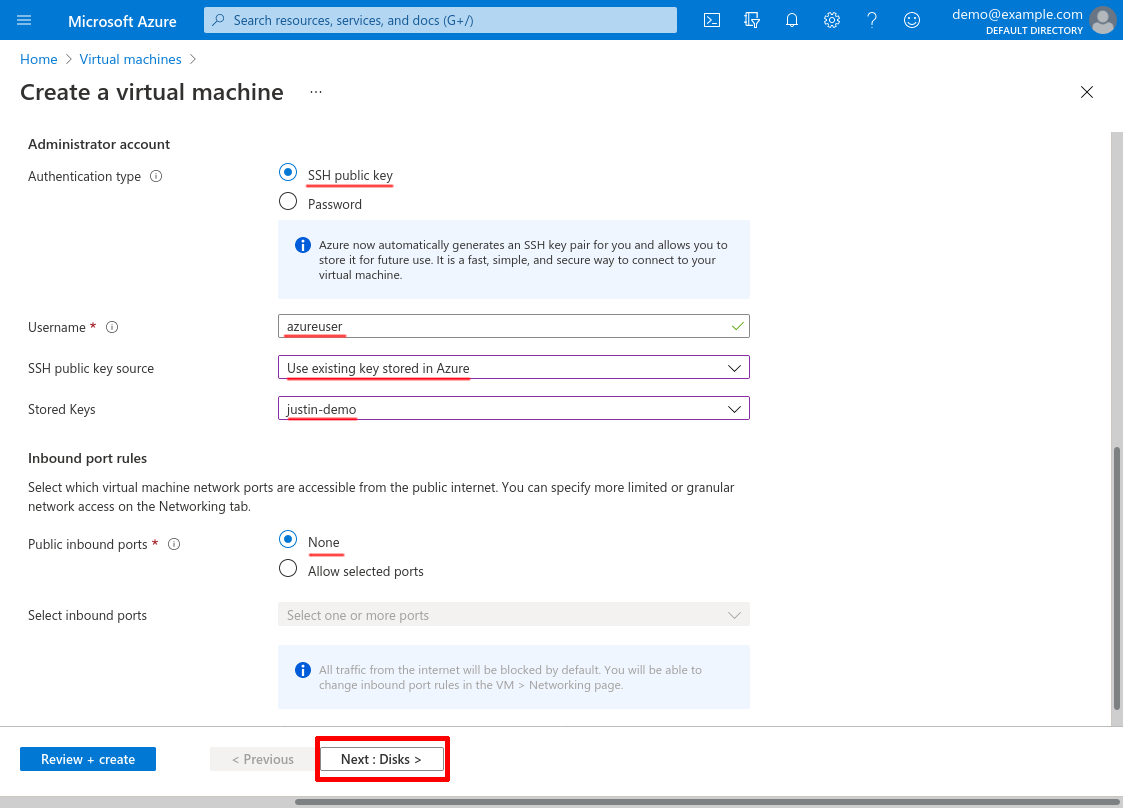
Now scroll down, and for Authentication type select SSH public key; for Username, enter azureuser; for SSH public key source, select Use existing key stored in Azure; and for Stored Keys, select a key that you can use to SSH into the VM (I selected the justin-demo key I created in the Register SSH Key section above).
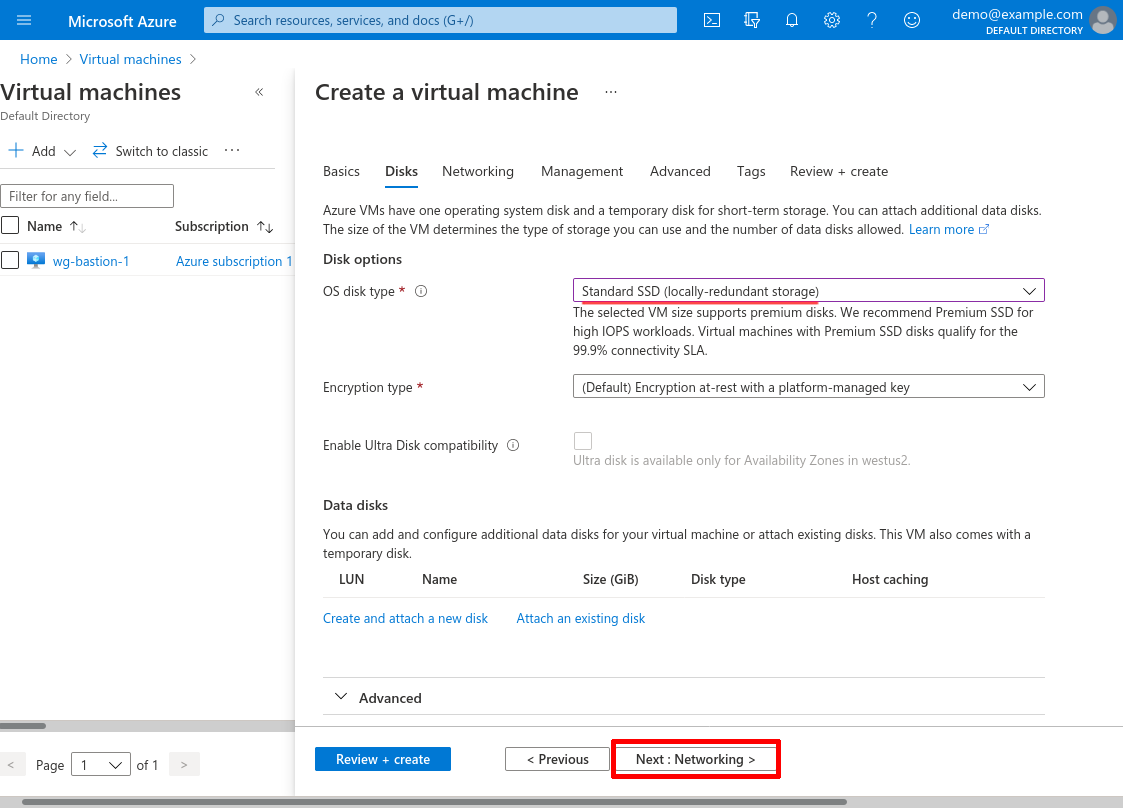
For Public inbound ports, select None. Then click the Next: Disks button:
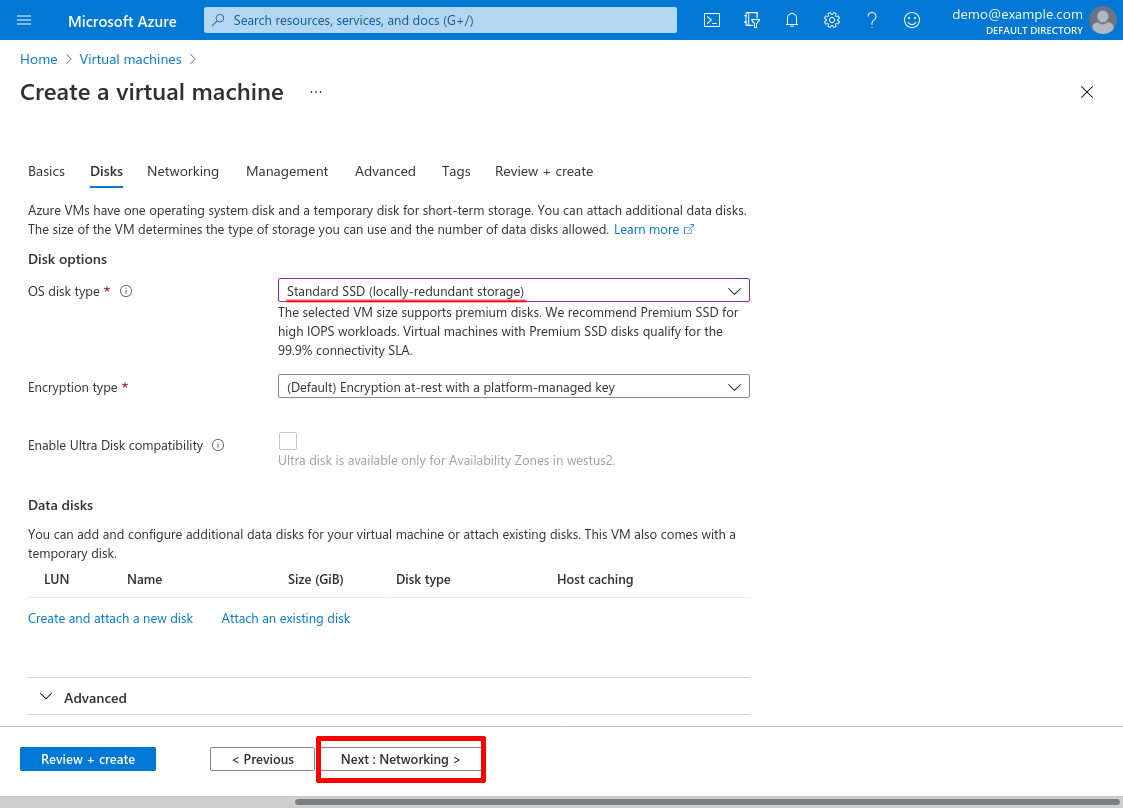
For OS disk type, select Standard HDD (you won’t need any high-performance disk settings for WireGuard unless you’re planning on doing something like logging all packets to disk). Then click the Next: Networking button:
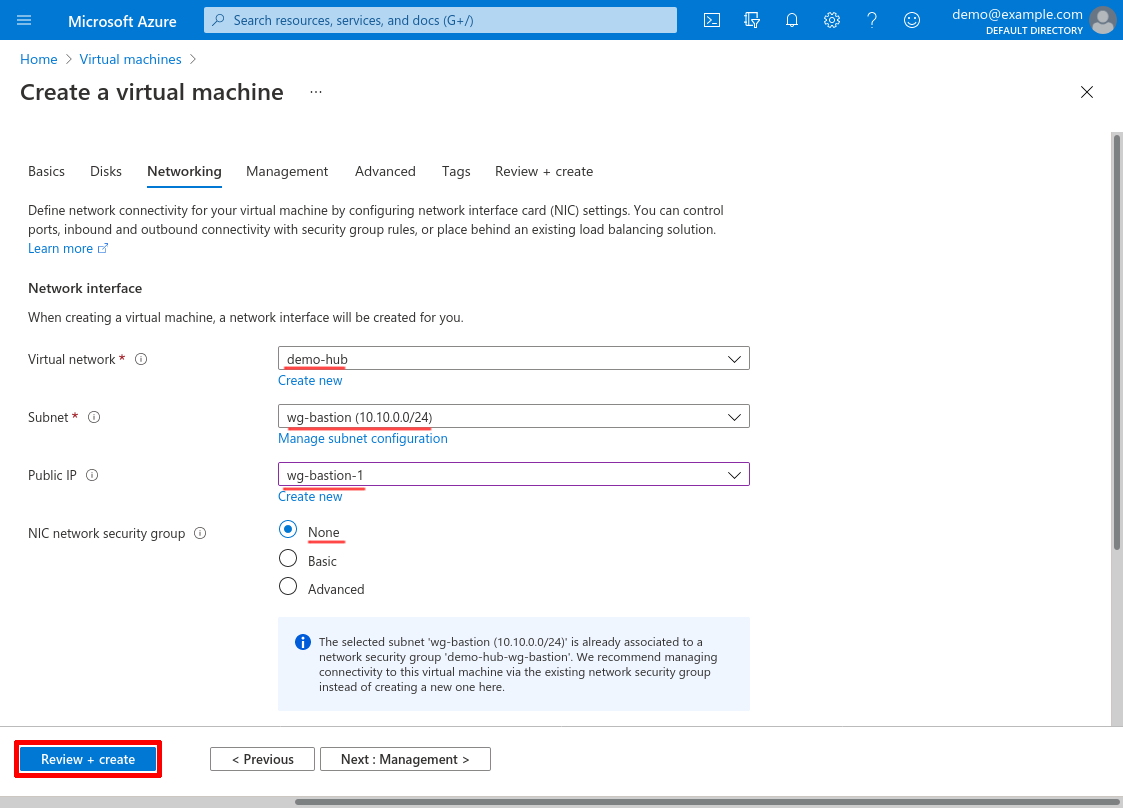
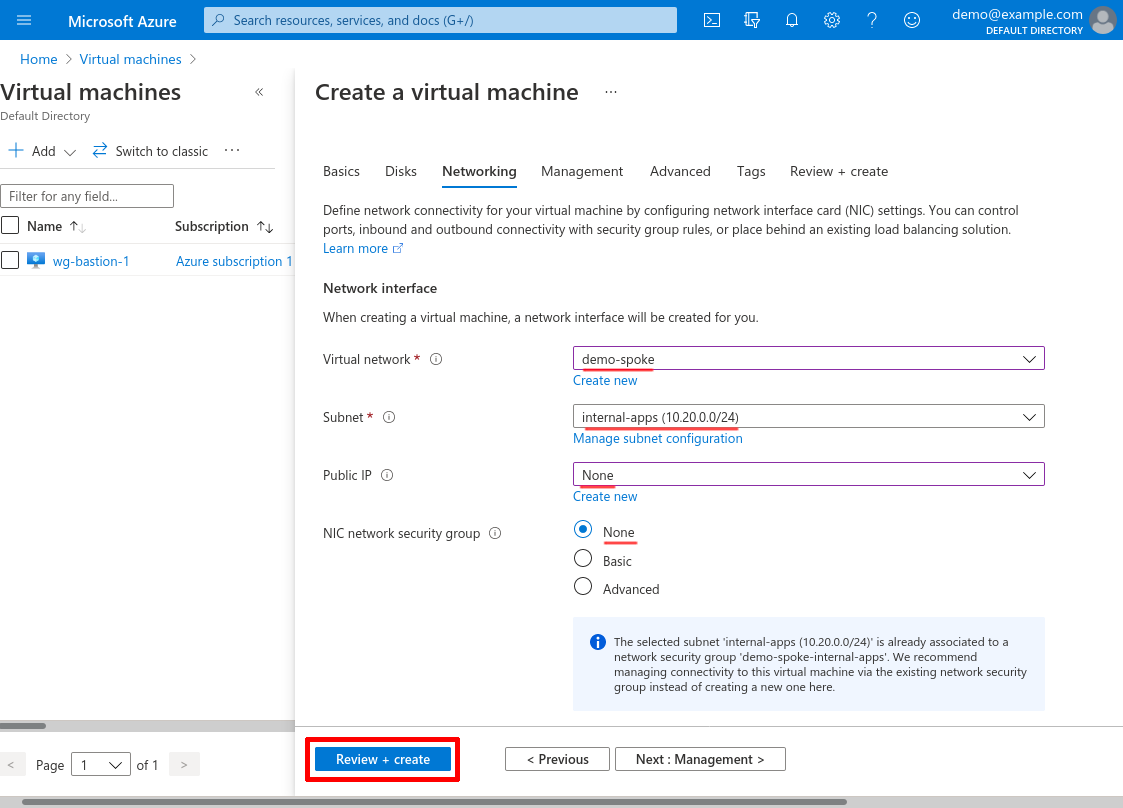
For Virtual network, select the demo-hub network we created in the Create Hub VNet section above; and for Subnet, select the wg-bastion subnet we created at the same time. For Public IP, select the wg-bastion-1 IP we created in the Create WireGuard Public IP section above.
For NIC network security group, select None (since we’re launching this VM into the wg-bastion subnet, the demo-hub-wg-bastion NSG we set up in the Create WireGuard Server NSG section above will apply to it).
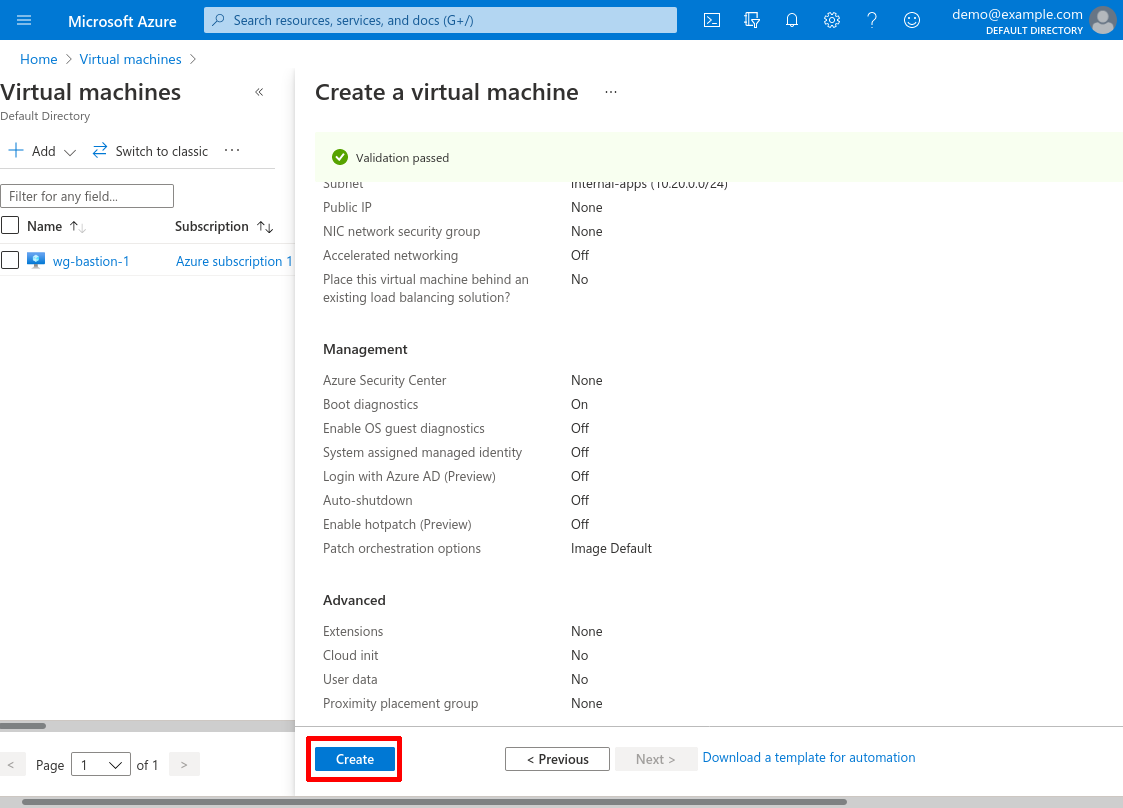
If you want to, you can proceed to the Management, Advanced, and Tags sections of the VM launch process — but these are all the settings we need for our example server. So you can go ahead and click the Review + create button now:
Scroll down to review all your settings, then click the Create button:
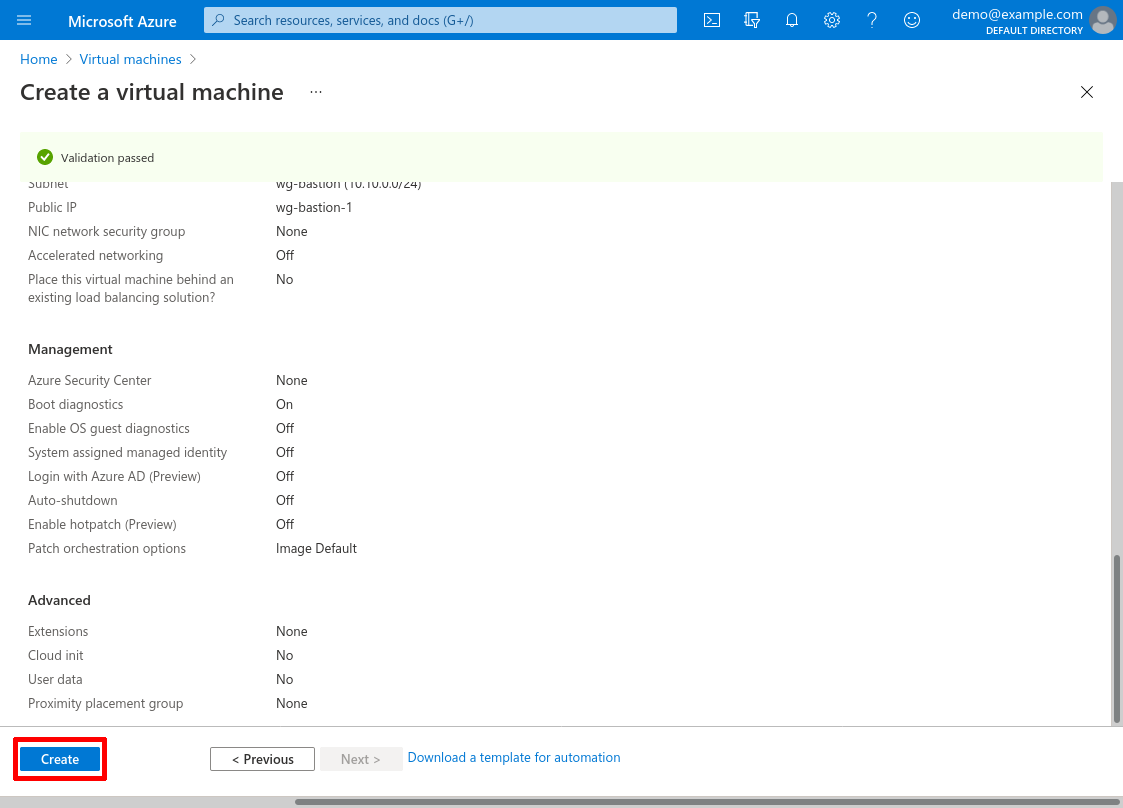
When the VM deployment finishes, click the Go to Deployment button:
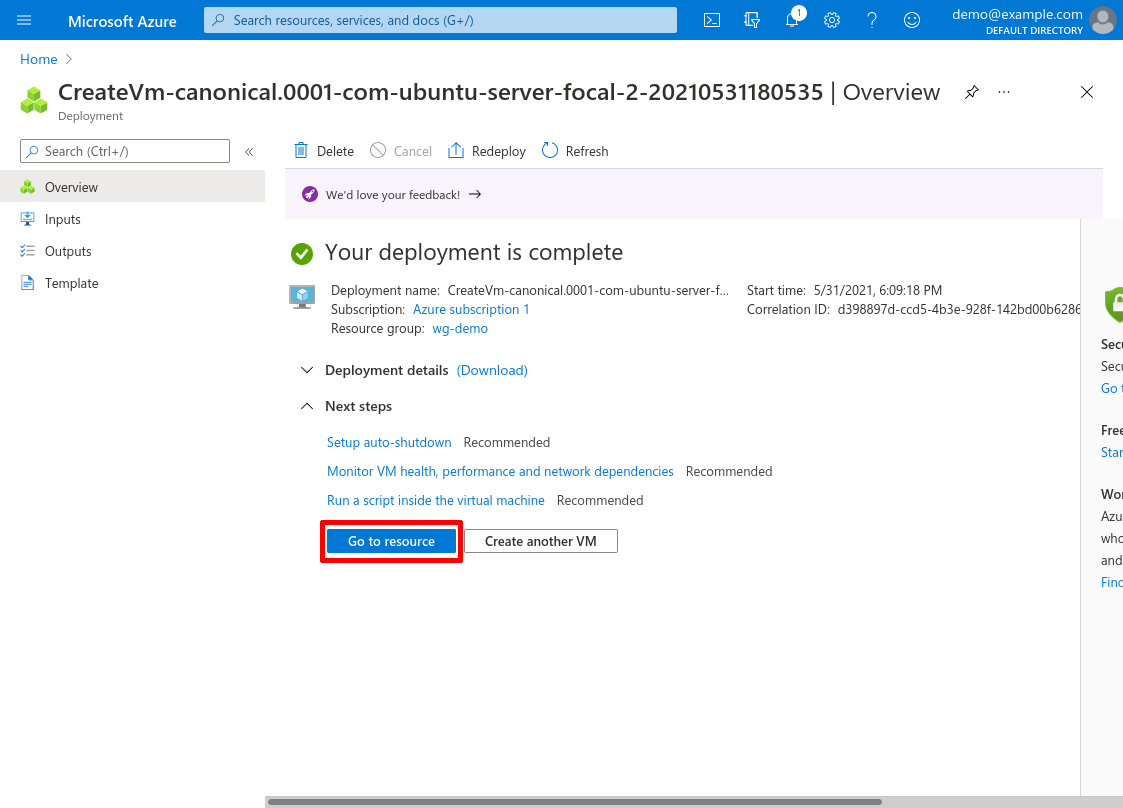
Navigate to the main page for the VM, and click on its Networking link in the leftnav:
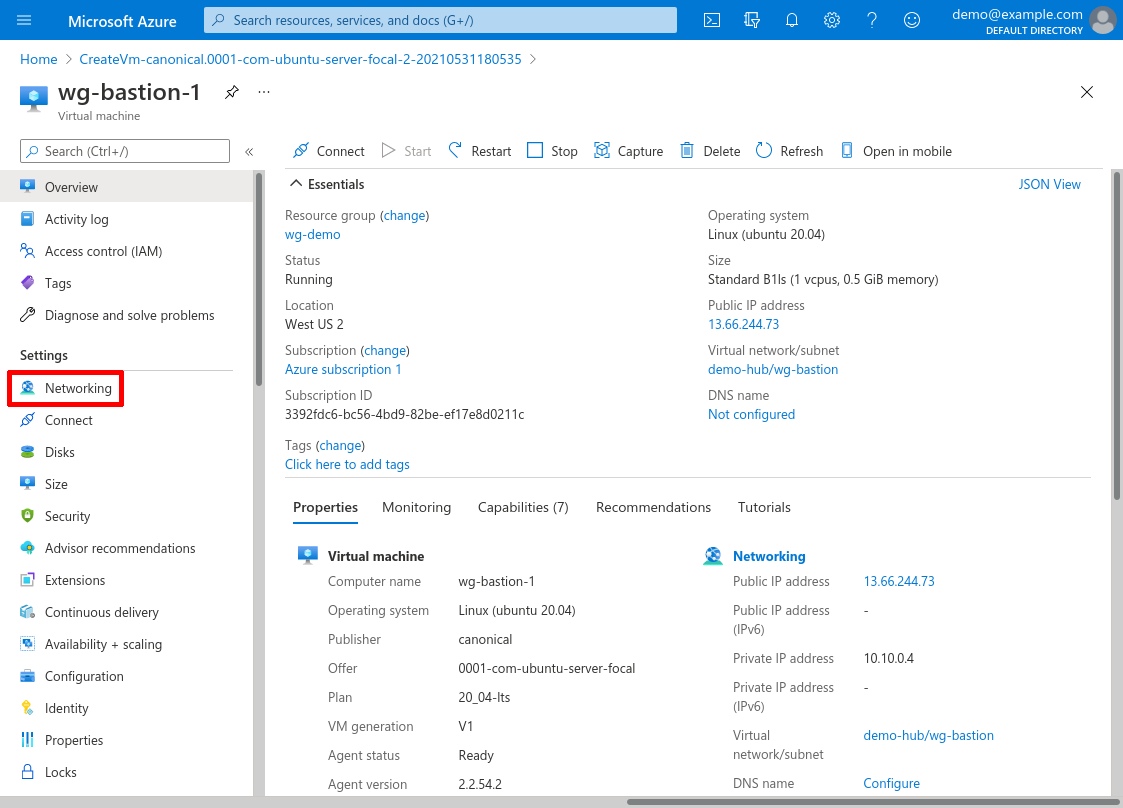
Now click the link to its Network interface (named wg-bastion-1190 in this example):
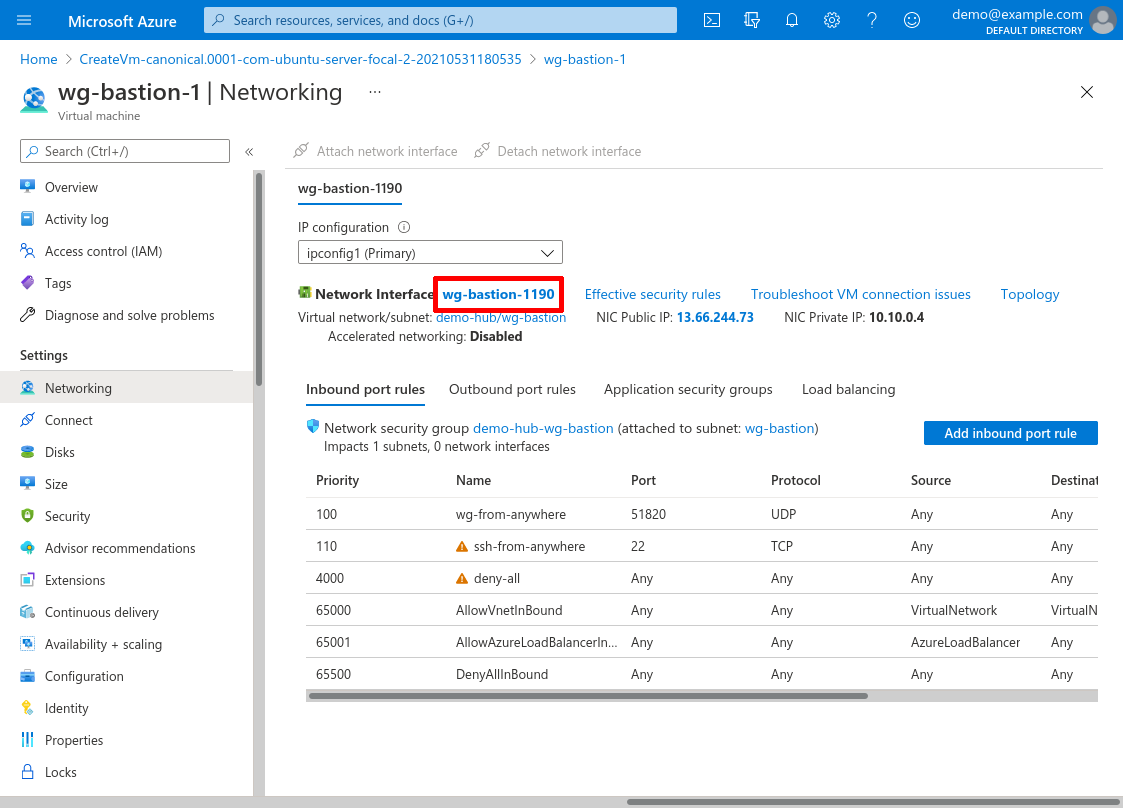
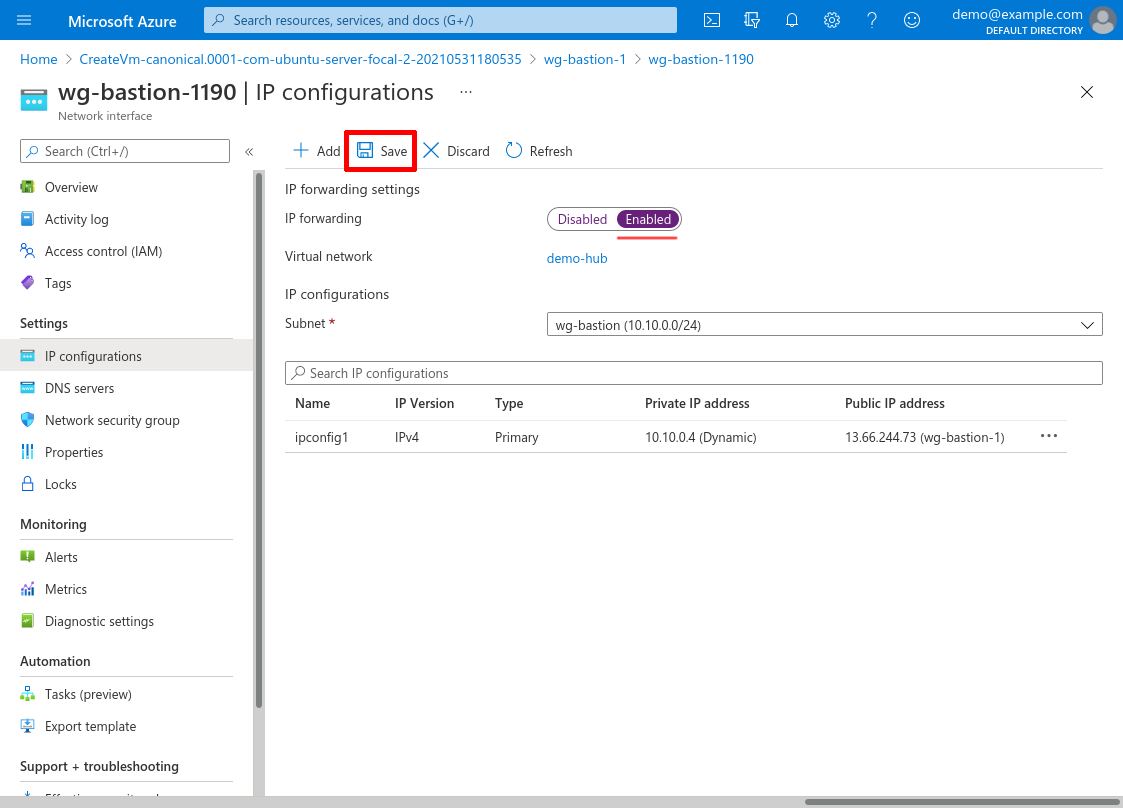
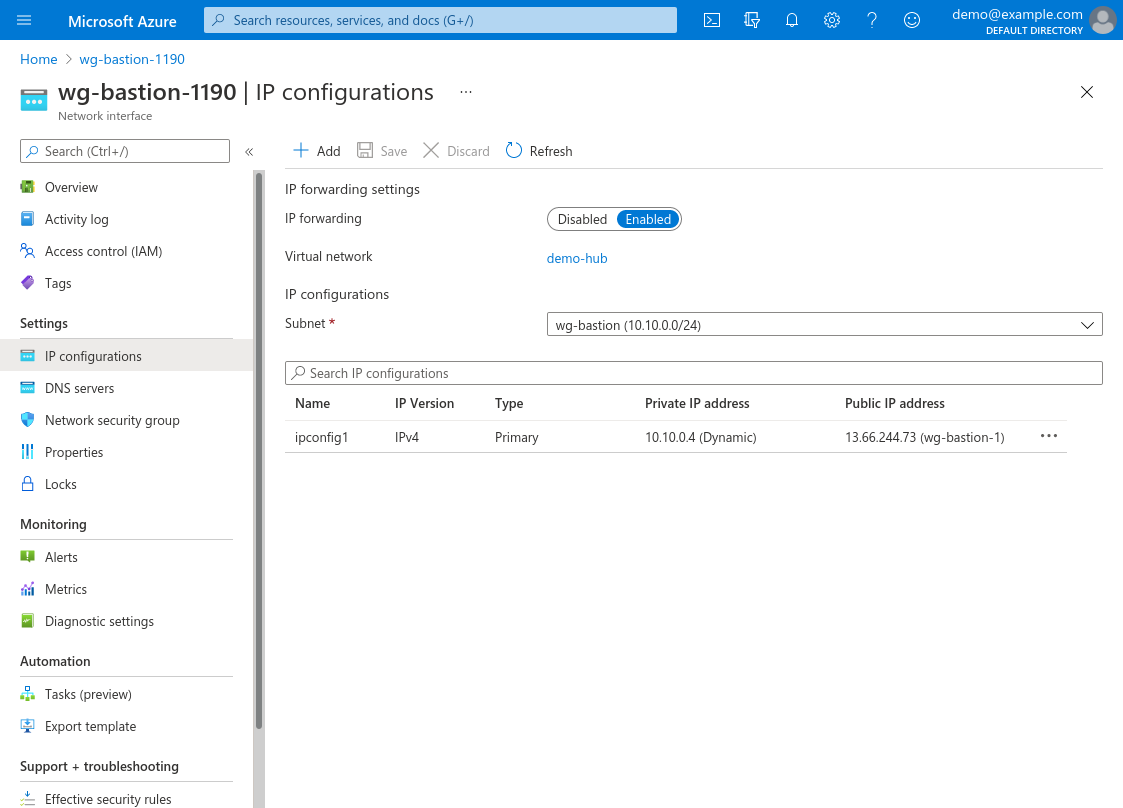
Now click on the network interface’s IP configurations link in the leftnav:

Select Enabled for the network interface’s IP forwarding option; then click the Save button:
Configure WireGuard Server
At this point, we’ve just launched a generic Azure VM instance running Ubuntu 20.04. Copy the VM’s Public IP address (13.66.244.73 in this example) from the Azure Portal, and open up a terminal on your local workstation.
SSH into the VM from your local workstation (add the -i flag to the ssh command if you need to specify the path to the SSH key pair with which you launched the VM):
justin@jws:~$ ssh azureuser@13.66.244.73
The authenticity of host '13.66.244.73 (13.66.244.73)' can't be established.
ED25519 key fingerprint is SHA256:iAcUyXn0OInuoYHk/dQNBTQsZOhC7Nz5a3XVFPiFCIE.
Are you sure you want to continue connecting (yes/no/[fingerprint])? yes
Warning: Permanently added '13.66.244.73' (ED25519) to the list of known hosts.
Welcome to Ubuntu 20.04.2 LTS (GNU/Linux 5.4.0-1047-azure x86_64)

 * Documentation:  https://help.ubuntu.com
 * Management:     https://landscape.canonical.com
 * Support:        https://ubuntu.com/advantage

  System information as of Mon May 31 21:07:39 UTC 2021

  System load:  0.0               Processes:             119
  Usage of /:   4.4% of 28.90GB   Users logged in:       0
  Memory usage: 53%               IPv4 address for eth0: 10.10.0.4
  Swap usage:   0%

1 update can be applied immediately.
To see these additional updates run: apt list --upgradable


The list of available updates is more than a week old.
To check for new updates run: sudo apt update


The programs included with the Ubuntu system are free software;
the exact distribution terms for each program are described in the
individual files in /usr/share/doc/*/copyright.

Ubuntu comes with ABSOLUTELY NO WARRANTY, to the extent permitted by
applicable law.

To run a command as administrator (user "root"), use "sudo <command>".
See "man sudo_root" for details.

azureuser@wg-bastion-1:~$
Now install WireGuard on the server. Since the VM is running Ubuntu 20.04, execute the following commands on it:
$ sudo apt update
$ sudo apt install wireguard
Next, generate a WireGuard key on the VM:
$ wg genkey > server.key
$ wg pubkey < server.key > server.pub
$ cat server.key
ABBBBBBBBBBBBBBBBBBBBBBBBBBBBBBBBBBBBBBBBFA=
$ cat server.pub
fE/wdxzl0klVp/IR8UcaoGUMjqaWi3jAd7KzHKFS6Ds=
And also generate a WireGuard key on your local workstation (if you haven’t yet installed WireGuard on your local workstation, do so now):
justin@jws:~$ wg genkey > my-workstation.key
justin@jws:~$ wg pubkey < my-workstation.key > my-workstation.pub
justin@jws:~$ cat my-workstation.key
AAAAAAAAAAAAAAAAAAAAAAAAAAAAAAAAAAAAAAAAAEE=
justin@jws:~$ cat my-workstation.pub
/TOE4TKtAqVsePRVR+5AA43HkAK5DSntkOCO7nYq5xU=
SCP the public key from your local workstation to the VM, and the VM’s public key to your workstation:
justin@jws:~$ scp my-workstation.pub azureuser@13.66.244.73:.
justin@jws:~$ scp azureuser@13.66.244.73:server.pub .
Create a new file on the server at /etc/wireguard/wg0.conf, and put the following content in it:
# /etc/wireguard/wg0.conf

# local settings for WireGuard Server
[Interface]
PrivateKey = ABBBBBBBBBBBBBBBBBBBBBBBBBBBBBBBBBBBBBBBBFA=
Address = 10.0.0.2/32
ListenPort = 51820

# IP forwarding
PreUp = sysctl -w net.ipv4.ip_forward=1
# IP masquerading
PreUp = iptables -t mangle -A PREROUTING -i wg0 -j MARK --set-mark 0x30
PreUp = iptables -t nat -A POSTROUTING ! -o wg0 -m mark --mark 0x30 -j MASQUERADE
PostDown = iptables -t mangle -D PREROUTING -i wg0 -j MARK --set-mark 0x30
PostDown = iptables -t nat -D POSTROUTING ! -o wg0 -m mark --mark 0x30 -j MASQUERADE

# firewall local host from wg peers
PreUp = iptables -A INPUT -i wg0 -m state --state ESTABLISHED,RELATED -j ACCEPT
PreUp = iptables -A INPUT -i wg0 -j REJECT
PostDown = iptables -D INPUT -i wg0 -m state --state ESTABLISHED,RELATED -j ACCEPT
PostDown = iptables -D INPUT -i wg0 -j REJECT
# firewall wg peers from other hosts
PreUp = iptables -A FORWARD -o wg0 -m state --state ESTABLISHED,RELATED -j ACCEPT
PreUp = iptables -A FORWARD -o wg0 -j REJECT
PostDown = iptables -D FORWARD -o wg0 -m state --state ESTABLISHED,RELATED -j ACCEPT
PostDown = iptables -D FORWARD -o wg0 -j REJECT

# remote settings for Justin's Workstation
[Peer]
PublicKey = /TOE4TKtAqVsePRVR+5AA43HkAK5DSntkOCO7nYq5xU=
AllowedIPs = 10.0.0.1/32
Replace the PrivateKey value with the private key you generated on the server (server.key), and the PublicKey value with the public key you generated on your local workstation (my-workstation.pub).
For a detailed explanation of all the settings in this file, see the Point to Site Configuration article (“Host β” in that article is the equivalent of the WireGuard bastion server in this article). The firewall commands in this file will prevent clients from using the WireGuard tunnel to connect directly to other services on the server, or to other WireGuard clients that you add later (omit these firewall commands if you do want to allow such access). Since we’re using Azure NSGs to control access from the WireGuard server to other services in our cloud, we don’t need to add any additional firewall settings on the server itself.
Bring up the wg0 WireGuard interface we just configured, by running the following commands on the server:
$ sudo systemctl enable wg-quick@wg0.service
$ sudo systemctl start wg-quick@wg0.service
Now with the interface up, when you run sudo wg on the server, you should see the following output:
$ sudo wg
interface: wg0
  public key: fE/wdxzl0klVp/IR8UcaoGUMjqaWi3jAd7KzHKFS6Ds=
  private key: (hidden)
  listening port: 51820

peer: /TOE4TKtAqVsePRVR+5AA43HkAK5DSntkOCO7nYq5xU=
  allowed ips: 10.0.0.1/32
Configure WireGuard Client
Configure your local workstation to connect to the server over WireGuard. Create a new file on your local workstation at /etc/wireguard/wg-bastion-1.conf, and put the following content in it:
# /etc/wireguard/wg-bastion-1.conf

# local settings for Justin's Workstation
[Interface]
PrivateKey = AAAAAAAAAAAAAAAAAAAAAAAAAAAAAAAAAAAAAAAAAEE=
Address = 10.0.0.1/32

# remote settings for WireGuard Server
[Peer]
PublicKey = fE/wdxzl0klVp/IR8UcaoGUMjqaWi3jAd7KzHKFS6Ds=
Endpoint = 13.66.244.73:51820
AllowedIPs = 10.20.0.0/16
Replace the PrivateKey value with the private key you generated on your local workstation (my-workstation.key), and the PublicKey value with the public key you generated on the server (server.pub). Also replace the Endpoint value with the actual public IP address of the VM (the IP address we created with the Create WireGuard Public IP step); and replace the AllowedIPs value with the actual IPv4 address space of your spoke VNets (separate multiple address blocks with commas, or add a separate AllowedIPs line for each block).
Start up the wg-bastion-1 WireGuard interface we just configured on your local workstation:
justin@jws:~$ sudo systemctl enable wg-quick@wg-bastion-1.service
justin@jws:~$ sudo systemctl start wg-quick@wg-bastion-1.service
Now if you run sudo wg on your local workstation, it should include the following output:
justin@jws:~$ sudo wg
interface: my-vpc-01
  public key: /TOE4TKtAqVsePRVR+5AA43HkAK5DSntkOCO7nYq5xU=
  private key: (hidden)
  listening port: 56789

peer: fE/wdxzl0klVp/IR8UcaoGUMjqaWi3jAd7KzHKFS6Ds=
  endpoint: 13.66.244.73:51820
  allowed ips: 10.20.0.0/16
Launch Internal Application VM
If you already have some internal web apps running in your spoke VNets, you can skip this step. Otherwise, we’ll set up a simple app for to test out our WireGuard connection.
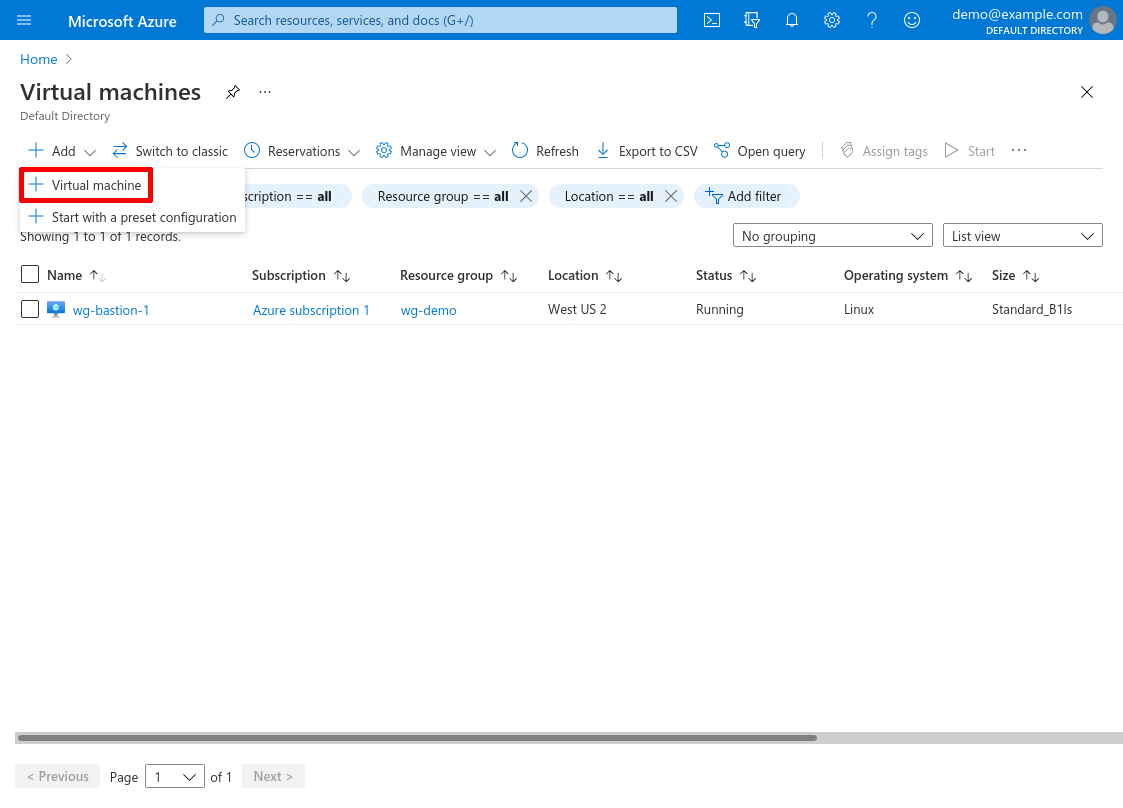
Return to the Virtual machines service in the Azure Portal; click the Add button, and select Virtual machine:
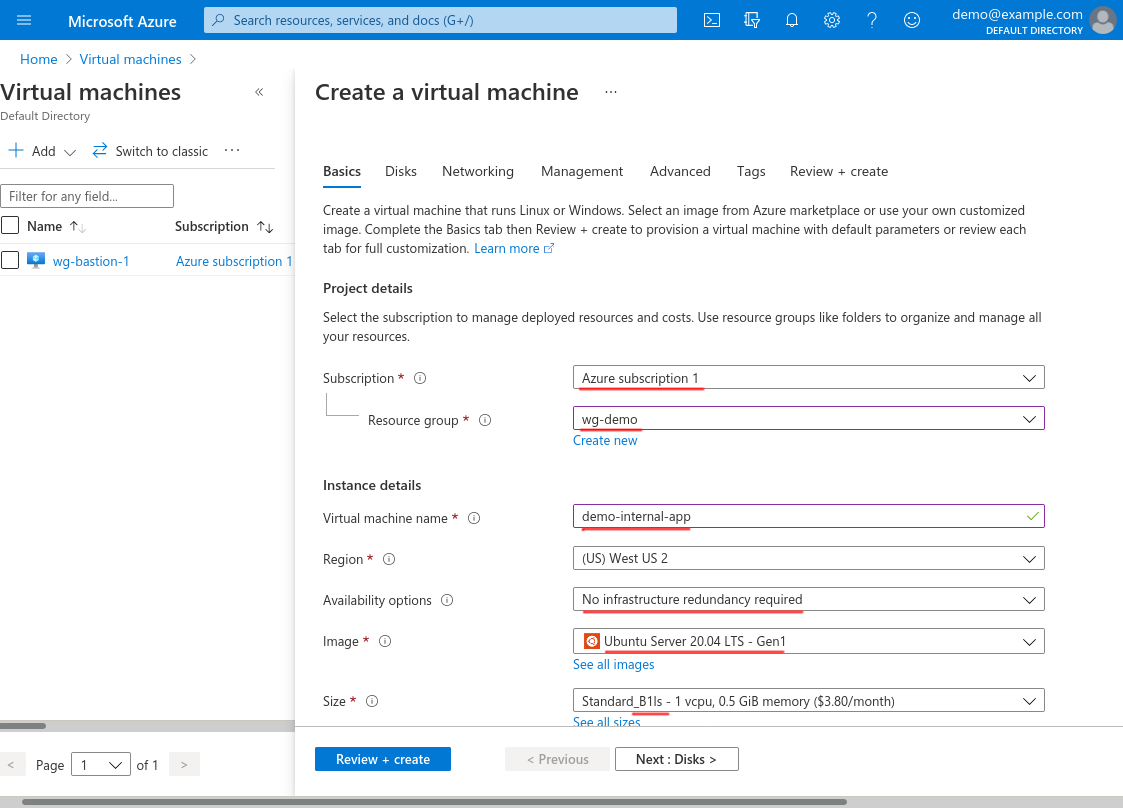
Select the Subscription and Resource group of the spoke VNet, then enter a Virtual machine name. I’ll name the VM demo-internal-app for this example. For Availability options select No infrastructure redundancy required; and for Image select Ubuntu Server 20.04 LTS. For Size, select the cheapest possible instance (B1ls):
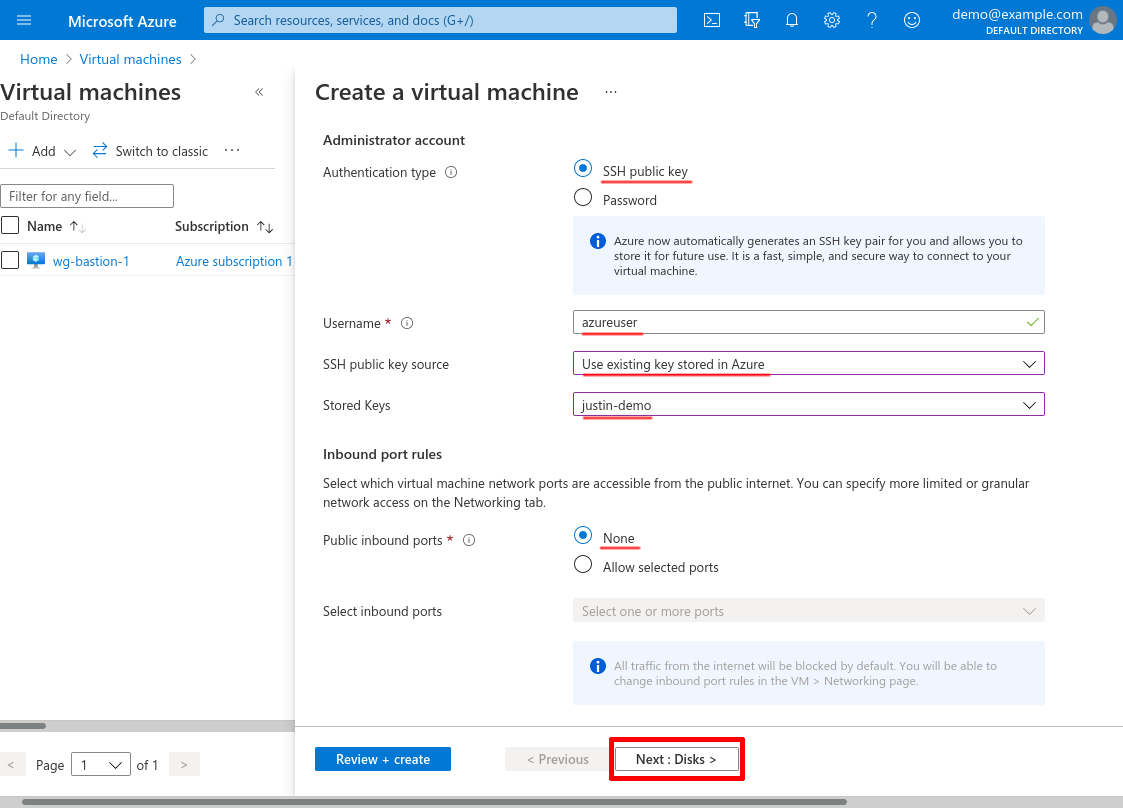
Scroll down and for Authentication type select SSH public key; for Username, enter azureuser; for SSH public key source, select Use existing key stored in Azure; and for Stored Keys, select a key that you can use to SSH into the VM (I selected the justin-demo key I created in the Register SSH Key section above).
For Public inbound ports, select None. Then click the Next: Disks button:
For OS disk type, select Standard HDD. Then click the Next: Networking button:
For Virtual network, select the demo-spoke network we created in the Create Spoke VNet section above; and for Subnet, select the internal-apps subnet we created at the same time. For Public IP, select None; and for NIC network security group, select None.
Then can click the Review + create button:
Scroll down to review all you settings, then click the Create button:
When the VM deployment finishes, click the Go to Deployment button:

On the main page for the VM, find the Private IP address of the VM, and copy it:
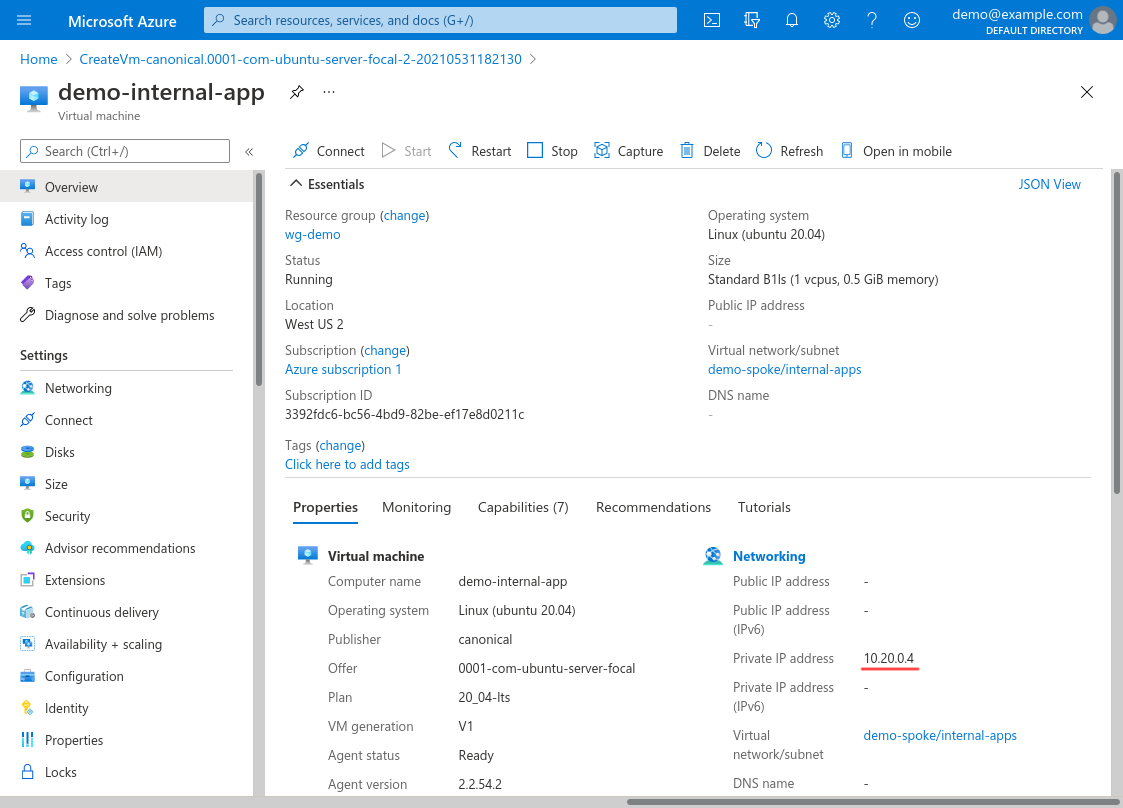
Connect Through WireGuard
With the private IP address of the internal application VM we launched in the previous step (10.20.0.4), open up a terminal on your local workstation, and SSH into the VM (add the -i flag to the ssh command if you need to specify the path to the SSH key pair with which you launched the VM):
justin@jws:~$ ssh azureuser@10.20.0.4
The authenticity of host '10.20.0.4 (10.20.0.4)' can't be established.
ED25519 key fingerprint is SHA256:8NlhzD1R6MjP8k2M4fXJSA2jLEKtwjWbn6ON5nPhGbk.
Are you sure you want to continue connecting (yes/no/[fingerprint])? yes
Warning: Permanently added '10.20.0.4' (ED25519) to the list of known hosts.
Welcome to Ubuntu 20.04.2 LTS (GNU/Linux 5.4.0-1047-azure x86_64)
...
azureuser@demo-internal-app:~$
This SSH session is routed through the WireGuard connection between my local workstation and the WireGuard server we set up in the Configure WireGuard Client section, and from that WireGuard server to the internal application VM we set up in the Launch Internal Application VM section. This routing happens because:
-
In the
wg-bastion-1WireGuard interface I set up for my local workstation in the Configure WireGuard Client section, I set theAllowedIPsvalue for the WireGuard server to10.20.0.0/16(a block which contains the internal application’s IP address,10.20.0.4). -
I started up that interface with
wg-quick(via thesudo systemctl start wg-quick@wg-bastion-1.servicecommand), which automatically sets up routes on my local workstation to match theAllowedIPsvalue for each peer of the interface. -
In the
wg0configuration file I set up for the WireGuard server in the Configure WireGuard Server section, I used severalPreUpcommands (executed bywg-quick) to configure the Linux networking subsystem on the server to allow network traffic to be forwarded, and to apply masquerading (aka NAT) to the WireGuard traffic forwarded to the spoke VNet.
Now that we’re SSH’d into the internal application server, run the following commands on it to start a demo web app (which serves the directory listings of a dummy directory via a Python webserver running on port 80):
$ mkdir -p dummydir && cd dummydir
$ sudo python3 -m http.server 80
With the demo web app booted up, you can now access the internal application from your local workstation. Run this command (using the private IP address of the internal application’s VM):
$ curl 10.20.0.4If you see any HTML output from this, the WireGuard tunnel through the WireGuard bastion server to the internal application works! Just like the SSH session above, this HTTP request will be routed through the WireGuard tunnel between your local workstation and the WireGuard server, and from the WireGuard server through the spoke VNet to the internal application.
Troubleshoot WireGuard Tunnel
If you try to connect to the internal application like above, but the connection hangs or you get an error like Connection refused or No route to host, first run sudo wg on your local workstation:
justin@jws:~$ sudo wg
interface: wg-bastion-1
  public key: /TOE4TKtAqVsePRVR+5AA43HkAK5DSntkOCO7nYq5xU=
  private key: (hidden)
  listening port: 56789

peer: fE/wdxzl0klVp/IR8UcaoGUMjqaWi3jAd7KzHKFS6Ds=
  endpoint: 13.66.244.73:51820
  allowed ips: 10.20.0.0/16
  latest handshake: 57 seconds ago
  transfer: 312.84 KiB received, 294.07 KiB sent
You should see the interface to wg-bastion-1 listed (if not, follow the instructions for Configure WireGuard Client above). You should also see some data both sent and received in the transfer field for the WireGuard bastion server peer.
If you don’t see a transfer field at all listed for the peer, you likely have a routing problem on your local workstation. First make sure that the IP of the internal app server to which you’re trying to connect (10.20.0.4 in this example) is within the listed IP blocks in the allowed ips field. If it isn’t, correct the AllowedIPs setting for the bastion server peer in your wg-bastion-1.conf file to include the IPv4 address space to which the internal app belongs; then restart the interface (via the sudo systemctl restart wg-quick@wg-bastion-1.service command).
If the allowed ips field is good, try using the ip route command to check the route to the internal application from your workstation. You should see something similar to this:
justin@jws:~$ ip route get 10.20.0.4
10.20.0.4 dev wg-bastion-1 src 10.0.0.1 uid 1000
    cache
If the result of the command indicates a device other than wg-bastion-1 will be used, you need to fiddle with the routing tables on your workstation.
Otherwise, if the transfer field for the peer lists some data sent, but none received, run sudo wg on the WireGuard server:
$ sudo wg
interface: wg0
  public key: fE/wdxzl0klVp/IR8UcaoGUMjqaWi3jAd7KzHKFS6Ds=
  private key: (hidden)
  listening port: 51820

peer: /TOE4TKtAqVsePRVR+5AA43HkAK5DSntkOCO7nYq5xU=
  endpoint: 198.51.100.1:45678
  allowed ips: 10.0.0.1/32
  latest handshake: 1 minute, 53 seconds ago
  transfer: 302.04 KiB received, 364.87 KiB sent
You should see the interface to wg0 listed (if not, go through the instructions for Configure WireGuard Server above). You should also see some data both sent and received in the transfer field for your workstation peer.
If you don’t see a transfer field listed at all, you’ve either incorrectly configured the PrivateKey, PublicKey, or Endpoint settings on the client (review the instructions for Configure WireGuard Client above); incorrectly configured the PrivateKey, PublicKey, or ListenPort settings on the server (review the instructions for Configure WireGuard Server above); or there’s some NSG or other VNet setting that’s blocking traffic on UDP port 51820 from being sent from your local workstation to the WireGuard server (see the section below to troubleshoot).
If the transfer field shows data both sent and received, then the WireGuard tunnel itself is working correctly — but either the WireGuard server is not routing traffic internally to other VNets, or some Azure networking setting is blocking traffic between the WireGuard server and your internal application servers. Follow the Basic Troubleshooting steps from the Point to Site Configuration article to check if it’s the former (“Host β” in that article is the equivalent of the WireGuard bastion server in this article). Otherwise, see the section below.
Troubleshoot Azure Networking
Here are three areas to check in the Azure portal if it looks like your WireGuard traffic is being blocked by some Azure networking gear:
IP Forwarding
The network interface used by your WireGuard server bastion must have its IP Forwarding setting Enabled. This setting is Disabled by default to prevent the VM from forwarding the packets it receives from one host onto another host.
To view this setting for a network interface, navigate to its main page, and click the IP configurations link it its leftnav:
Network Security Groups
The Inbound security rules for the NSG (Network Security Group) used by your WireGuard server bastion (demo-hub-wg-bastion in this example) must at least include access to UDP port 51820 (or whatever value you’ve configured the ListenPort setting to be on the WireGuard server) from your local workstation’s public IP address. For this example, I’ve configured the NSG to allow both UDP port 51820 and TCP port 22 from everywhere (via the wg-from-anywhere and ssh-from-anywhere rules):
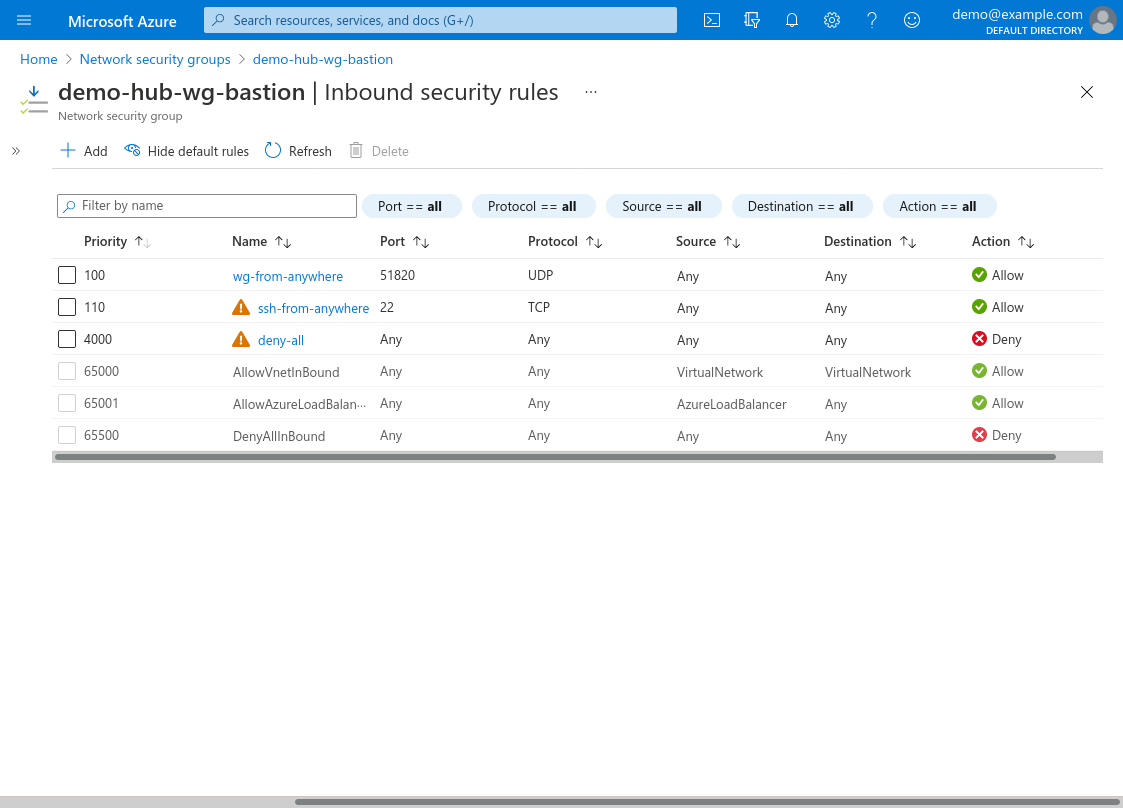
(The ssh-from-anywhere rule allows me to SSH directly into the WireGuard server; if you don’t need this, you can omit it.)
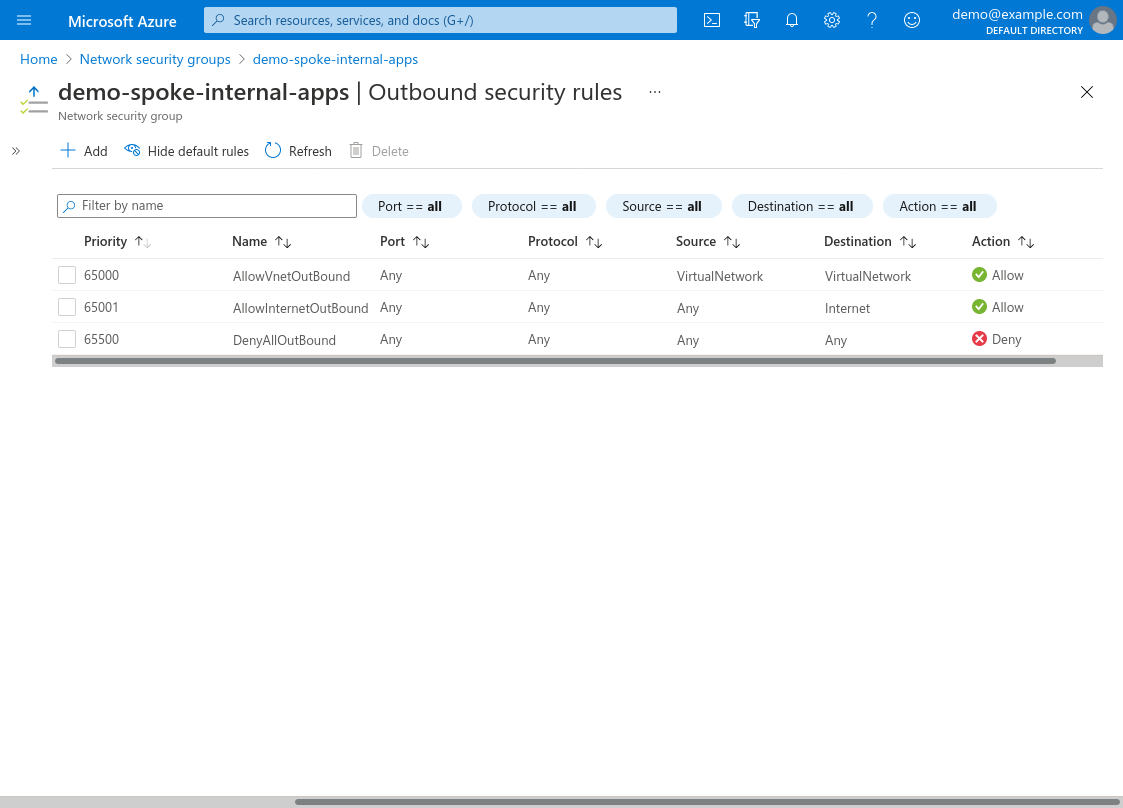
The Outbound security rules for the bastion NSG must at least include access to your internal application server on whatever port(s) the application uses (in this example, the application uses TCP port 80; and I also used TCP port 22 to SSH into the application server from the WireGuard server). Usually there’s no reason to customize Azure’s default outbound security rules, which allow outbound traffic to all other VNets (via the AllowVNetOutBound rule):

The Inbound security rules for the NSG used by your internal application (demo-spoke-internal-apps in this example) must at least include access to the port used by the application (TCP 80 in this example) from the bastion subnet (10.10.0.0/24). For this example, I’ve configured the NSG to allow TCP ports 80 and 443 from the WireGuard bastion (via the http-from-wg-bastion rule), as well as TCP port 22 (via the ssh-from-wg-bastion rule):
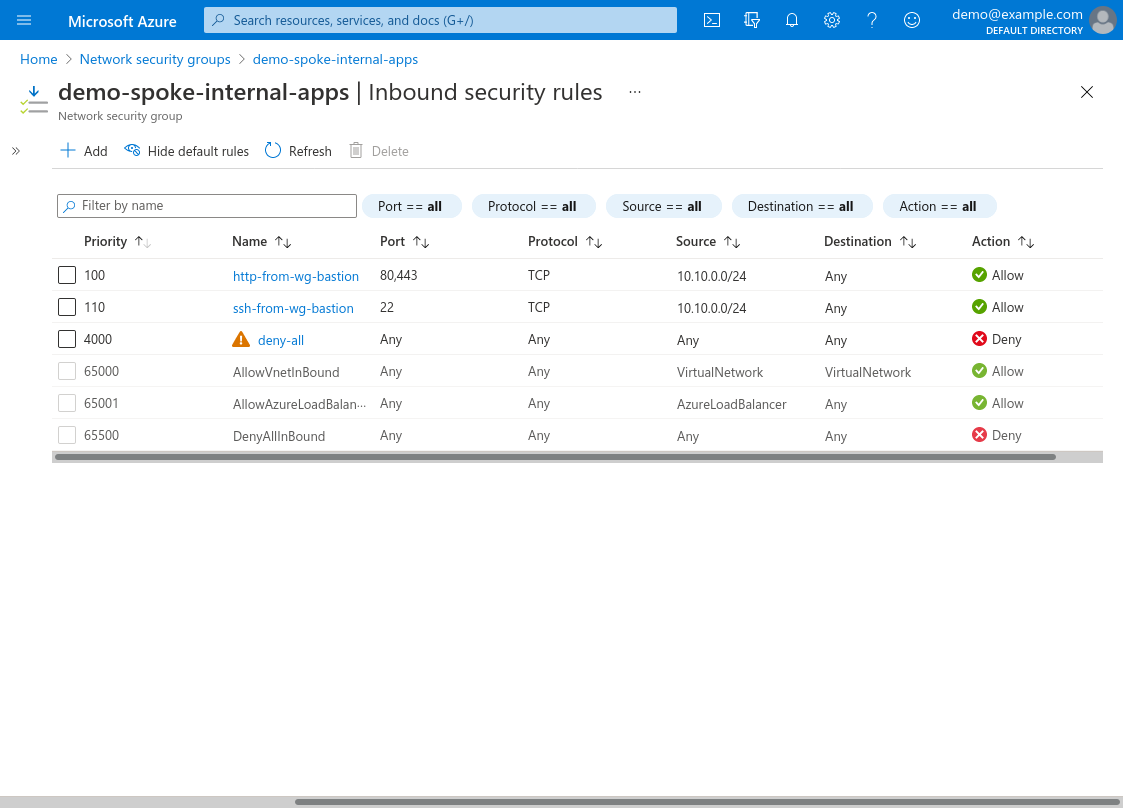
(The TCP 22 rule allows me to SSH into the application server through the WireGuard server; if you don’t need this, you can omit it.)
The Outbound security rules for the application NSG don’t matter (from a WireGuard perspective). For this example, I’ve kept the default rules, which allow all traffic to all destinations, VNet and Internet — but you can remove or override them without disrupting your access to the application through WireGuard (although note, depending on your application, if you remove these default rules you might need to replace them with other rules that allow your application to access the other network services it may need, like databases, fileshares, external APIs, etc):
VNet Peerings
The hub-to-spoke peering (configured on the hub VNet) needs its Traffic to remote virtual network set to Allow. You should also set its Traffic forwarded from remote virtual network setting to Block:

The spoke-to-hub peering (configured on the spoke VNet) needs its Traffic to remote virtual network set to Allow — and it also needs its Traffic forwarded from remote virtual network setting to Allow:
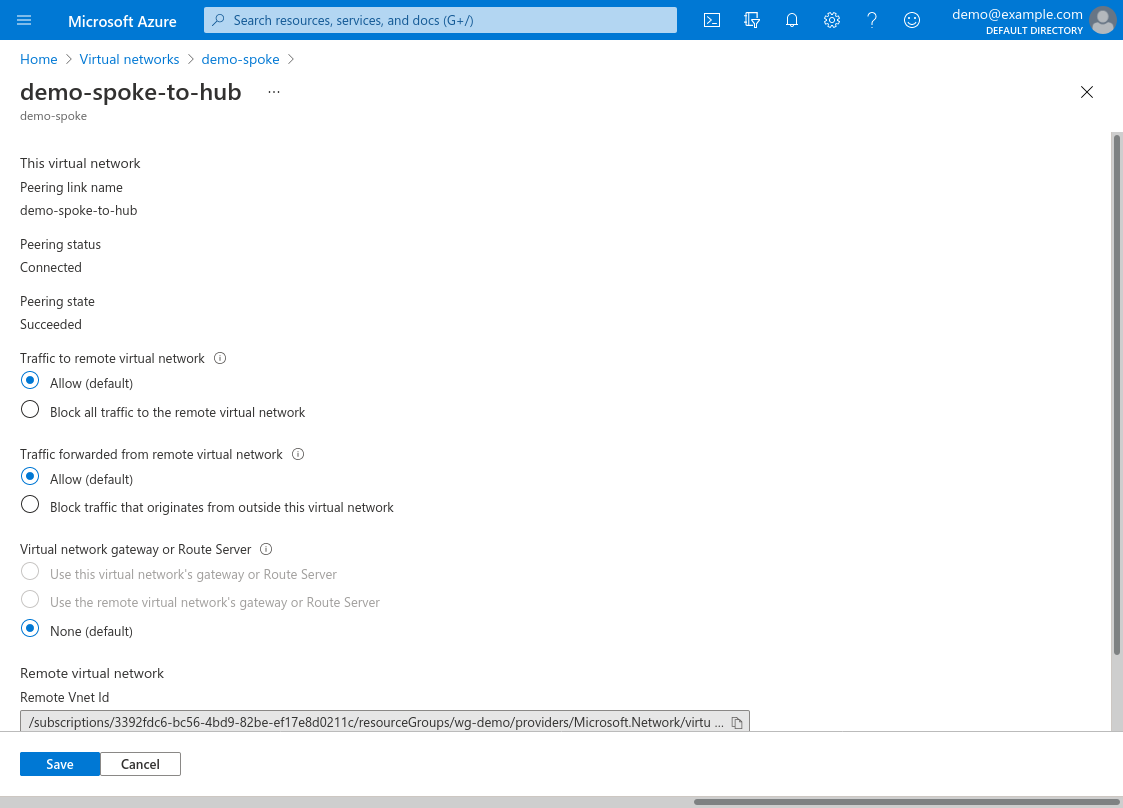
This is required to allow the WireGuard server in the hub VNet to forward traffic into the spoke VNet.