WireGuard Key Rotation With Pro Custodibus
This article will explain how WireGuard keys are used, why you should rotate them, and how you can rotate them manually. Then we’ll show you how to rotate WireGuard keys the easy way with the Pro Custodibus GUI (Graphical User Interface).
What Are WireGuard Keys
WireGuard uses two types of keys: key pairs (aka public key pairs or asymmetric key pairs), and preshared keys (symmetric secret keys).
Key Pairs
Each peer in a WireGuard VPN (Virtual Private Network) has a unique X25519 (aka Curve25519) key pair. This key pair is used to identify the peer, as well as to establish an encrypted tunnel with each other peer to which it can connect.
Each key pair is composed of two parts: a public key, and a private key. You distribute the public key to others so that they can connect to your peer; but you keep the private key secret. Keeping the private key secret is what prevents any other party from decrypting the traffic sent through a WireGuard tunnel, or from impersonating a peer.
The diagram below shows a simple WireGuard network with three peers:

The WireGuard interface using Peer A as its identity (in purple) is configured with the private key of Peer A; and its connection to Peer C is configured with the public key of Peer C. Correspondingly, the WireGuard interface using Peer C as its identity (in blue) is configured with the private key of Peer C; and its connection to Peer A is configured with the public key of Peer A.
Peer C is also connected to Peer B, and that connection is configured on the Peer C side with the public key of Peer B. On the Peer B side, the interface using Peer B as its identity is configured with the private key of Peer B; and its connection to Peer C is configured with the public key of Peer C.
Preshared Keys
You can optionally add a preshared key to the connection between any two peers. This preshared key is a secret, randomly-generated 256-bit number that can be used as part of the Noise protocol when establishing the encrypted connection between the two peers. Before the connection is established, both peers must be configured with the same preshared key (or both configured with no preshared key). The preshared key must be kept secret from all other parties in order for it to add any useful security to a connection.
The diagram below shows the addition of preshared keys to our simple WireGuard network:

The WireGuard interface using Peer A as its identity has been configured with the preshared key YYY123… for its connection with Peer C; and correspondingly, the WireGuard interface using Peer C as its identity has been configured with the same preshared key for its connection with Peer A. Similarly, the WireGuard interface using Peer B as its identity has been configured with the preshared key ZZZ123… for its connection with Peer C; and correspondingly, the WireGuard interface using Peer C as its identity has been configured with the same preshared key with its connection to Peer B.
Importantly, you don’t need to use preshared keys with WireGuard — there are no known practical attacks against the WireGuard cryptosystem, even without preshared keys. However, because WireGuard key pairs use elliptic-curve cryptography (ECC), in the future it might be possible for quantum computers to “crack” those key pairs (where the quantum computer would be able to calculate the private key from the public key). This would enable an organization with a quantum computer to decrypt any encrypted WireGuard traffic that it had previously captured and stored.
Using preshared keys means that even if an attacker calculated (or was able to steal) the private keys used by a WireGuard connection, she still wouldn’t be able to decrypt the connection’s encrypted WireGuard traffic. To do so, she would also have to steal the preshared key (a randomly-generated preshared key would not be “crackable” by quantum computers, nor by any other means).
An additional benefit of using preshared keys is that it allows you to rotate WireGuard key material without changing the identity of the peers in your network. You may want to use this feature of preshared keys in order to avoid rotating your WireGuard key pairs as frequently as you otherwise would.
Why Rotate WireGuard Keys
Known Breaches
There are two reasons why you would want to rotate your WireGuard keys. One reason is if you know that someone unauthorized has had access to the private key of a peer, or the preshared key used by one of its connections. This can be something as dramatic as being attacked by a “sophisticated nation-state actor”, and having evidence that the attacker had access to one ore more of these keys. But it can also be something as pedestrian as someone accidentally copying their WireGuard keys into a shared folder. In both cases, you should rotate the keys that were exposed.
Another case that falls into this category is when an employee leaves your company — or moves to a different team or role within your company. Any WireGuard keys to which the employee previously had access should be rotated (or simply removed, if the WireGuard connections are no longer needed).
Unknown Breaches
The other reason why you would want to rotate your WireGuard keys is if you don’t know whether or not someone unauthorized has had access to them. The best practice for managing any keys (or other secrets) is to rotate them on a regular basis, to guard against the possibility that someone unauthorized has had access to your keys without you knowing it.
For example, if you actually were attacked by a nation-state actor, that attacker might gain access to any number of your machines without leaving traces that you can detect — and you might not even learn of that attack until months or even years later. Or if you do have an employee who accidentally copies their WireGuard keys into a shared folder, you might not ever learn about it — but someone else might, and decide to copy those keys for their own unauthorized use later.
So it’s a good idea to rotate your WireGuard key pairs and preshared keys on a regular basis. If you don’t already have a defined key rotation policy that includes your WireGuard keys, a practical schedule that you might want to start with would to rotate your key pairs yearly, and your preshared keys monthly.
That way if, for example, an attacker managed to surreptitiously steal the WireGuard private key and all the preshared keys off of one of your hosts — and you rotate all your preshared keys on a monthly basis, and use preshared keys for all your connections — that attacker would only be able to decrypt the host’s WireGuard traffic, or impersonate the host on your WireGuard network, for at most one month.
How to Rotate WireGuard Keys
Key Pairs
To rotate the key pair used as the peer identity of a WireGuard interface, you start by generating a new X25519 key pair. You can do this on Linux using the wg program; first generate a new random private key:
$ wg genkey
gCCA6cbdTk/i/ELcHmzIL9FGtSePRoNlFfRU78pssng=
And then calculate the corresponding public key:
$ echo gCCA6cbdTk/i/ELcHmzIL9FGtSePRoNlFfRU78pssng= | wg pubkey
c/SrJGvfFHZydETnK1L/qOLJ/hIgc3kvIkjXTEo0axY=
Shut down the interface, and update its configuration to use the new private key:
[Interface]
PrivateKey = gCCA6cbdTk/i/ELcHmzIL9FGtSePRoNlFfRU78pssng=
...
Then bring the interface back up again. If this peer is connected to two other peers, like on our example network, you’re now 1/3 of the way through the process:

The other peers that previously were connected to the old peer identity will not be able to connect to this new peer identity yet — you have to update the configuration of each other remote interface connected to the local interface you just updated.
In our example above, that means updating the configuration of the interface using Peer A as its peer identity to replace the old public key of Peer C with the new public key. Bring that interface down, and make the change:
...
[Peer]
PublicKey = c/SrJGvfFHZydETnK1L/qOLJ/hIgc3kvIkjXTEo0axY=
...
Then start that interface back up. The connection between Peer A and Peer C should be working again; so now you’re 2/3 of the way through the process:

Do the same thing on Peer B. Now the key-pair rotation process is complete:

|
Tip
|
On Linux, if you want to avoid bringing down a WireGuard interface to make a minor change to it, you can use the |
Preshared Keys
The process of rotating the preshared key used by a connection between two peers is a little simpler than rotating key pairs, since you only have to make the change in two places (instead of all the places the key pair is used).
First, generate a new random 256-bit secret. You can do this on Linux with the wg genpsk command:
$ wg genpsk
xqZvBdtZtVNJrgm5kHx1TRoNOP52WBjr8Da5EhRJVO4=
Shut down the interface on one side of the connection, and update its configuration with the other side of the connection to use the new preshared key:
[Peer]
PublicKey = AAA123...
PresharedKey = xqZvBdtZtVNJrgm5kHx1TRoNOP52WBjr8Da5EhRJVO4=
...
Then bring the interface up again. You’re now 1/2 way through the process:

The connection between the two peers is now broken, because the other side of the connection is still configured with the old preshared key. So shut down the interface on the other side of the connection, and update its configuration with the other peer to use the new preshared key:
[Peer]
PublicKey = CCC123...
PresharedKey = xqZvBdtZtVNJrgm5kHx1TRoNOP52WBjr8Da5EhRJVO4=
...
Then start that interface back up. The process is now complete, and the connection between Peer A and Peer C should be working again:

Notice that unlike the key-pair rotation process above, this only affects the connection between Peer C and Peer A — the connection between Peer C and Peer B was unaffected (other than when we shut down the WireGuard interface on Peer C to update its configuration). That’s why, if you have a choice between rotating WireGuard key pairs or preshared keys, it’s often advisable to rotate the preshared keys instead of the key pairs.
|
Tip
|
On Linux, if you want to avoid bringing down a WireGuard interface to make a minor change to it, you can use the |
Rotating Key Pairs With Pro Custodibus
Pro Custodibus makes rotating key pairs easy (and Pro Custodibus’s Key Pair Rotation Documentation covers it succinctly). Each peer displayed in Pro Custodibus represents a unique key pair. As long as you have a Pro Custodibus agent running on each host that uses a peer, rotating the key pair associated with the peer can be done in just an single click.
If you have some hosts that use the peer without the Pro Custodibus agent running on them, that’s okay, too — you’ll just have to update those hosts with the rotated key manually.
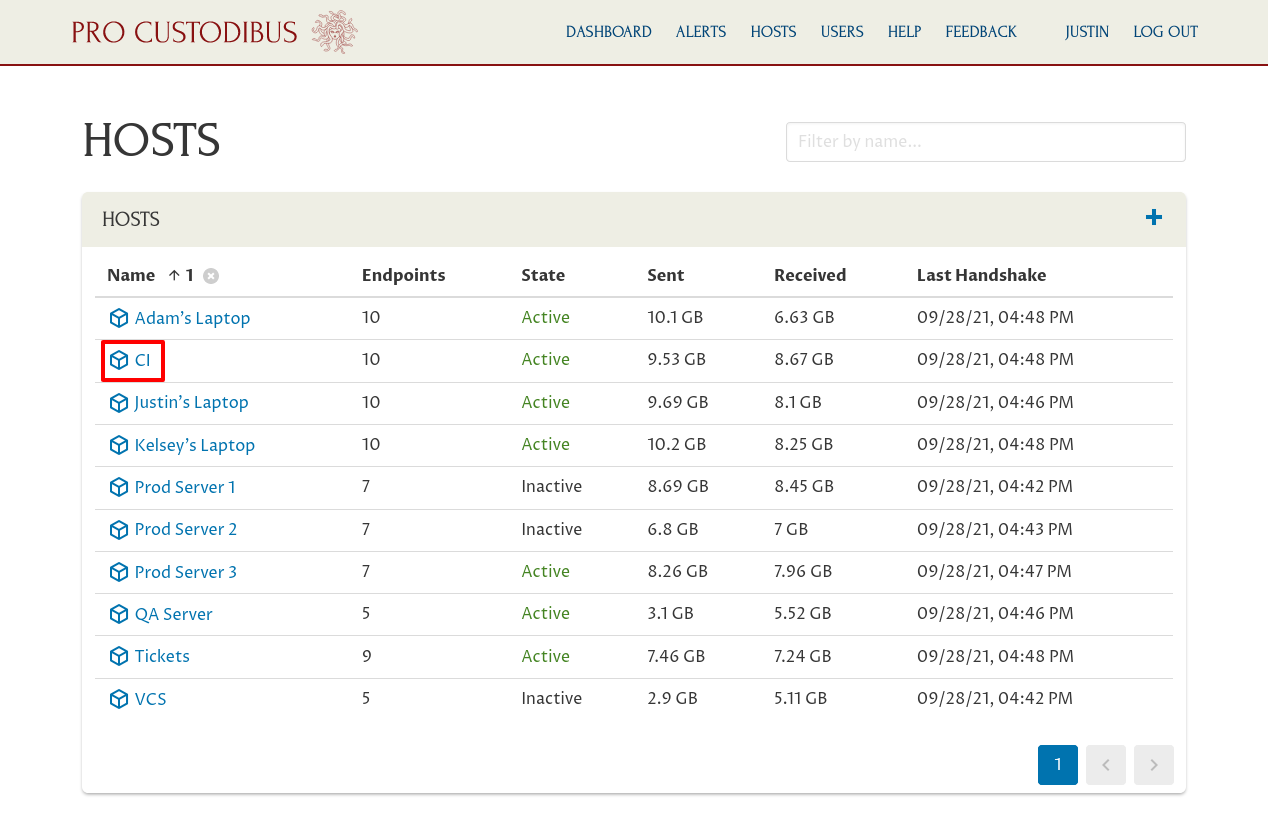
To start, navigate to the main page for the peer whose key pair you want to rotate. In this example, we’re going to rotate the peer used by the wg-dev interface on the CI box used by a development team. From the main Hosts page, we’d navigate to the main page for the CI host:
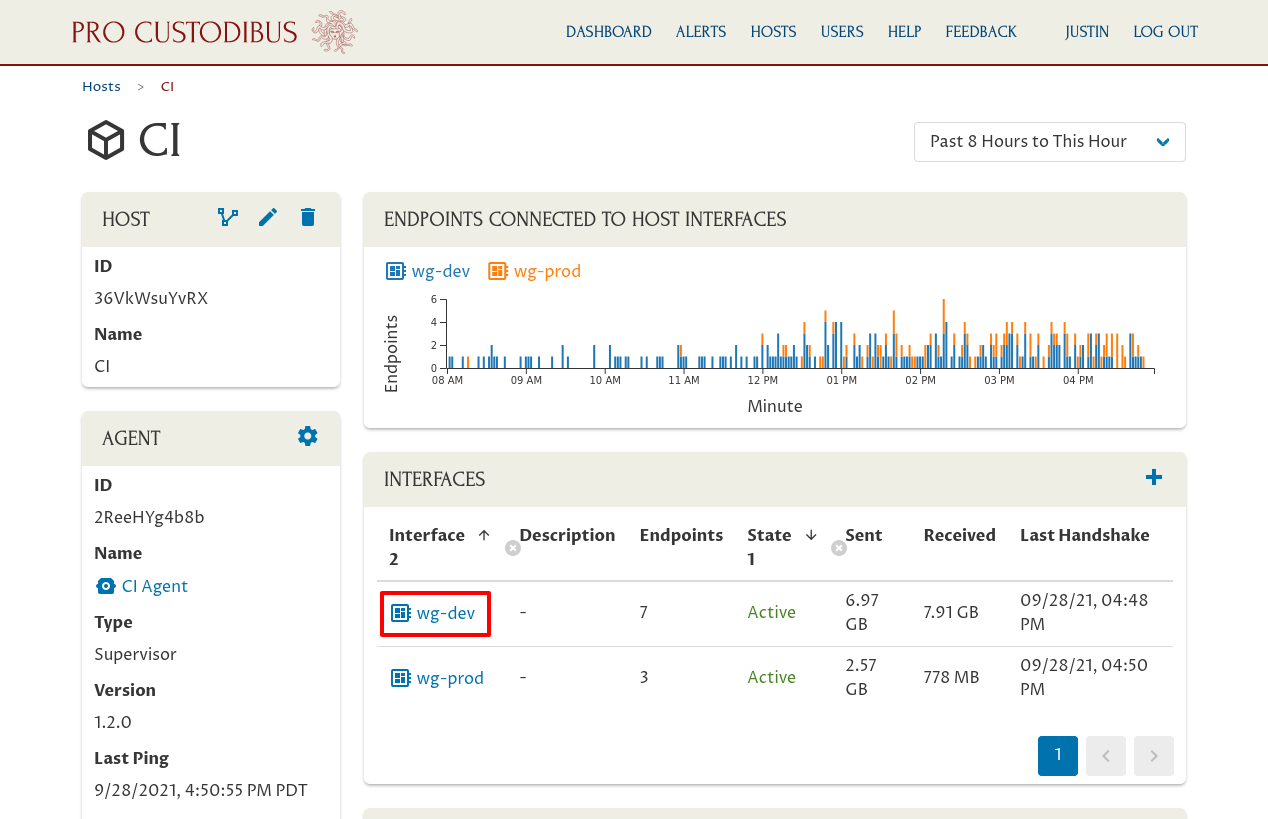
Then navigate to the main page for the wg-dev interface:
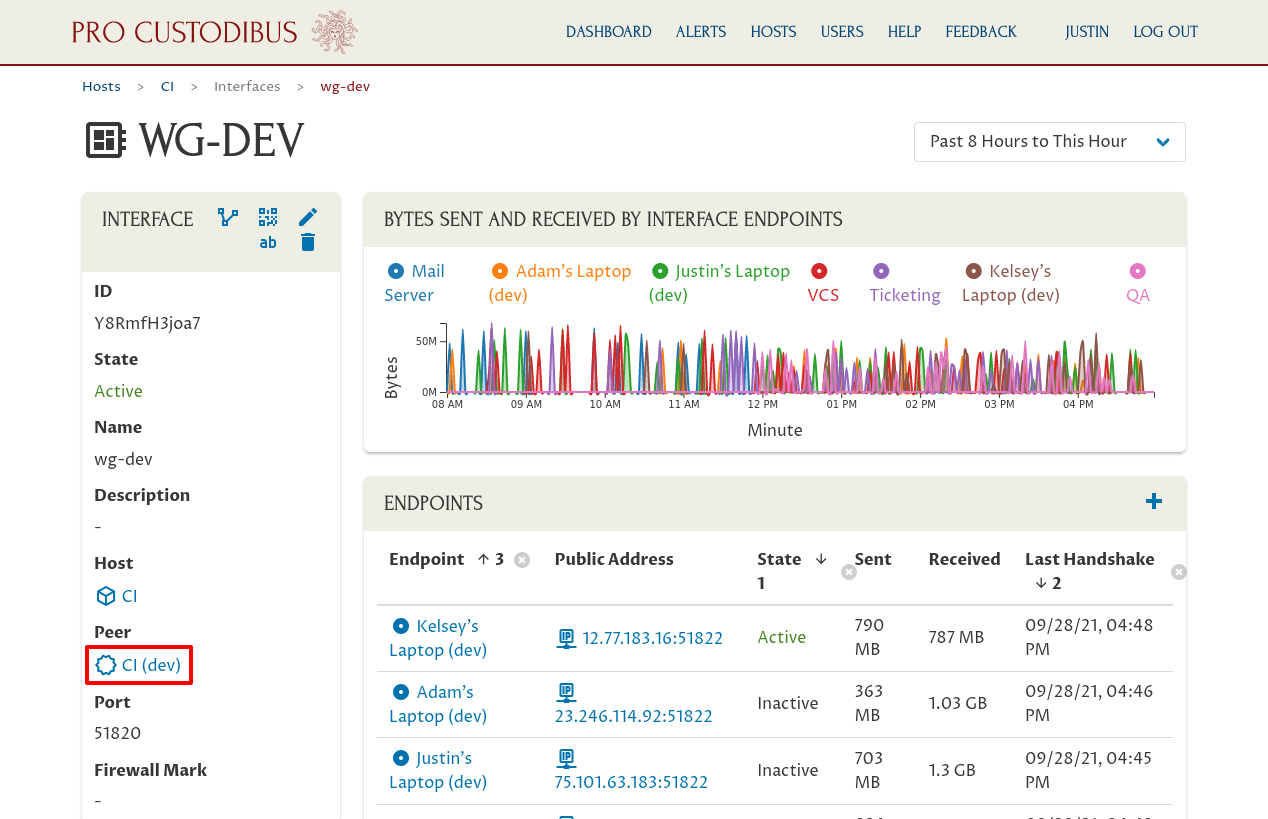
And from there navigate to the main page for the peer whose key pair we’re going to rotate:
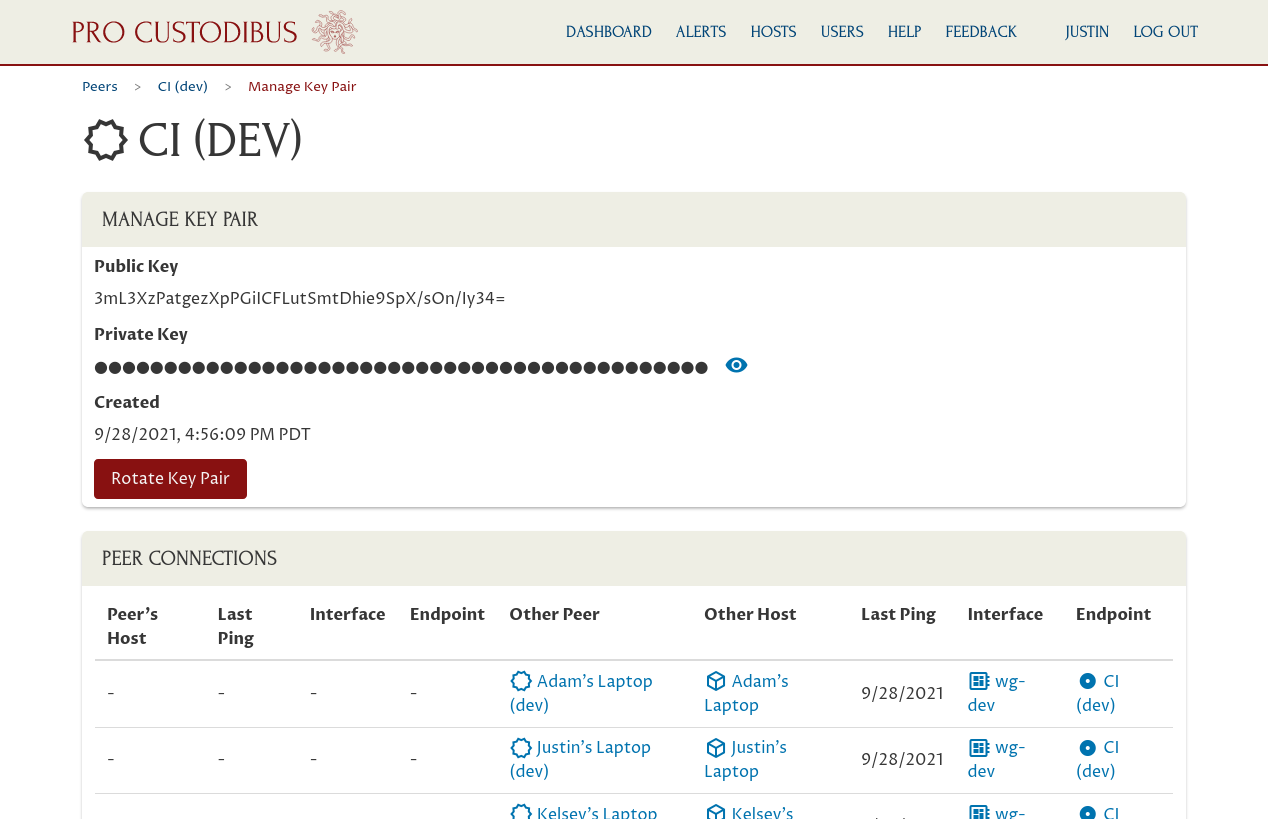
On the main peer page, click the Manage Key Pair icon on the right side of the Peer panel:
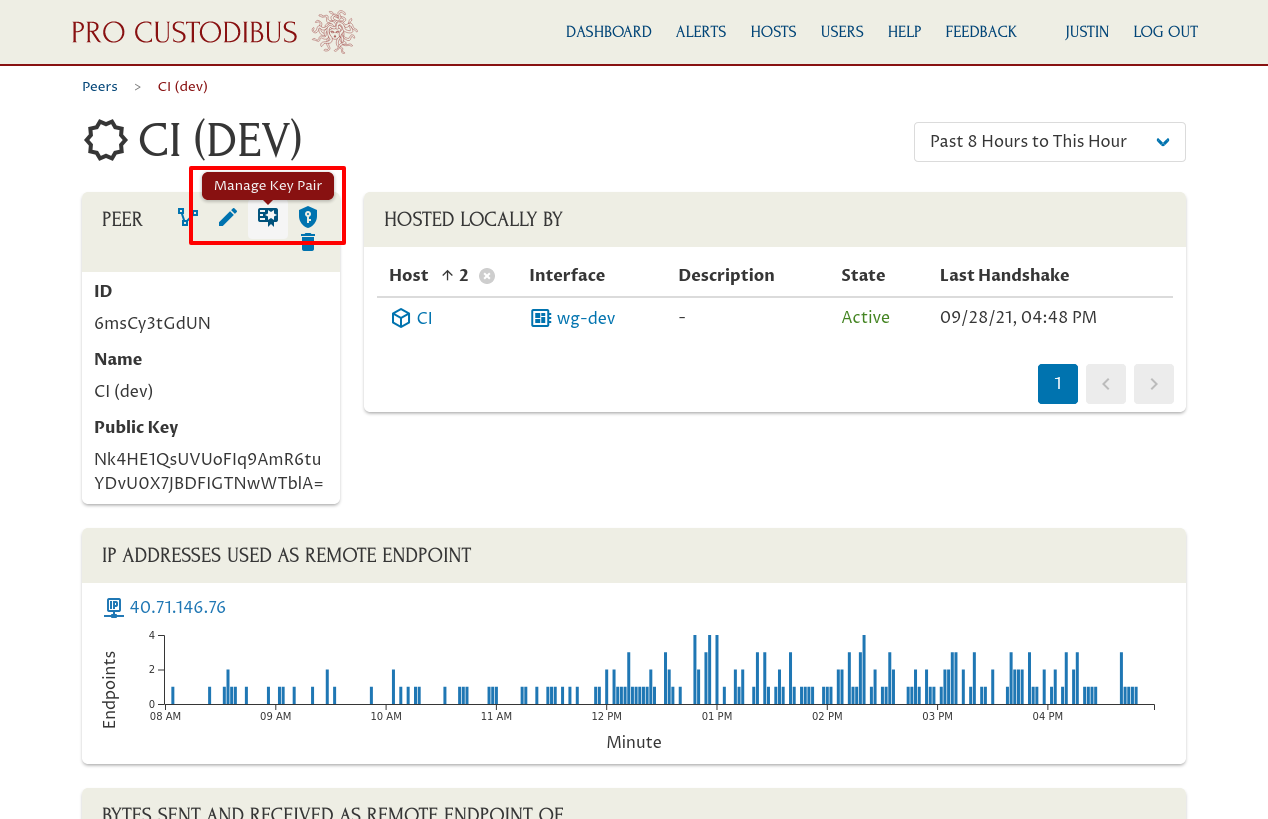
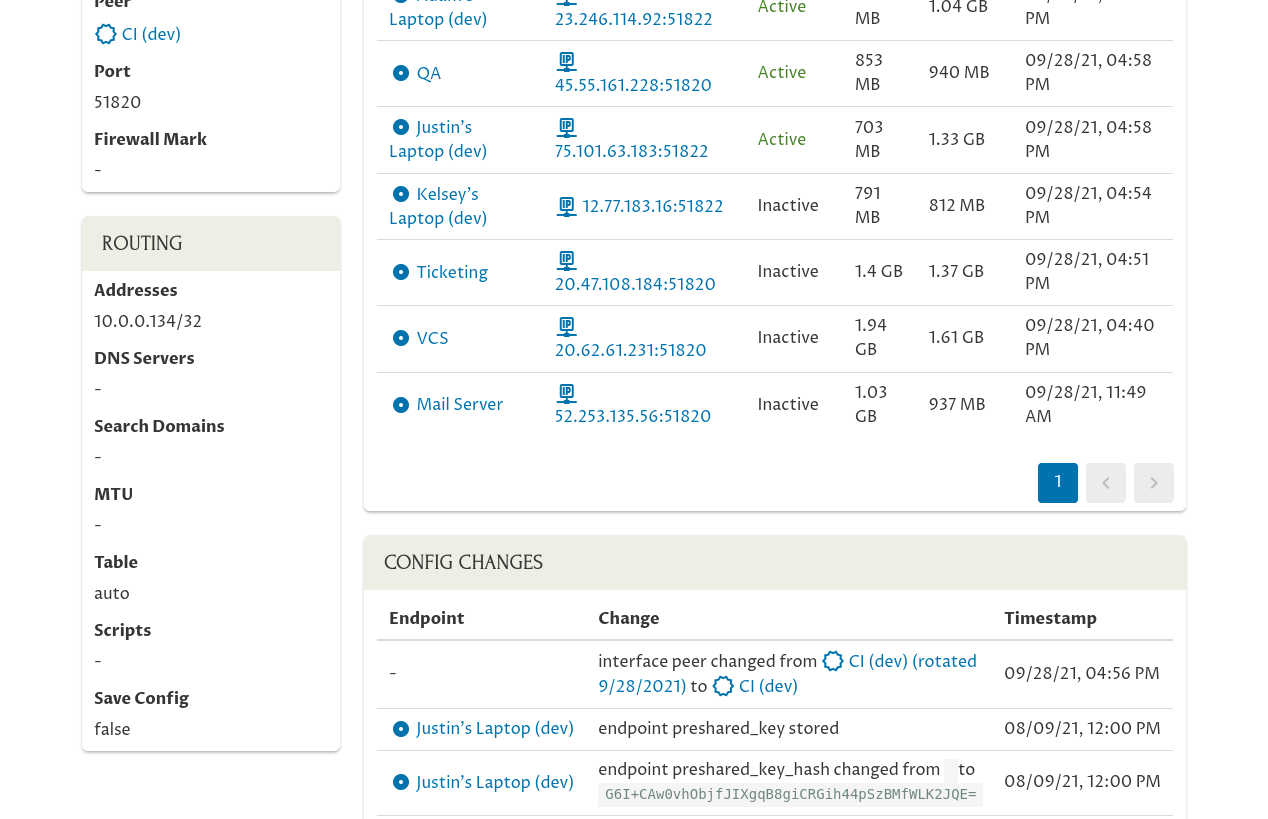
On this page you can see the details of the current “CI (Dev)” key pair, as well of a list of connections that use it:
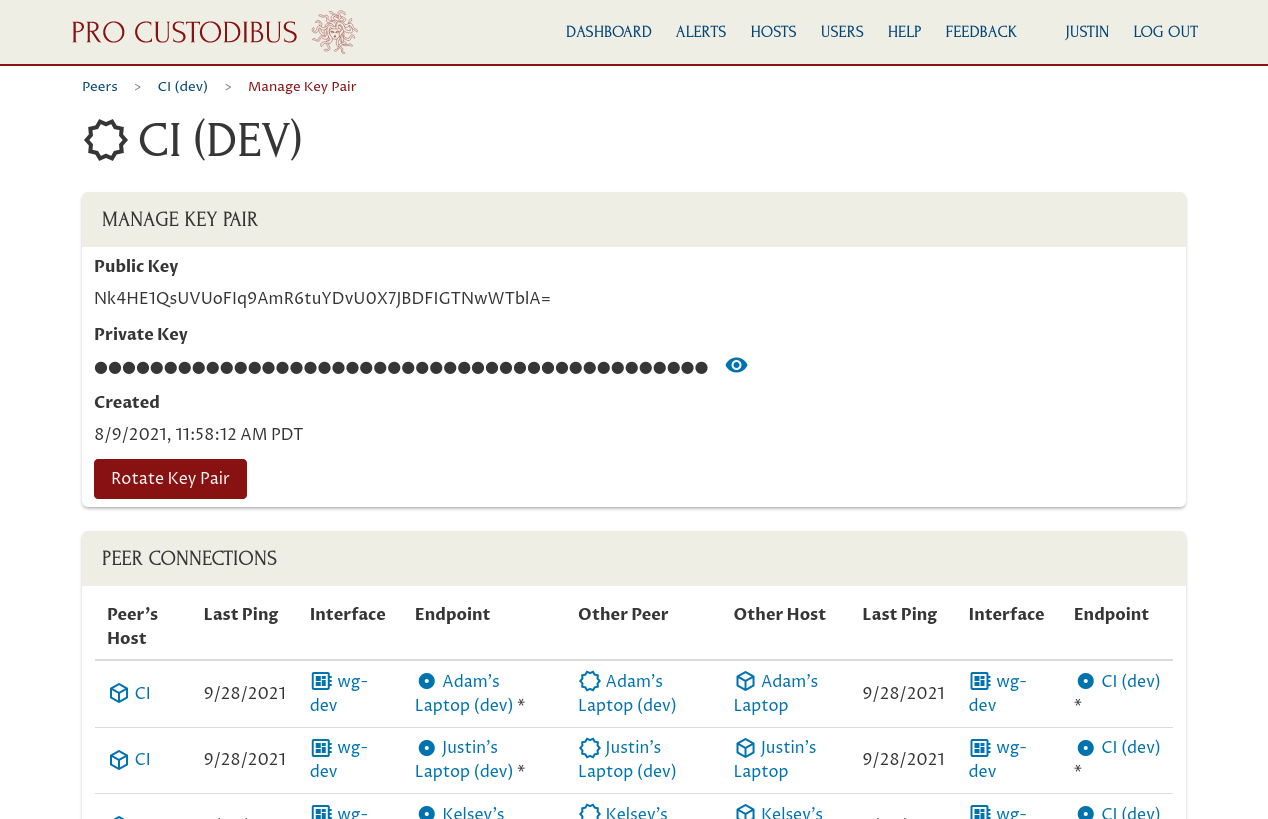
Scroll down to see the full list of these connections:
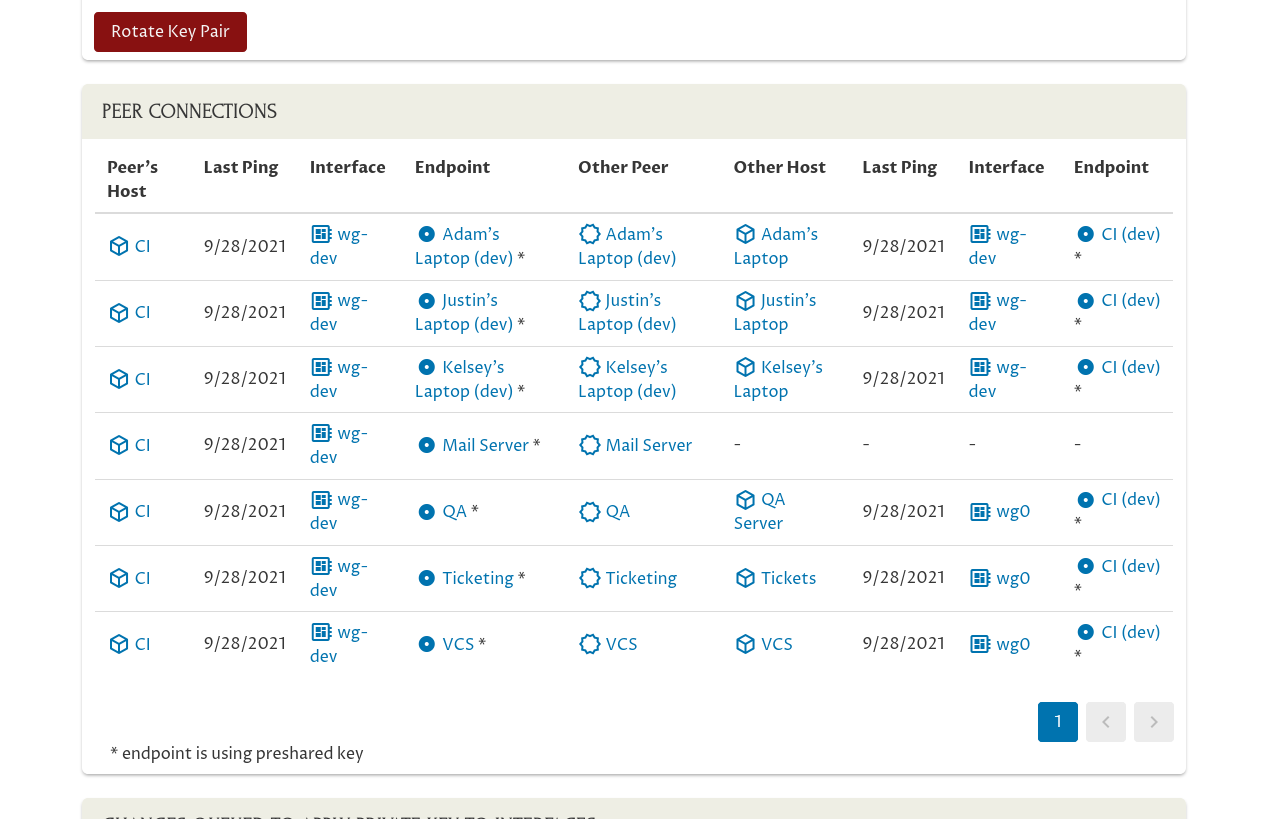
The left side of the Peer Connections table shows the side of the connection that’s using the “CI (Dev)” peer as its peer identity — in this case, the “CI (Dev)” peer is only used as the peer identity for the “wg-dev” interface on the “CI” host. The right side of the table shows the side of the connection that’s connected to the “CI (Dev)” peer from other peer identities.
So the left side of the table is the “local” side of the connection from the perspective of the “CI (Dev)” peer; and the right side is the “remote” side of the connection. The first row of the table, for example, shows the connection from the “CI (Dev)” peer on the left to the “Adam’s Laptop (dev)” peer on the right. The endpoint on the left side of that row represents the configuration on the “CI” host’s “wg-dev” interface to connect to Adam’s laptop; and the endpoint on the right side of that row represents the configuration on the “Adam’s Laptop” host’s “wg-dev” interface to connect to the CI box.
This table of connections is showing us that the Pro Custodibus agent is up and operational on all of the hosts using the “CI (Dev)” peer, except for the host using the “Mail Server” peer as its peer identity (as we have a recent ping listed from the agent for all hosts except the host using the “Mail Server” peer as its peer identity — which isn’t listed at all). So Pro Custodibus will be able to rotate the “CI (Dev)” key pair and automatically update all hosts with the new key pair — except for the unmonitored host using the “Mail Server” peer as its peer identity.
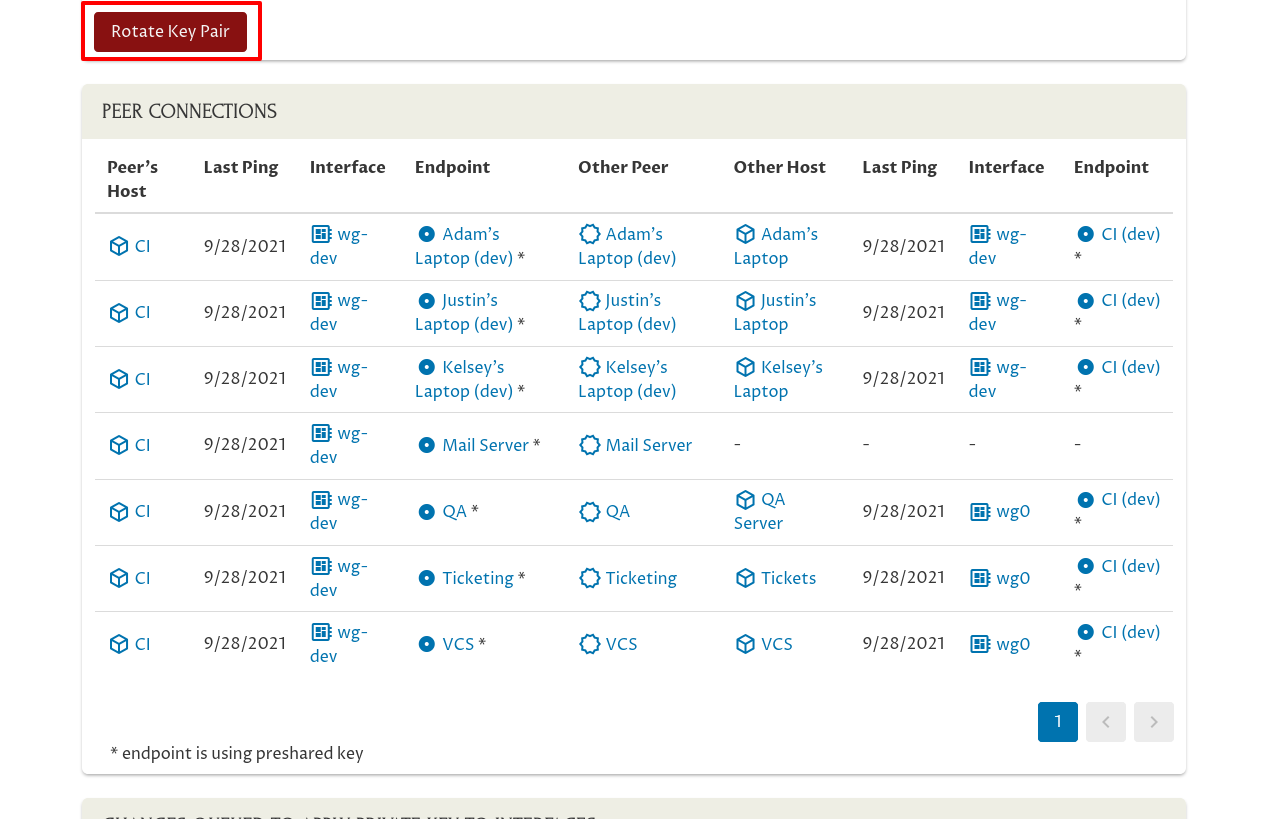
To rotate this key pair, click the Rotate Key Pair button:
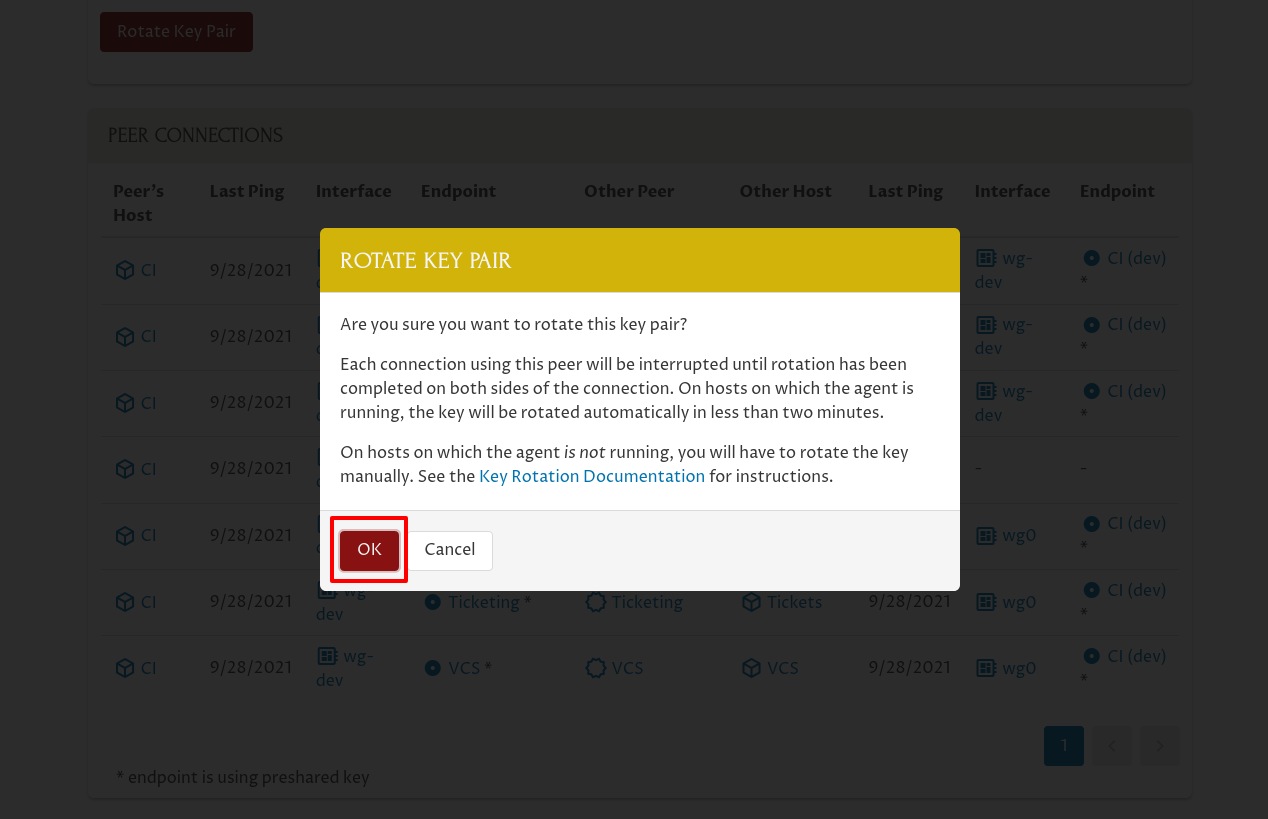
This will bring up a Rotate Key Pair confirmation dialog. Click the OK button to proceed:
Pro Custodibus will automatically generate a new key pair for you; and since in Pro Custodibus, peers and key pairs are logically equivalent, Pro Custodibus will represent this new key pair as a new peer (and will rename the old peer it replaces with the date it was rotated to distinguish it from the new peer). Here’s the new peer:
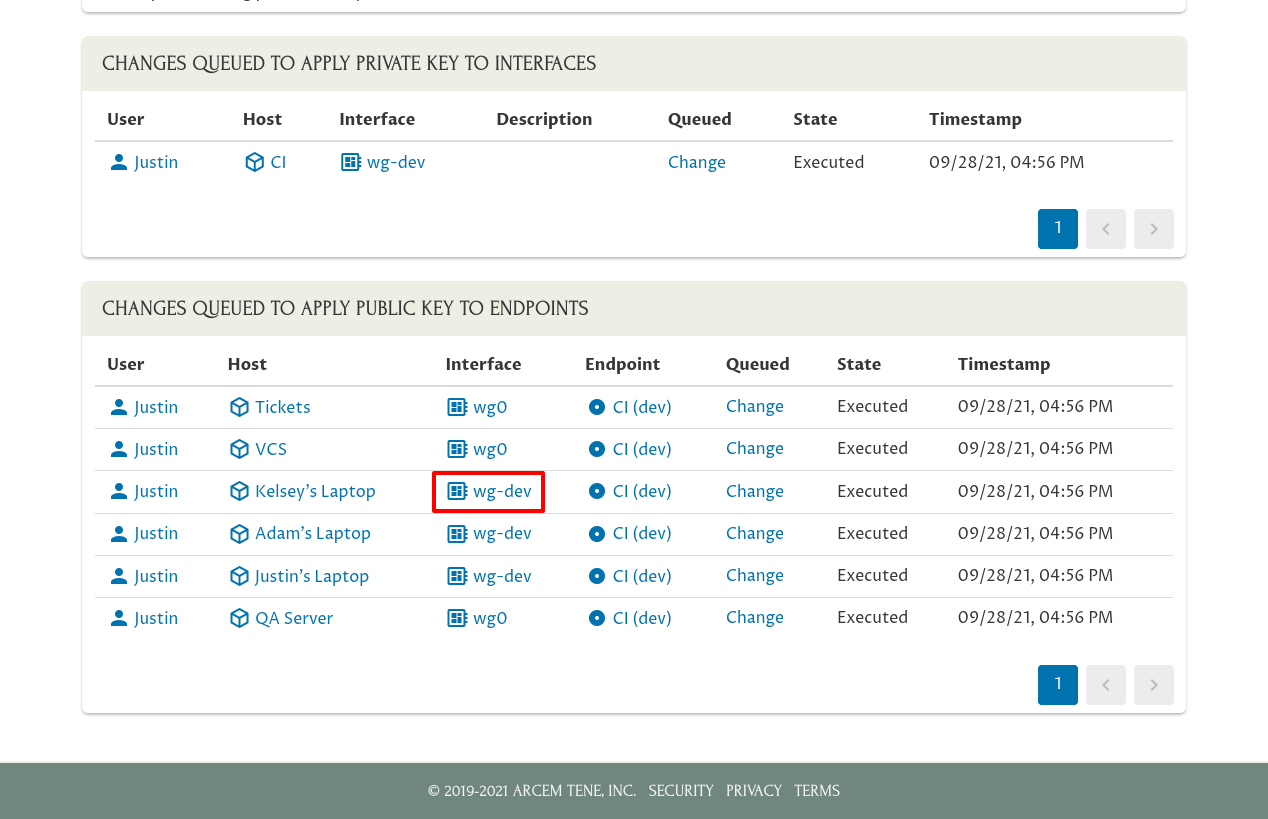
If you scroll down on this page, you’ll also see the changes that Pro Custodibus has queued to be executed by the agents running on various hosts:
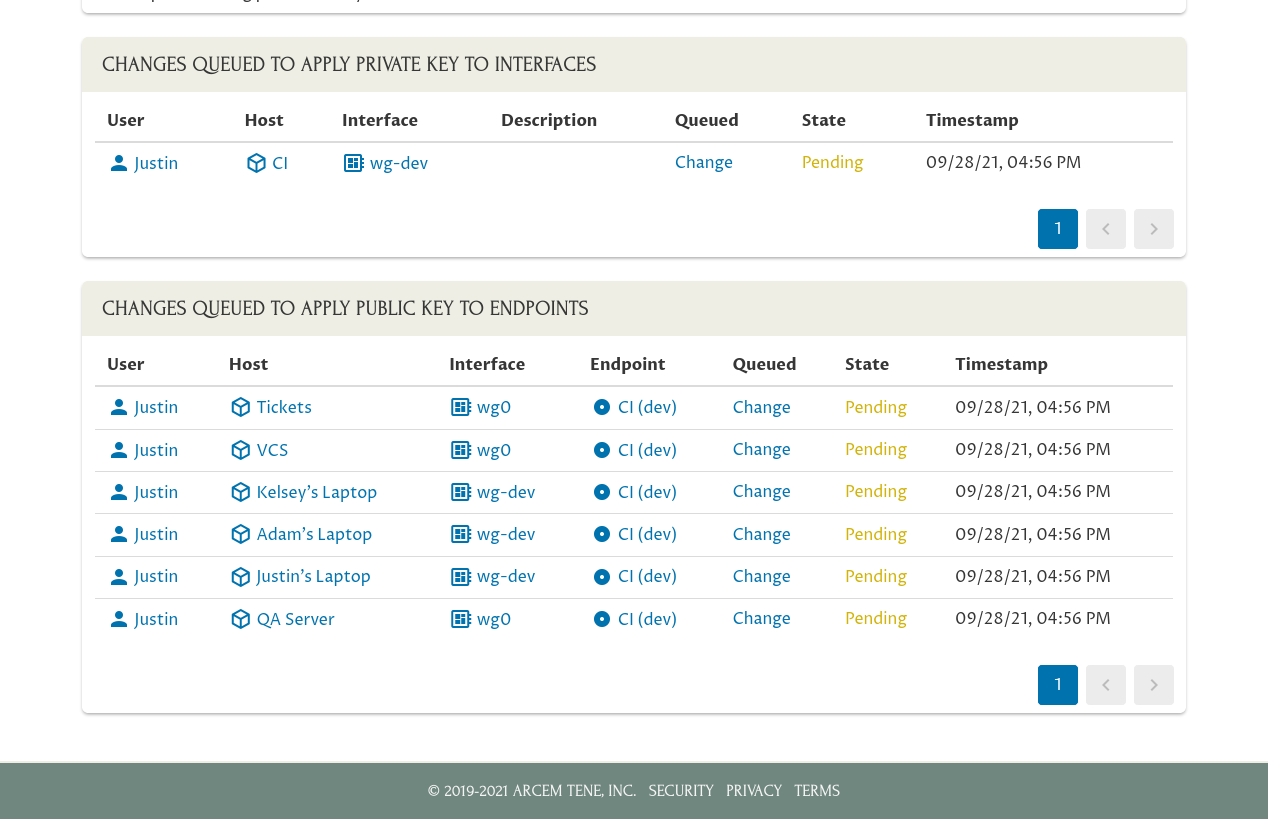
The Changes Queued to Apply Private Key to Interfaces panel shows that to complete the rotation, the “CI” host needs to update its “wg-dev” interface with the private key of the new key pair. The Changes Queued to Apply Public Key to Endpoints panel shows that the other hosts which connect to the CI box over WireGuard need to update their WireGuard interfaces with the public key of the new key pair (like the “Tickets” host needs to update its “wg0” interface, the “VCS” host needs to update its “wg0” interface, etc).
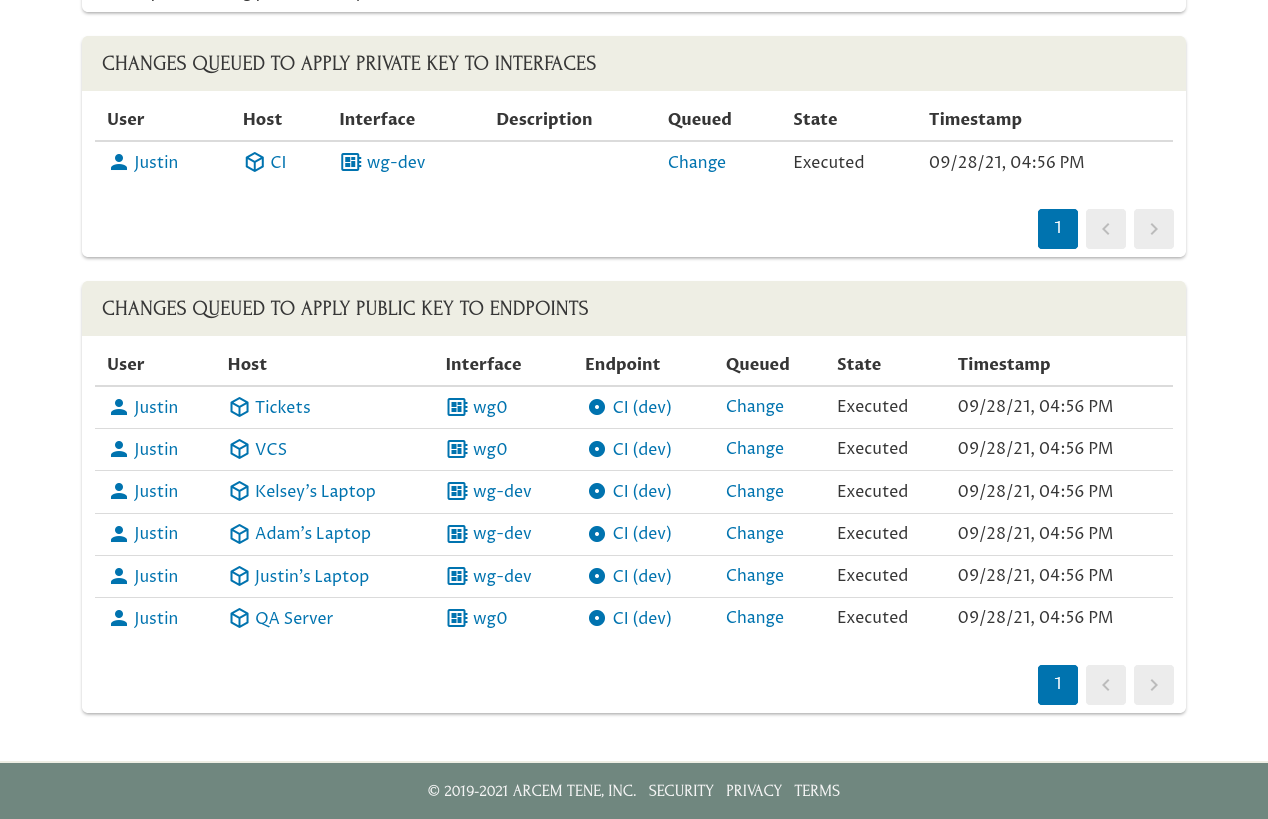
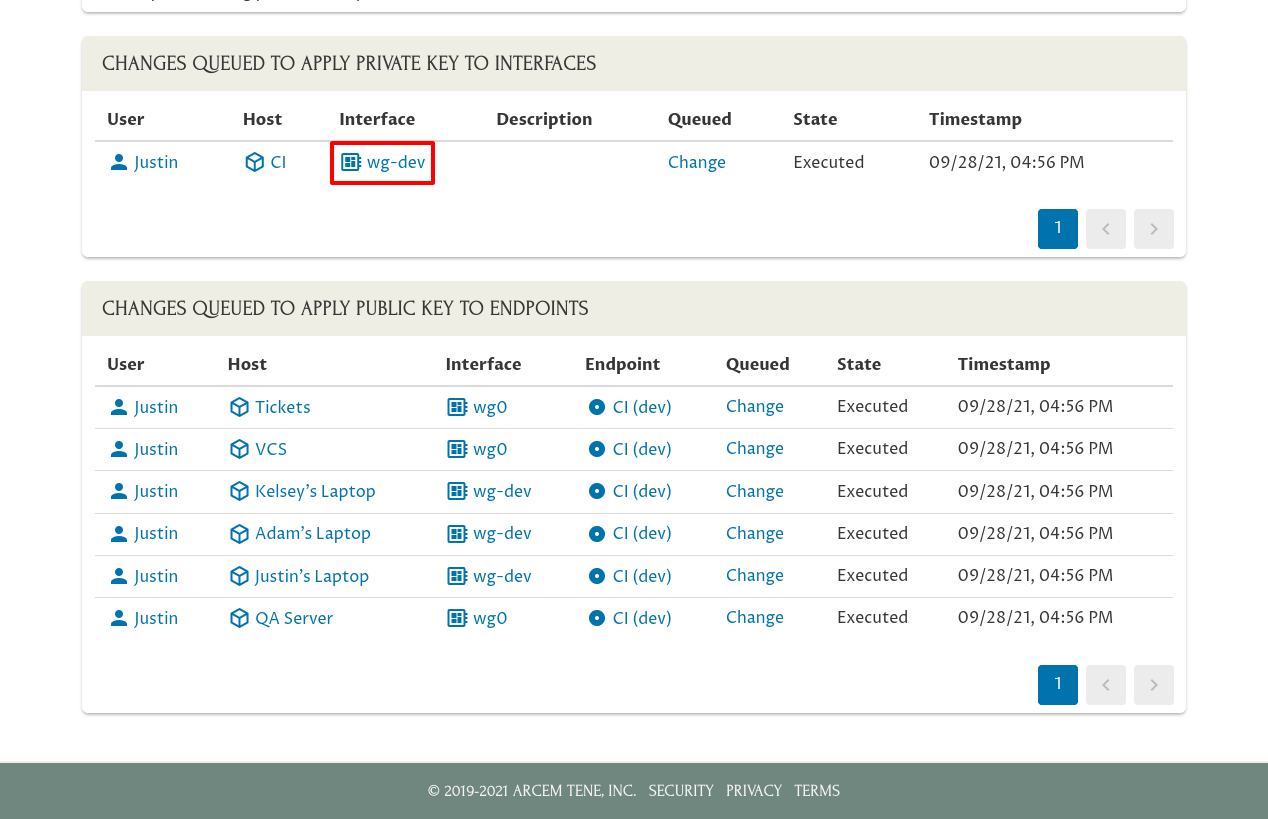
Within a minute or two, the Pro Custodibus agent running on each host will download the information about the change it needs to make, and execute it. Once each change has been executed, the key-pair rotation will be complete (except for the mail server, which we’ll cover a bit later):
If you navigate to the main page for the “wg-dev” interface on the CI box (the interface using the rotated peer as its peer identity)…:
…you’ll see in the CI wg-dev interface’s Config Changes panel that its peer identity has been changed from the “CI (dev) (rotated 9/28/2021)” peer (the old peer using the old key pair) to the “CI (dev)” peer (the new peer for the new key pair):
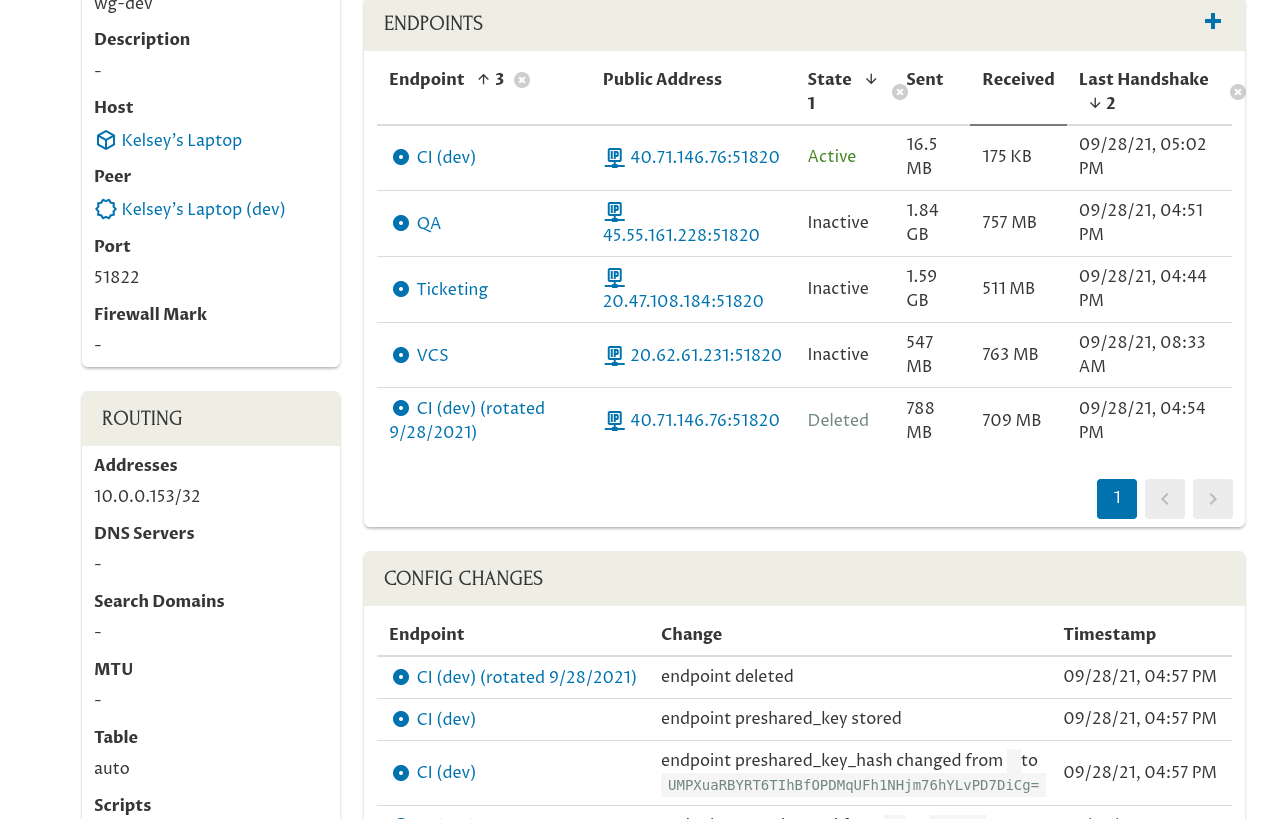
And if you go back to the Manage Key Pair page and navigate to the main page for the “wg-dev” interface on Kelsey’s laptop (one of the interfaces that connects to the rotated peer)…:
…you’ll see in wg-dev interface’s Endpoints panel on Kelsey’s laptop that the connection to the old peer identity (“CI (dev) (rotated 9/28/2021)” has been deleted, and replaced with a new connection to the new peer identity (“CI (dev)”). Also, this change has been recorded in the Config Changes panel (with the deletion of the old endpoint and the individual configuration settings of the new endpoint enumerated):
Now, let’s return to the issue of the mail server, which you’ll recall is connected to the CI box over WireGuard, but doesn’t have the Pro Custodibus agent running on it. Because it doesn’t have the agent running on it, Pro Custodibus can’t update it with the newly-rotated public key — we’ll have to update it manually.
Go back to the Manage Key Pair page and copy the new Public Key for the “CI (Dev)” peer:

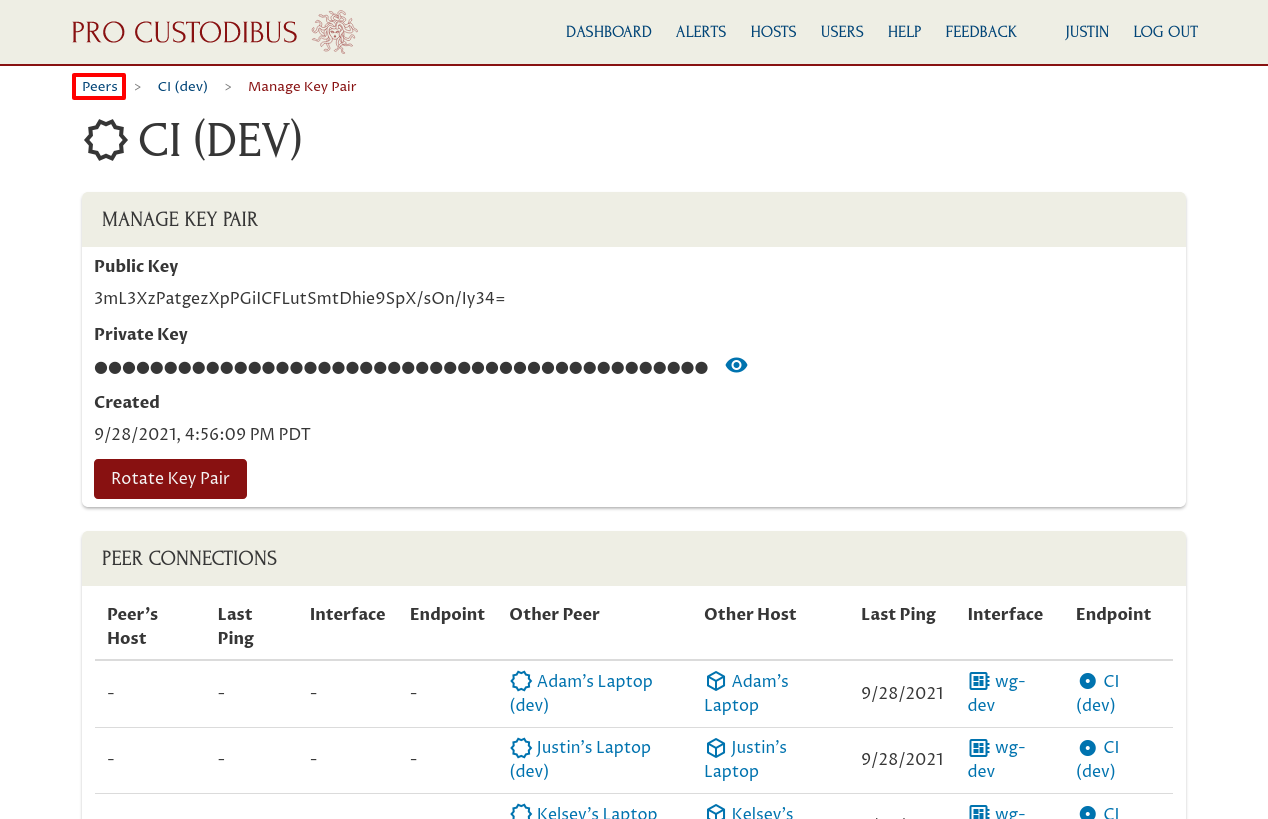
We’ll need to replace the old public key in the mail server’s WireGuard configuration with this new public key. In case you hadn’t noted what that old public key was, you can find it by navigating back to the old peer’s page. Click the Peers link in the breadcrumbs to navigate to the full list of peers used by your organization:
On this peers list, find the old peer, and click its name:
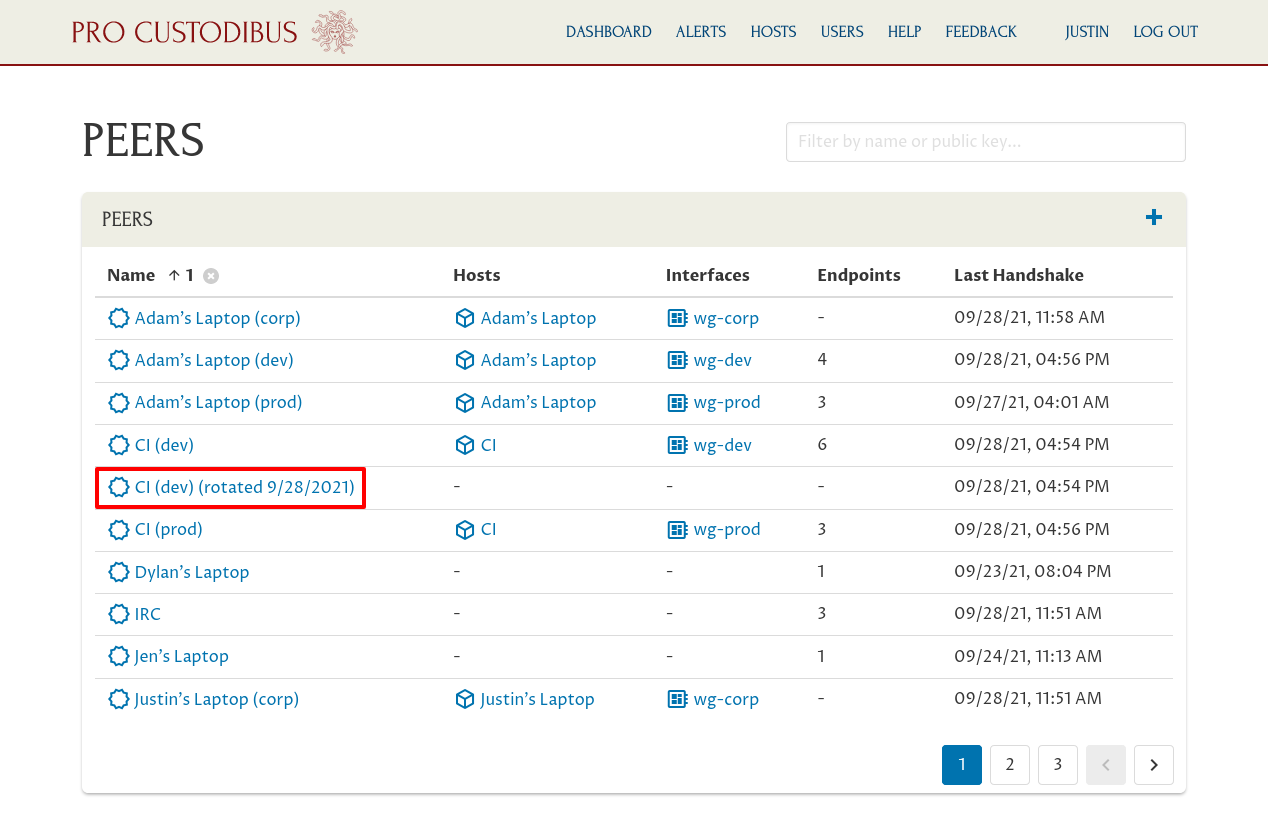
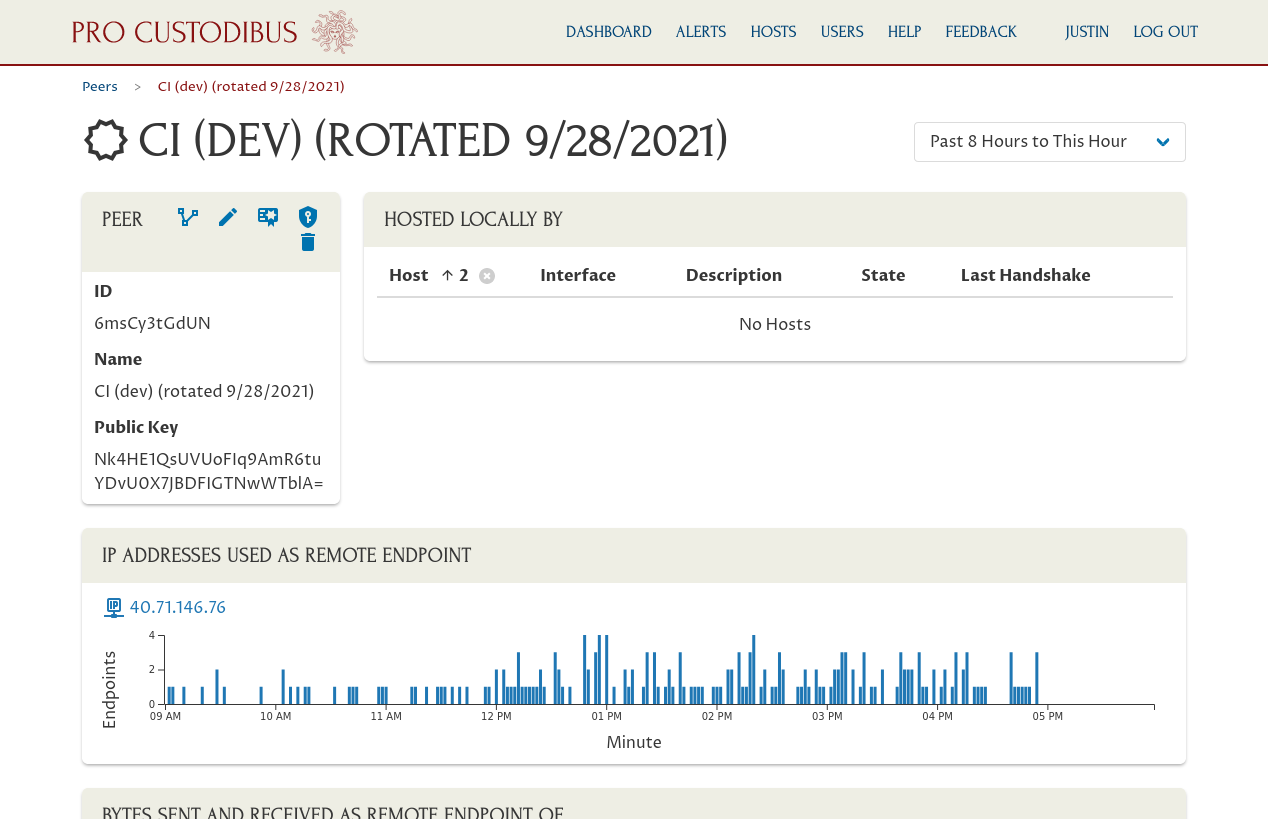
Note the public key of the old peer (you won’t need the whole thing — just enough of it to distinguish it from other peers in the mail server’s WireGuard configuration):
Now we have to manually edit the mail server’s WireGuard configuration. Shut down its WireGuard interface, and replace the reference in its WireGuard configuration to the old CI peer…:
...
[Peer]
PublicKey = Nk4HE1QsUVUoFIq9AmR6tuYDvU0X7JBDFIGTNwWTblA=
PresharedKey = AsYZovh+/bsZ4l2aHgI5HVa2RXCVD8KjZ/RZ1375gkg=
AllowedIPs = 10.0.0.134/32
Endpoint = 40.71.146.76:51820
...…with the new public key of the new CI peer:
...
[Peer]
PublicKey = 3mL3XzPatgezXpPGiICFLutSmtDhie9SpX/sOn/Iy34=
PresharedKey = AsYZovh+/bsZ4l2aHgI5HVa2RXCVD8KjZ/RZ1375gkg=
AllowedIPs = 10.0.0.134/32
Endpoint = 40.71.146.76:51820
...
Restart the WireGuard interface on the mail server, and the full key-pair rotation finally will be complete!
Rotating Preshared Keys With Pro Custodibus
Rotating preshared keys is also easy with Pro Custodibus (and is also covered by the Preshared-Key Rotation Documentation).
Similar to key-pair rotation, as long as you have a Pro Custodibus agent running on each host that uses a peer, you can rotate all the preshared keys used by the connections with that peer in a single click. And just like with key-pair rotation, if you have some hosts that use the peer without the Pro Custodibus agent running on them, that’s okay, too — you’ll just have to update those hosts with the new preshared key manually.
|
Tip
|
You can now set up automatic key-rotation policies to completely automate the process of rotating preshared keys — see the WireGuard Automatic Key Rotation article for details. |
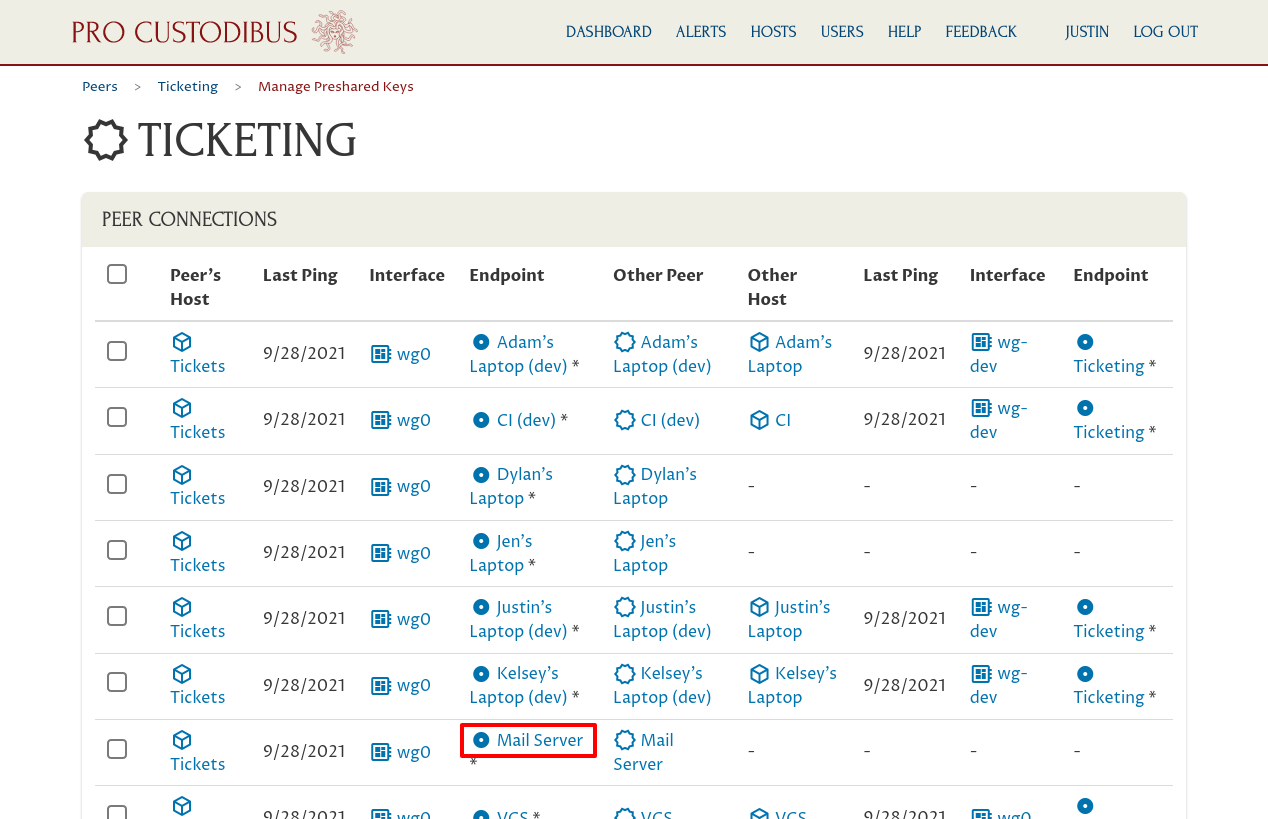
To start, navigate to the main page for the peer whose preshared keys you want to rotate. In this example, we’re going to rotate the preshared keys of the peer used by our ticketing server. From the main Hosts page, navigate to the main page for the Tickets host:
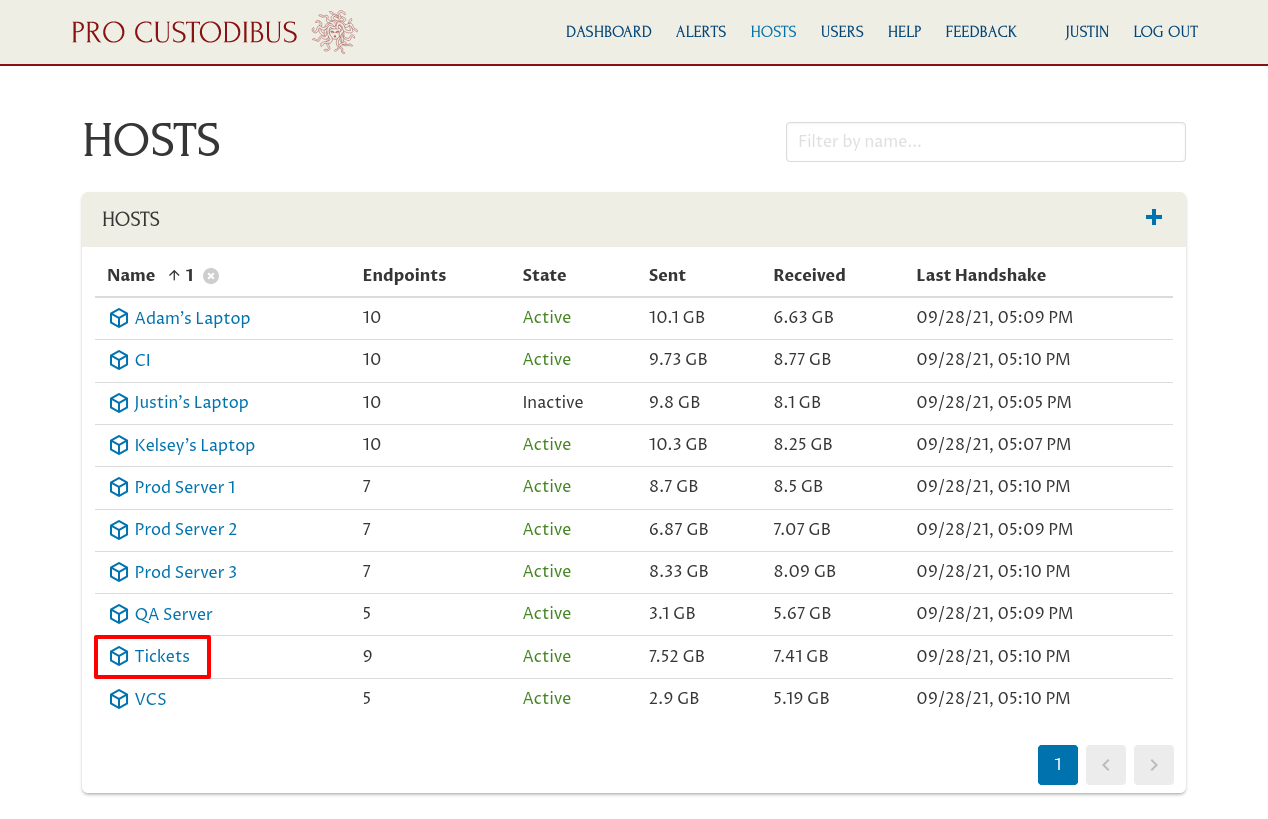
Then navigate to the main page for the wg0 interface:
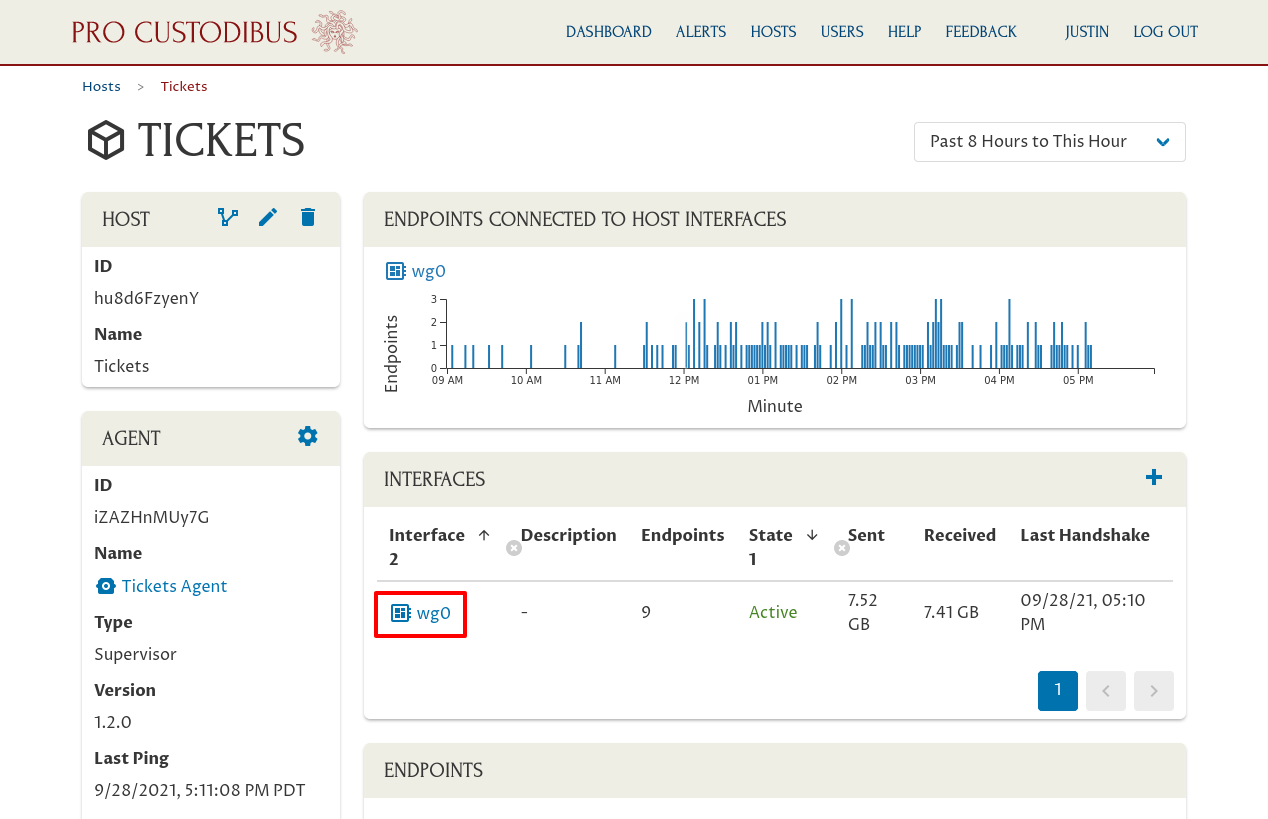
And from there navigate to the main page for the peer whose preshared keys we’re going to rotate:
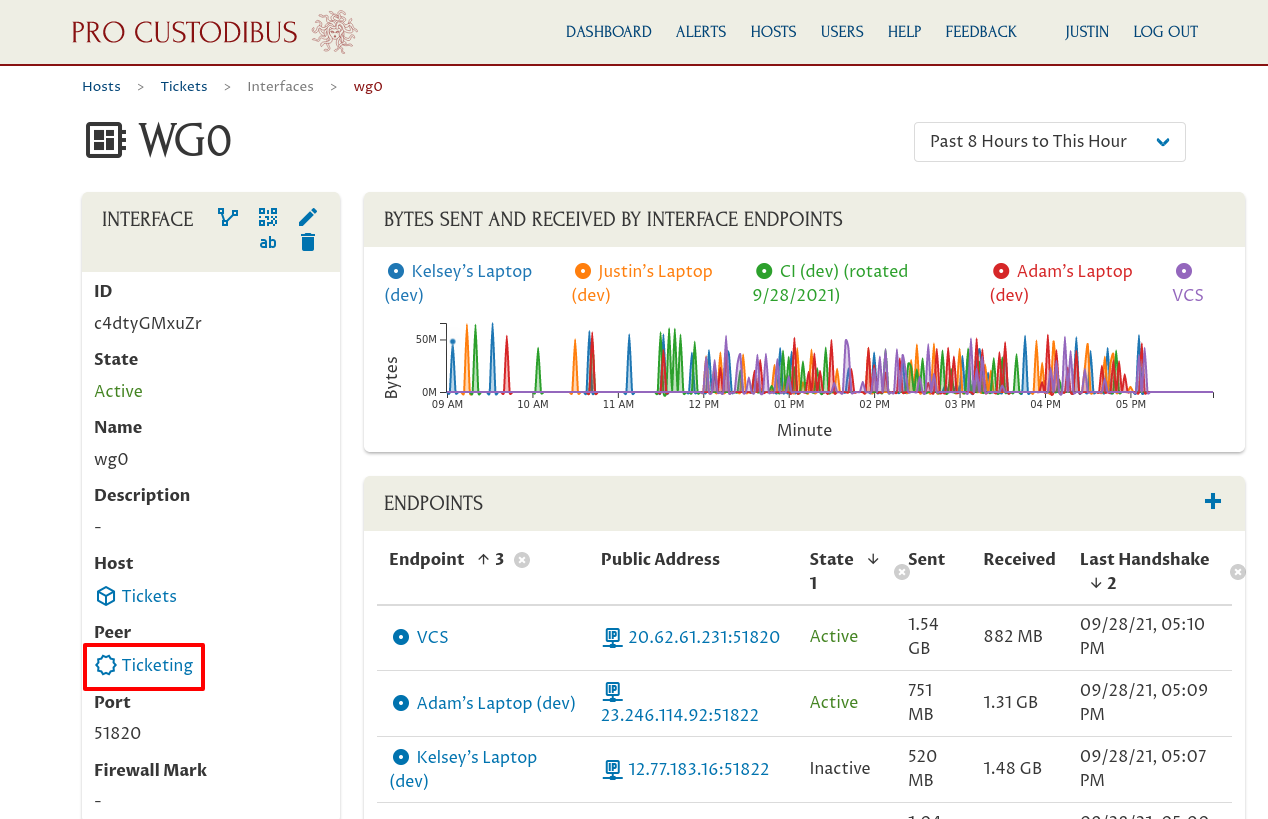
On the main peer page, click the Manage Preshared Keys icon on the right side of the Peer panel:
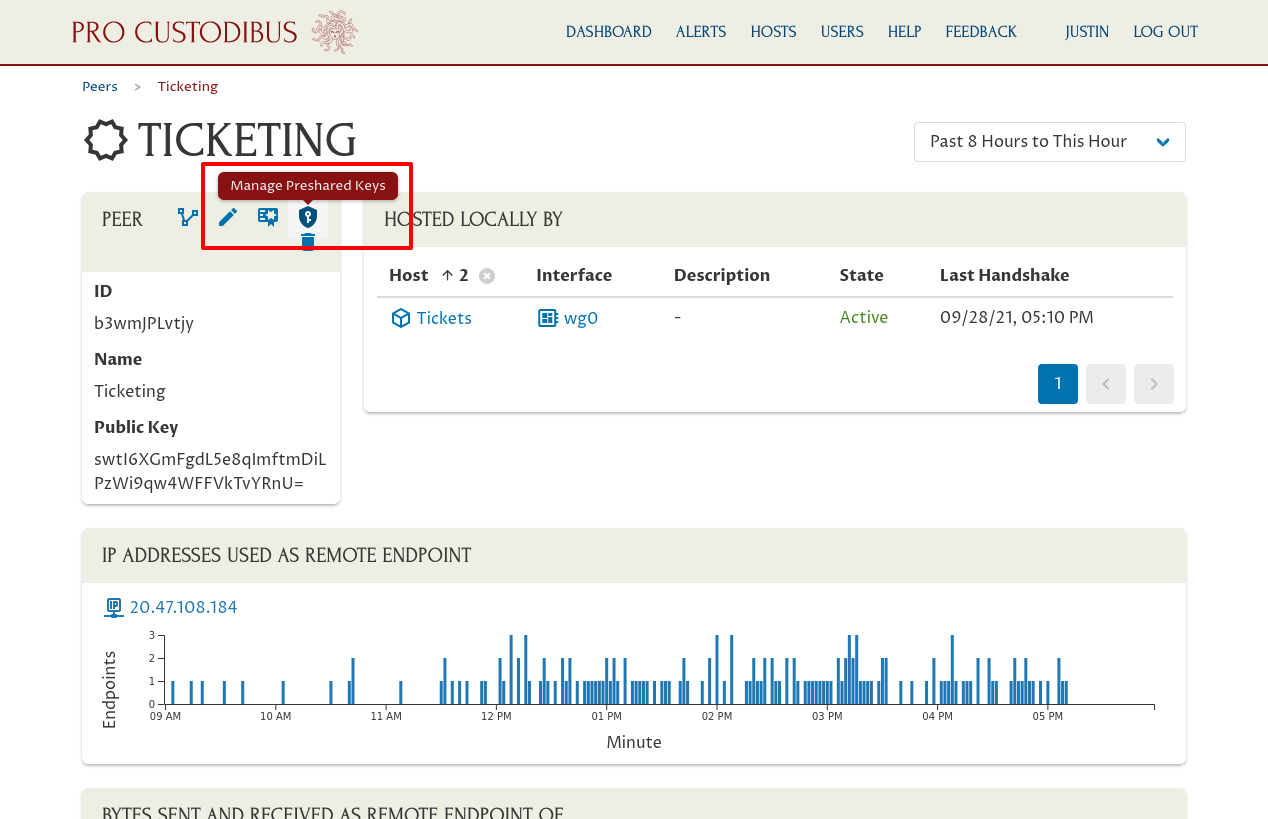
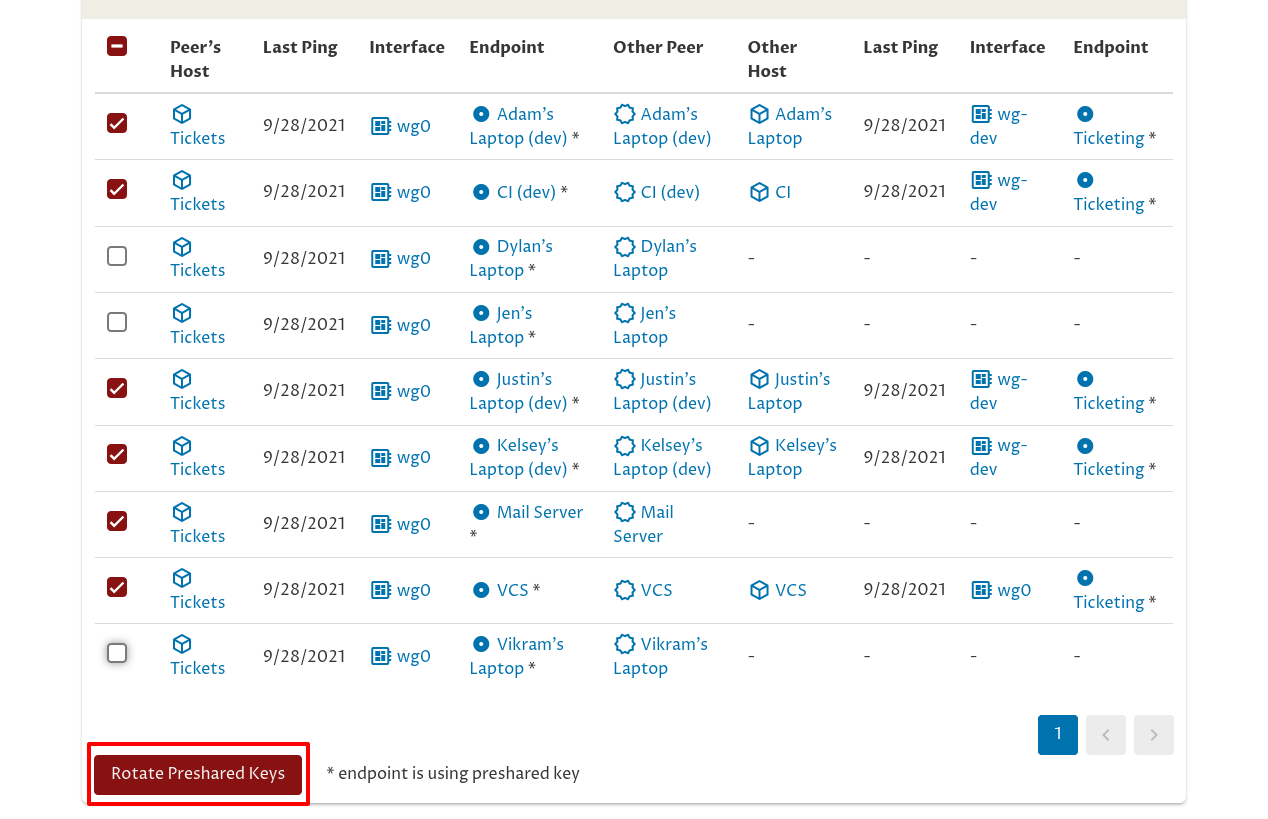
On this page, similar to the “Manage Key Pair” page, you can see the full list of connections that use the “Ticketing” peer.
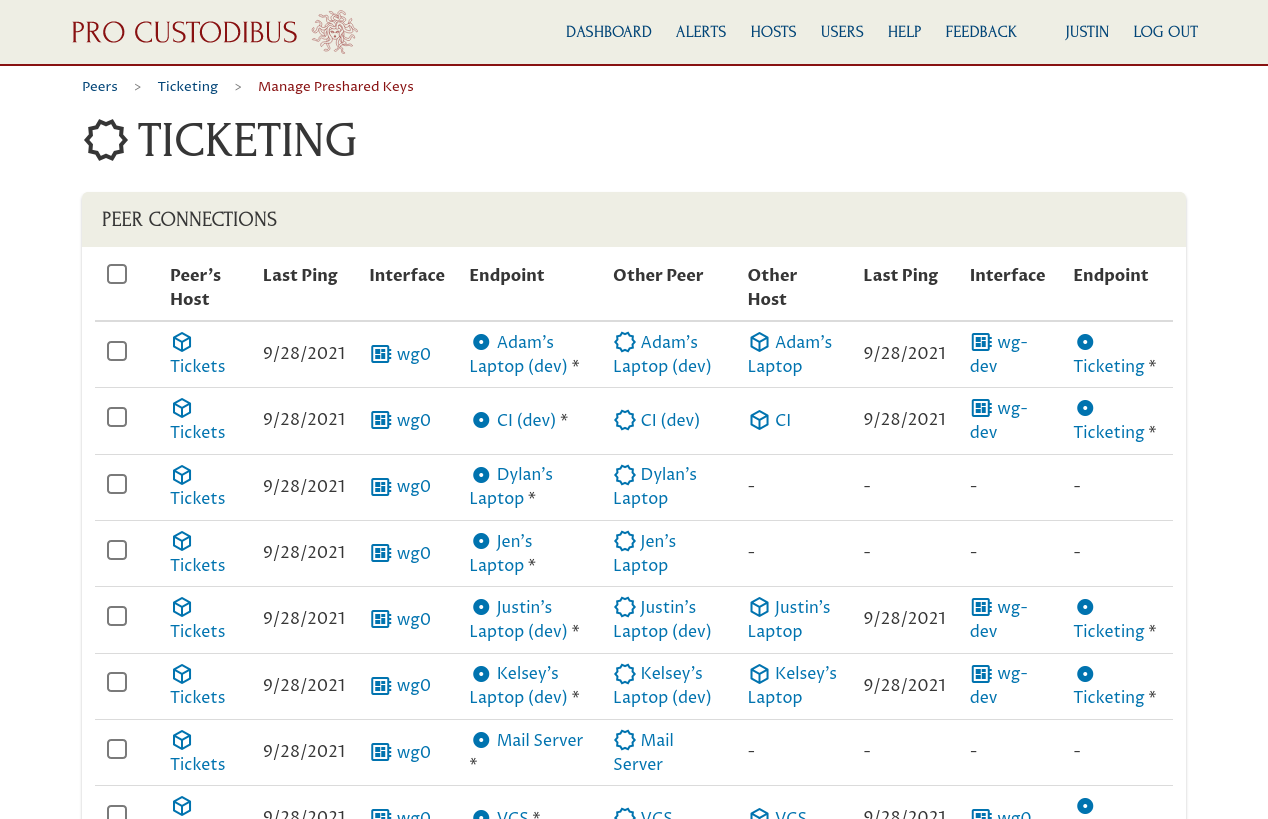
Scroll down a bit to see the full list:
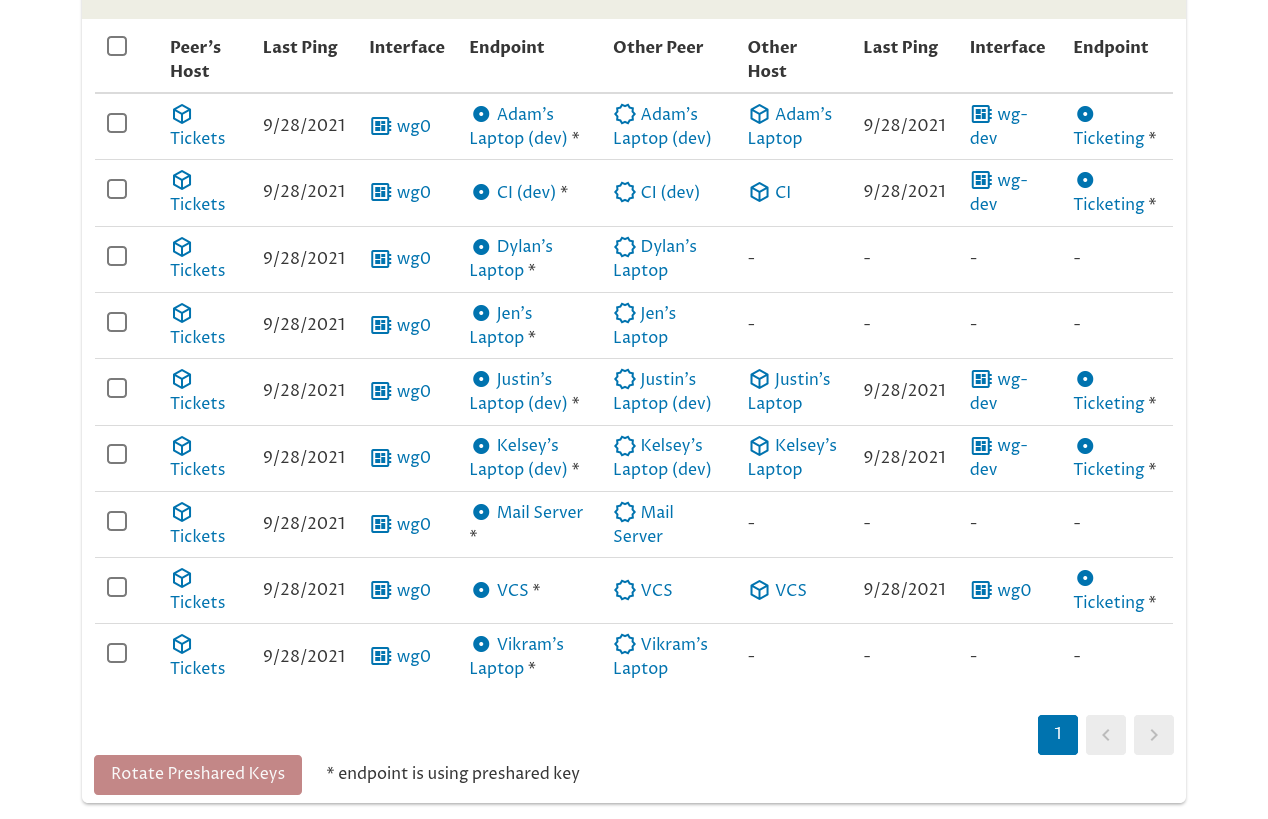
Just like on the “Manage Key Pair” page, the left side of the Peer Connections table shows the side of the connection that’s using the “Ticketing” peer as its peer identity — in this case, the “Ticketing” peer is only used as the peer identity for the “wg0” interface on the “Tickets” host. The right side of the table shows the side of the connection that’s connected to the “Ticketing” peer from other peer identities.
This table of connections is showing us that the Pro Custodibus agent is up and operational on most of the hosts connected to the “Ticketing” peer — but not on these four: Dylan’s laptop, Jen’s laptop, the mail server, and Vikram’s laptop. So while Pro Custodibus can generate a new preshared key for all the listed connections (including the connections with those four machines), it can’t rotate the key automatically on those four hosts — we’d have to update the WireGuard configuration on those four hosts manually.
So let’s skip Dylan’s, Jen’s, and Vikram’s laptops for now, and rotate the preshared keys for the rest of the connections to the Tickets server (including the mail server, which will require a manual step). To do so, check the checkbox next to each connection except for those three; then click the Rotate Preshared Keys button:
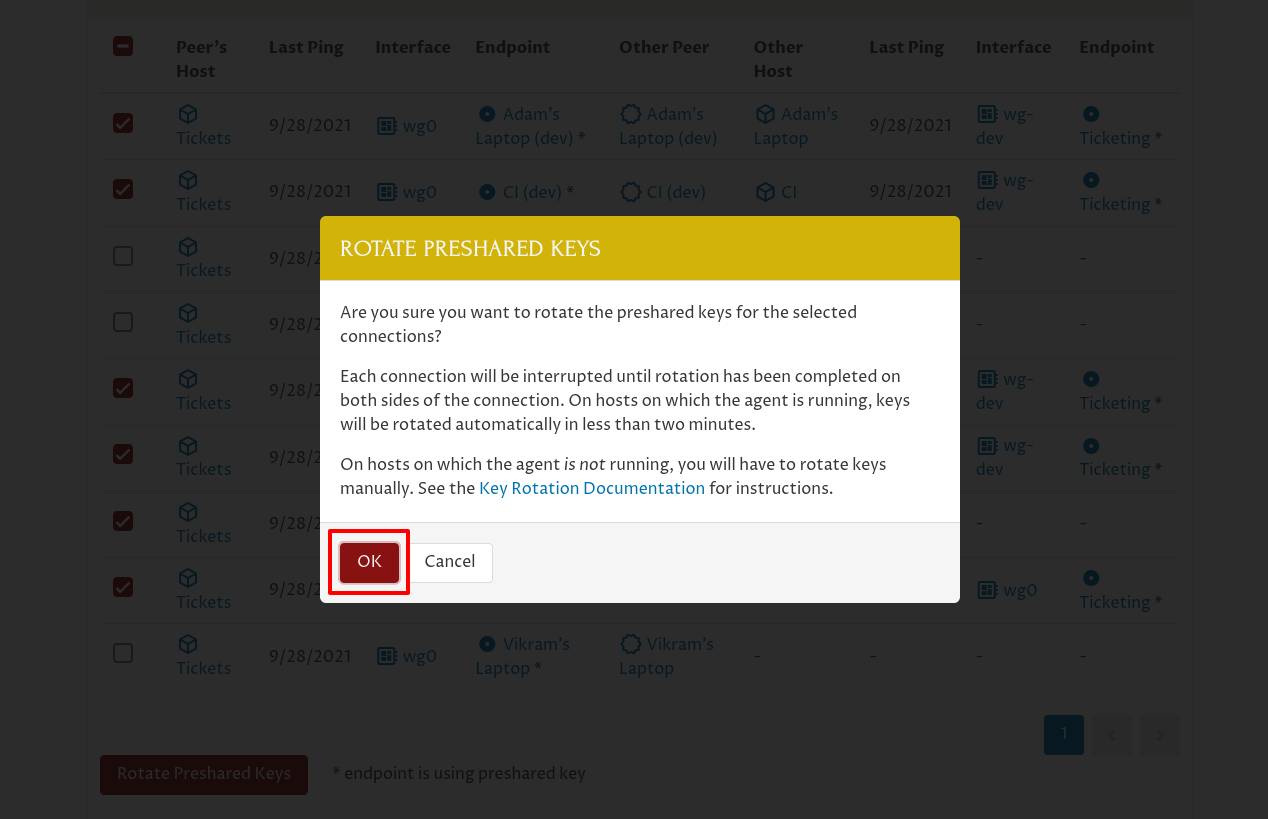
This will bring up a Rotate Preshared Keys confirmation dialog. Click the OK button to proceed:
Pro Custodibus will automatically generate a new random preshared key for each selected connection, and queue a change to update each side of each connection to update it with the new preshared key:
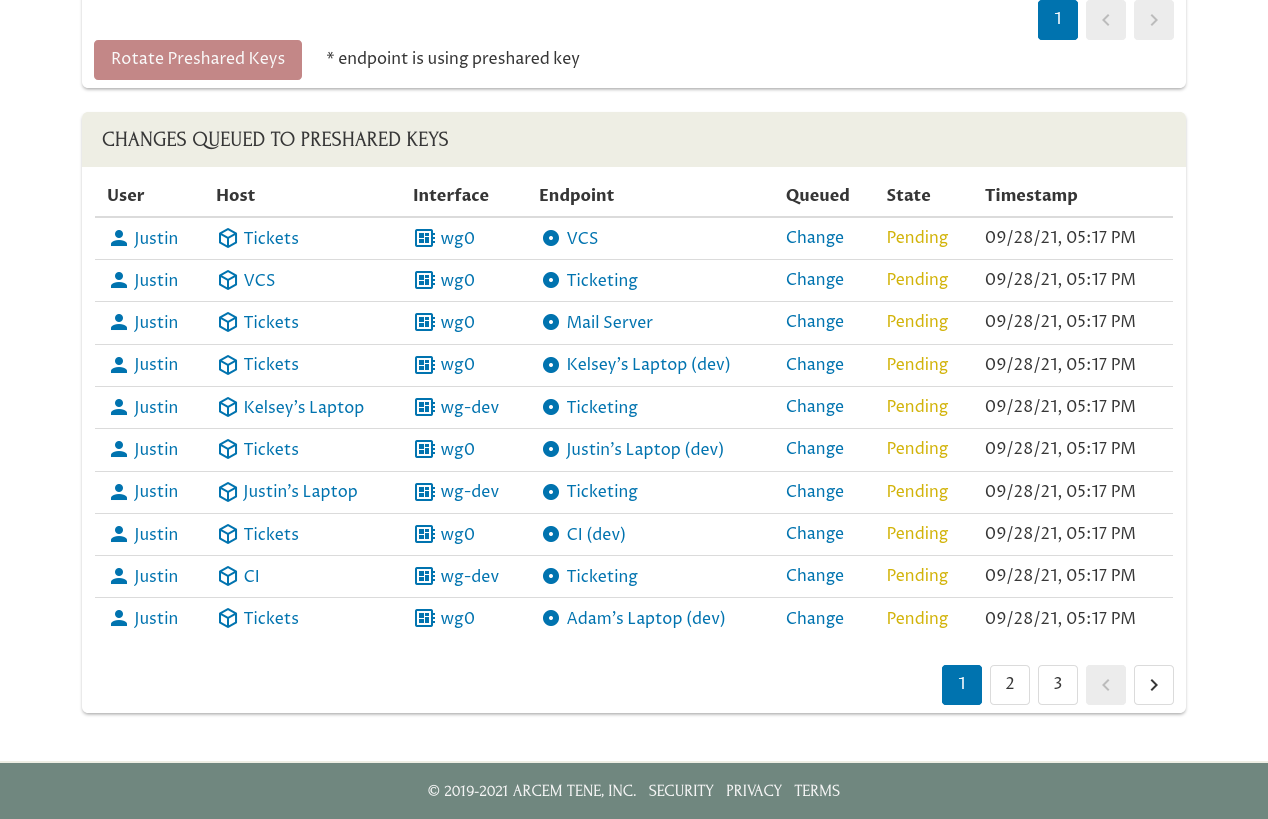
Notice that in the first row of the Changes Queued to Preshared Keys table, Pro Custodibus has queued a change to update the preshared key used by the connection between the “Tickets” server and the “VCS” server — on the “Tickets” side of the connection. In the second row, it’s queued the corresponding change to the preshared key for the connection between the same two servers — on the “VCS” side of the connection.
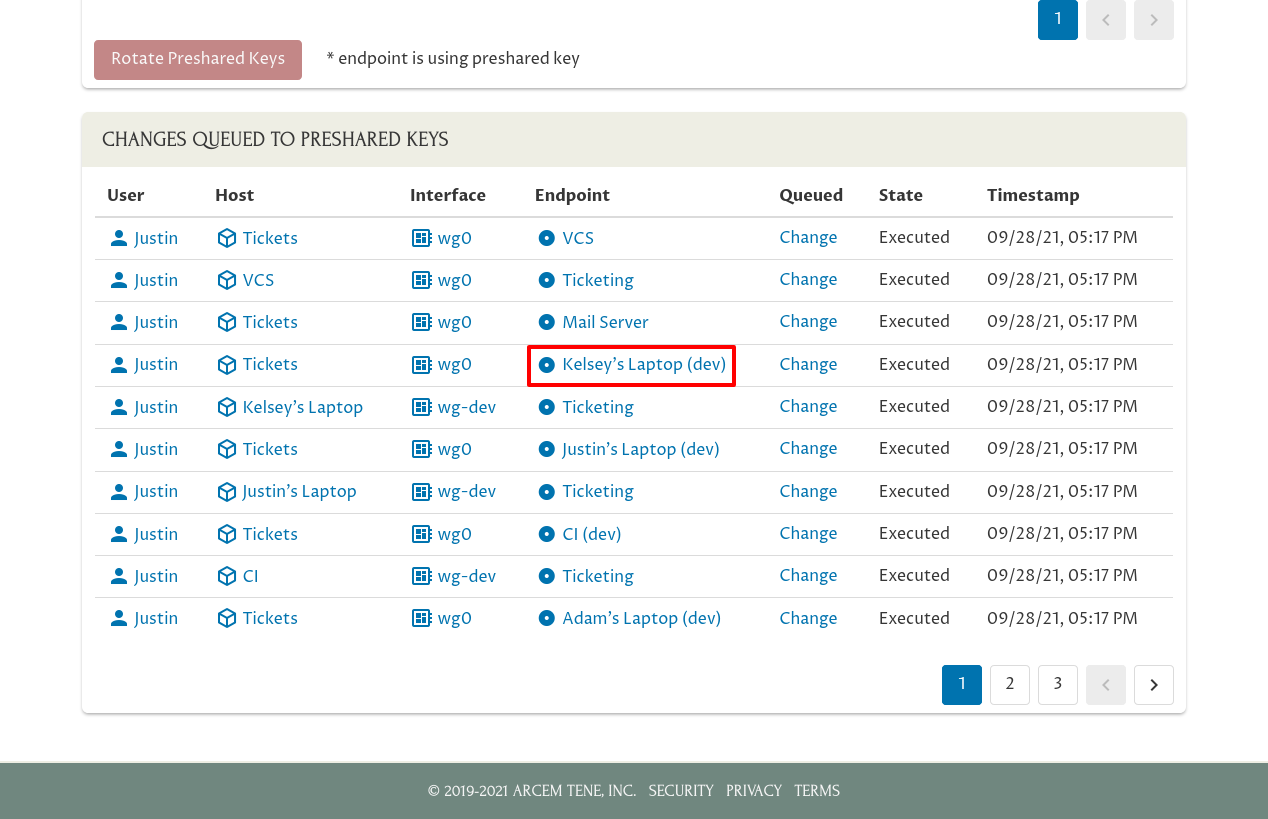
Within a minute or two, the Pro Custodibus agent running on each host will download the information about the change it needs to make, and execute it. Once the change to the preshared key has executed on both sides of a connection, the rotation will be complete for that connection:

Once those changes have been executed, if you navigate to the main page for the connection to “Kelsey’s Laptop (dev)” from the “Tickets” host…:
…you’ll see in that endpoint’s Changes panel that its preshared key has been changed. The SHA-256 hash of the new key is 43O7DsY9/t/uqdw2NjkbUvnj7BGzGy0UgPVLYXzNnPg=:
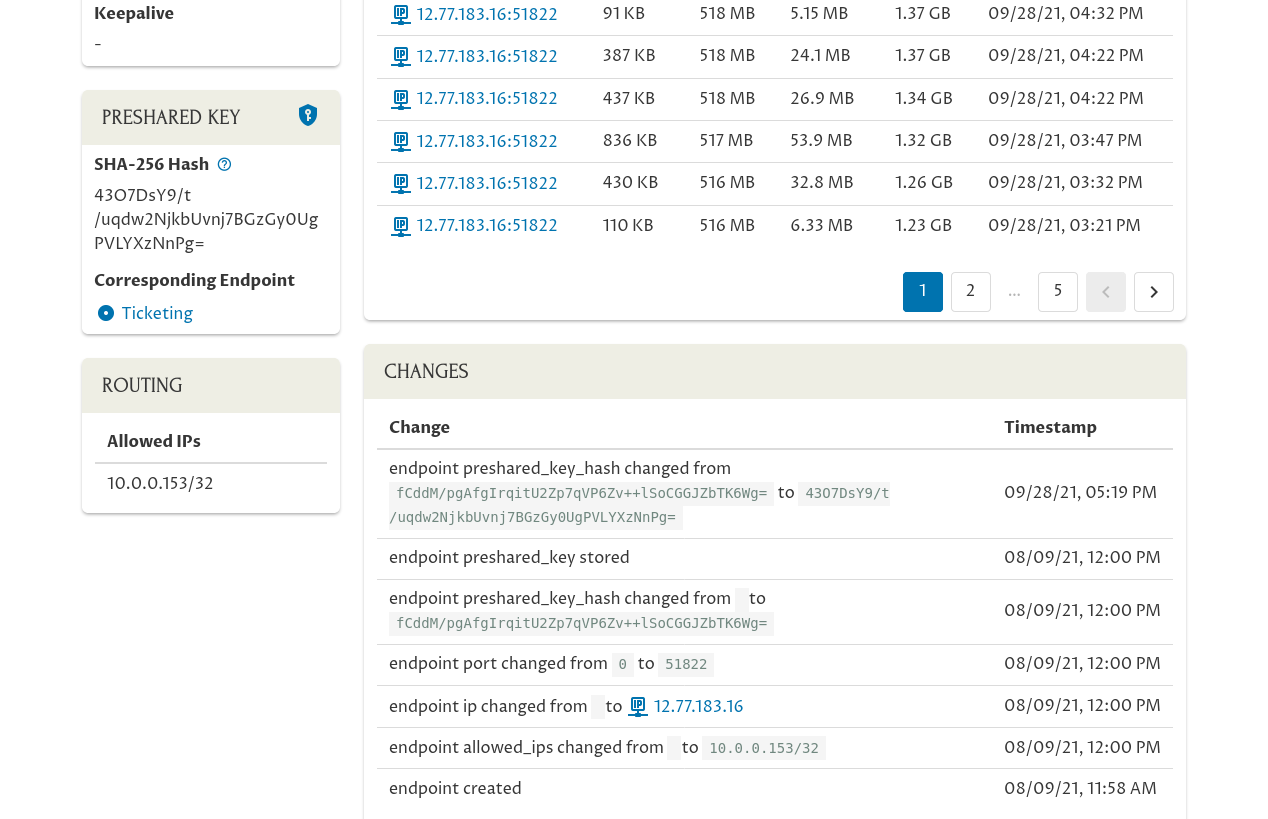
|
Note
|
Because the value of a preshared key is secret, the Pro Custodibus UI will display that secret value only on the dedicated “Manage Preshared Key” page for each individual key. Everywhere else, the UI will display only the SHA-256 hash of the key, which you can use as a unique identifier for the key. See the Preshared Key Documentation for the details about how to calculate a key’s SHA-256 hash. |
If you click the link on this page to the corresponding endpoint — the “reverse” connection to the Tickets server from Kelsey’s laptop…:
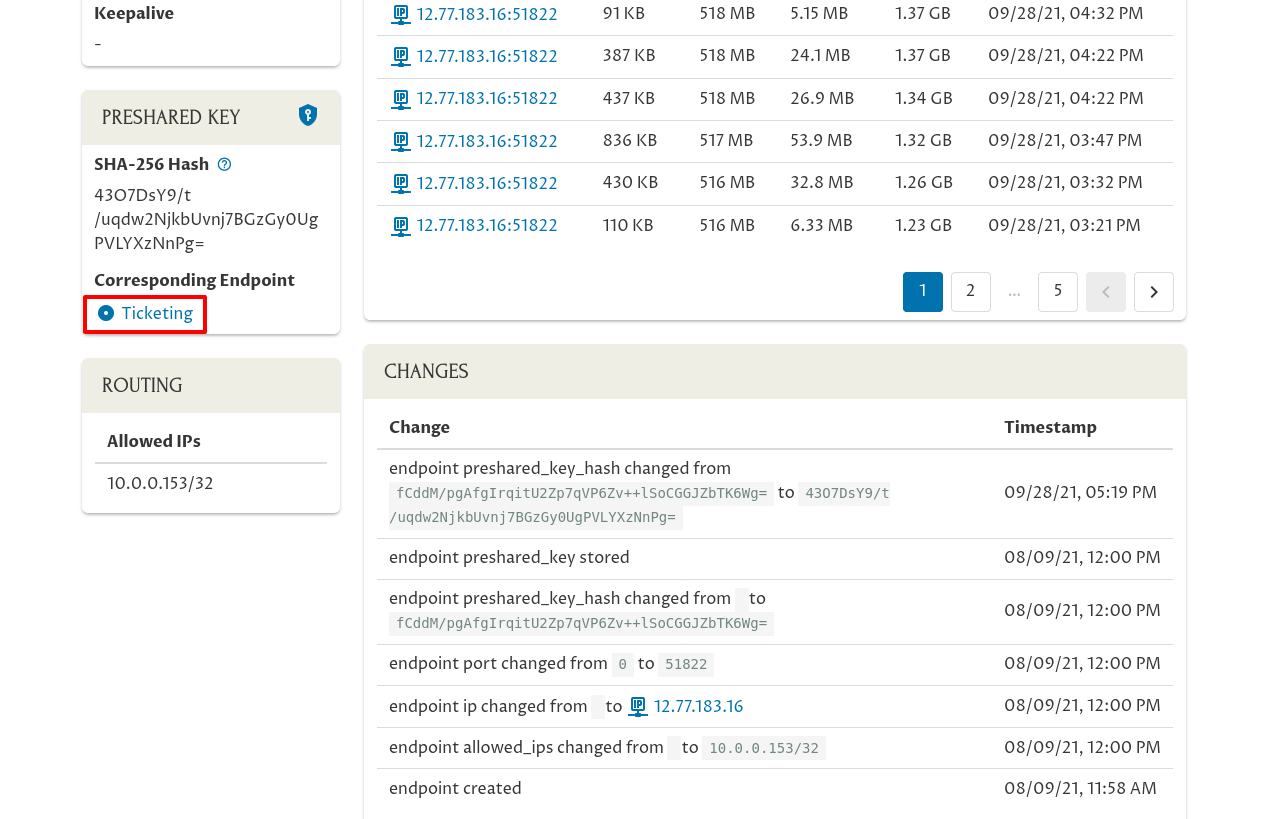
…you’ll see in its Changes panel that the same exact change has been made to the preshared key on its side of the connection:
Since the hash of the new preshared key is 43O7DsY9/t/uqdw2NjkbUvnj7BGzGy0UgPVLYXzNnPg= on both sides of the connection, you know both sides of the connection is using the same new preshared key.
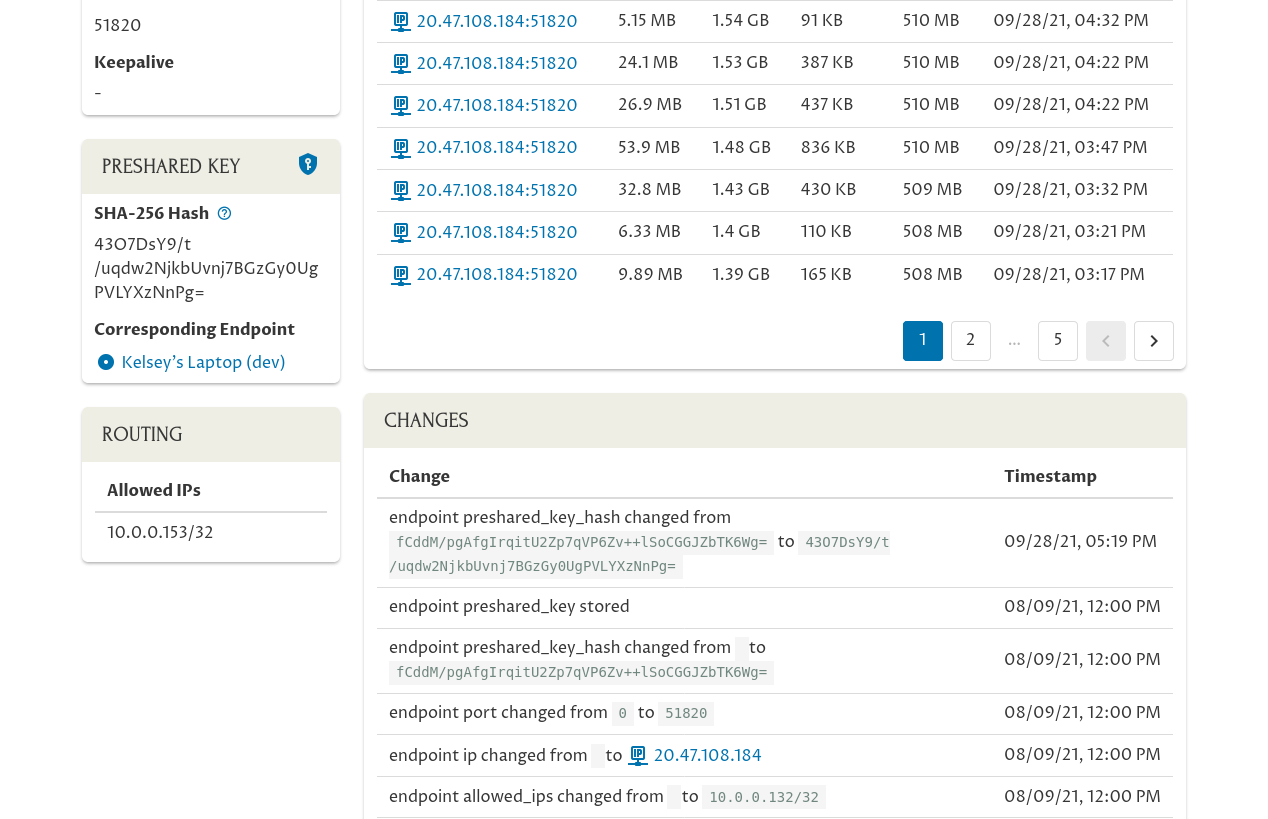
Now, let’s return back to the Manage Preshared Keys page for the “Ticketing” peer so we can deal with the mail server. Recall that we rotated the preshared key for the Tickets server’s connection to the mail server; but because the mail server doesn’t have the Pro Custodibus agent running on it, Pro Custodibus can’t update it with the new preshared key. We’ll have to make that update manually.
So go back to the Manage Preshared Keys page, and click the link to the “Tickets” host’s endpoint to the “Mail Server”:
Scroll down to the Preshared Key panel, and click the Manage Key icon on the right side of the panel:
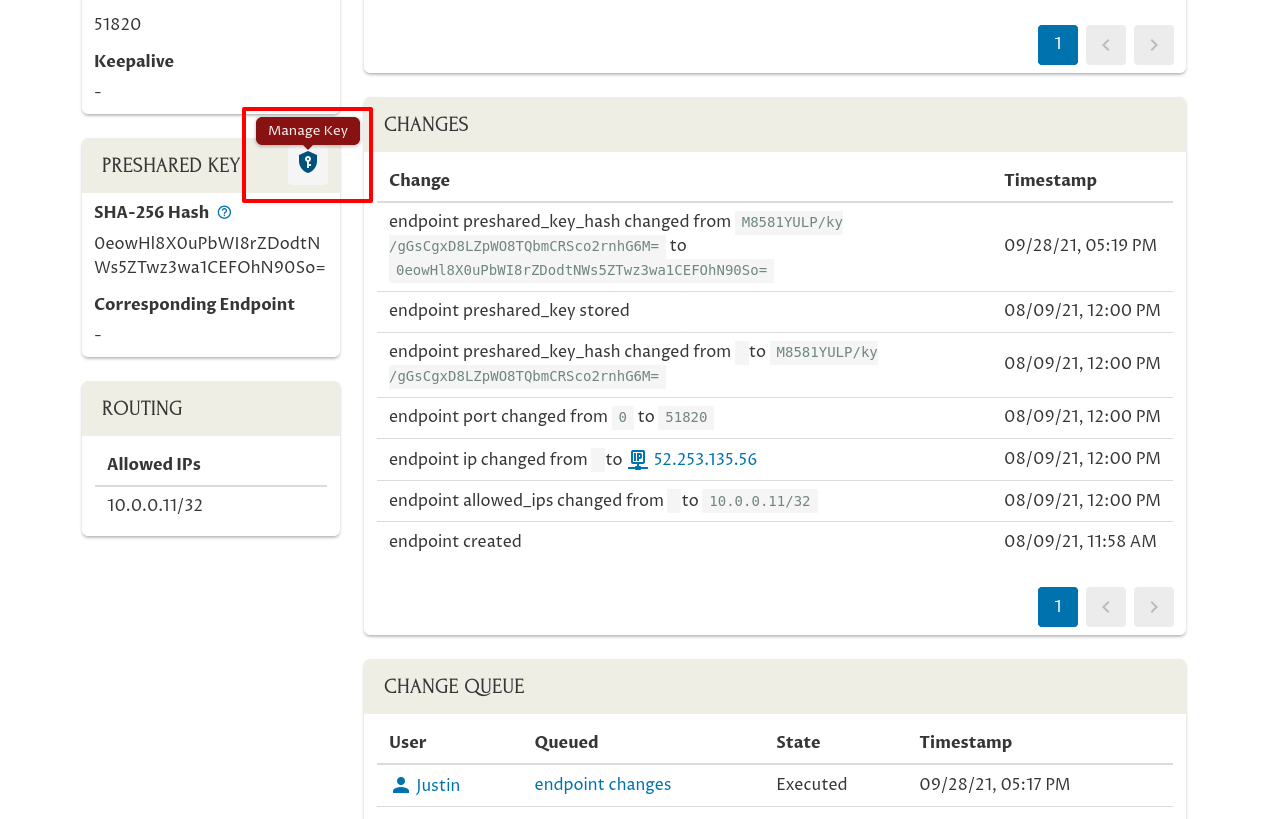
Copy the secret value from the Preshared Key field:
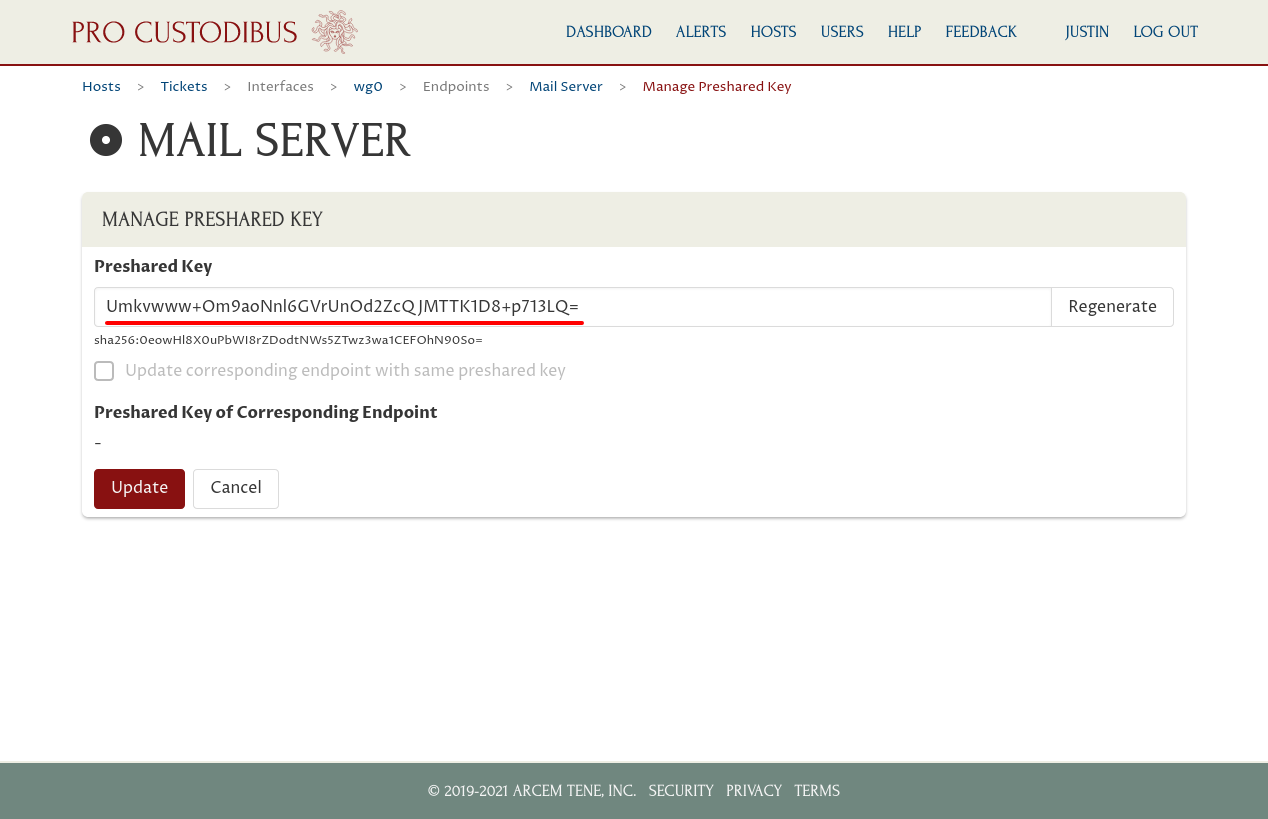
Now we have to manually edit the mail server’s WireGuard configuration. Shut down its WireGuard interface, and replace the old preshared key used by its connection to the Ticketing peer…:
...
[Peer]
PublicKey = swtI6XGmFgdL5e8qImftmDiLPzWi9qw4WFFVkTvYRnU=
PresharedKey = rQLr6EIsiVl1yA9e0bQPVy15LU5s60LaDkQtz3QyWa8=
AllowedIPs = 10.0.0.132/32
Endpoint = 20.47.108.184:51820
...…with the new preshared key (recall from the Ticketing peer’s page that its public key is swtI6XGmFgdL5e8qImftmDiLPzWi9qw4WFFVkTvYRnU=):
...
[Peer]
PublicKey = swtI6XGmFgdL5e8qImftmDiLPzWi9qw4WFFVkTvYRnU=
PresharedKey = Umkvwww+Om9aoNnl6GVrUnOd2ZcQJMTTK1D8+p713LQ=
AllowedIPs = 10.0.0.132/32
Endpoint = 20.47.108.184:51820
...
Restart the WireGuard interface on the mail server to complete the preshared-key rotation.